1. Shadow Empire
  2. News

Shadow Empire News

Unexpected things you can find playing Shadow Empire

From the Beta:

"I've been playing for a few weeks and I'm impressed how this game can show new content with every match!

I've just met this super predator packs lol"

This game is endless!


You can still join the Beta here

Developer Log #3 - Building an Economy

Shadow Empire Beta is open! Join and help us polishing the game

In the previous Dev Diary we discussed Military Conquest. Which is without doubt a very important activity.

However to supply your Armies of conquest, to produce Replacement Troops or to raise new Formations you’ll need Industrial Points and Resources. Here the Economy part comes in.

Assets
At game start with the default options you’ll have a tiny but usually functional economy.


Here in the bottom you see the Assets present in your initial Zone. There are different kinds of Assets you can have.

1. Public Assets. These are the ones you can construct yourself using the Construct Order. They require you to pay and feed Workers. You have full control over them.

2. Private Assets. These have been constructed by the Population of your Zone and are not in your control. The Private Economy makes its own decisions on what to construct. However almost all Private Assets send a part of their production to you as a Tax.

3. Free Folk settlements. The Free Folk are people who live in the territories you claimed but who remain independent and have not yet joined your Population. If your economy is running well and your Population is happy they will join you in large numbers. Especially in the early game, they are a key source of Population increase.

4. Hex Feats. These are special artefacts or sites that provide a simple and fixed bonus to a site.

Except for Free Folk settlements all Assets can require input and will provide output.

5. Input is the Resources and/or workforce that the Asset has consumed to produce or perform its task.

6. Output is what an Asset has actually produced.

Game Start
In the game start example used in the screenshot above we are receiving 132 Food from the Private Farm which is enough to feed our initial Workers. 100 Workers require 1 Food. We have plenty of Energy arriving from our Hex Feat, a damaged but still functional Galactic Republic Generator.


In the Items Tab of the Zone we can see this as well. The Zone is only producing Surpluses. Or in other words: consumption is lower than production. Most of the surplus (if some Zone reserves are not merited) will be send to your Strategic HQ (SHQ).


We can see these items have arrived in our SHQ above. The Items in our SHQ can be used to produce Replacement Troops and to raise new Formations. Also the SHQ can sell the Items to the Traders. (or buy from them of course)

Constructing Assets
After playing some turns and maybe raising some Troops you might realize you need more Items like Industrial Points or Food.

There is (even at low tech level) plenty of choice of Assets you can build. In the example below I selected the Construct Order and am going to choose to start construction of an Industry Asset.


In the construction window the Construction Costs are shown as well as the Input & Output of the Asset when it is completed.


t will take several turns to complete the construction of the Industry Asset. Note that it requires lots of Metals.

Different Public Asset Types
Click on an Asset (in bottom or in popup) to get more information on it.

Notably there are Asset Types that can be built only in your City Hex (like Industry or Bureaucratic Offices) and Assets that can be built anywhere.

Mines can only be built on top of Hexes with their corresponding Deposits. Wind Traps only in mountain Hexes. And Volcanic Taps only on volcano Hexes.

Trading
In this game example I am only producing about a 100 metals a turn. While completing the Industry Asset requires 1500 metals. I could have constructed some more Scavenging Assets first, or maybe a Metal Mine (if i would have found deposits), but here Trading can come in handy as well.


Using the Trade Order a SHQ can sell excess Items to the Traders.


And use the proceeds to buy the Metals that we need.

Keep in mind that prices go up with an excess of demand and go down with an excess of supply. The Traders of your Zones also trade with Zones owned by other Regimes and there is a real planetary economy running.

Workshops
In case you can’t find Machinery with the Traders you can use your workshops to produce them. Eventually you will have to construct Heavy Industries to fabricate machines in a more efficient fashion.

The Workshops can also be used to make Ammunitions. Which you’ll only need once you get in a shooting war. Especially offensive combat consumes a lot of Ammo.

Credits
To pay more Workers (once you have more Assets) or to buy from the Traders what you need, you’ll need Credits. A key source of obtaining these is from Taxing your Zones.


You receive Service Tax and Income Tax from your Population. Other taxes in the game are Sales Tax that will be paid by the Traders and Tariffs that will also be paid by Traders if they engage in Imports/Exports.

However, keep in mind that the more you Tax your Zones the more you’ll stifle the development of the Private Economy.

Private Economy
There is some detailed modelling going on of the Private Economy and your Population will save credits and food (for emergencies) as well as invest their saved Credits in new Private Assets. Furthermore they’ll spend Credits on fabrication and consumption of luxury goods. They’ll even be able to Mothball or Close Assets when there is not enough Population to man all Assets. What you need to know for now is that this is all mostly beyond your control.

The only ways you can impact the Private Economy is by taxation, providing emergency Food and investing Credits in the Private Economy (through calling your Governor and giving Zone Orders). Though plenty of Stratagems and Decisions also can have an impact.

The Private Economy is a great source of Quality of Life (QOL) for the Zone because the moment the Population is in the safe zone concerning Food production the Population will be focussing a lot on Health, Education, Entertainment and Security Assets. They want to have a nice life.


Here above an example of some typical early Private Assets. Note the Arena and the Museum which provide Quality of Life points that will eventually raise the Civilization level of your Zone and as a consequence determine your Empire’s Civilisation Level.

You can usually only build one Asset per Hex of a certain type. If there is already a Private Asset in place in your Hex that is blocking you from constructing a Public Asset you have the option to nationalize it. This costs some Credits and might very well cause some unhappiness but will gain you the corresponding Public Asset.


Here the Private Scavenging Asset is nationalized (500 Credits of cost) into the Public Recycling Asset.

Asset Levels
Almost all Assets can be upgraded.


But keep in mind that the highest Asset Level available for upgrade is the same level as the Level of the City. So small villages can only construct Assets upto Level 1 for example. Where huge cities can go all the way up to Level 7.

But do note that there is a second limiting rule and each Asset Type is limited either by your Regime’s Tech, Admin or Civilization Level. For example Bureaucrat Offices Level is limited by your Civilisation Level and Industry Level is limited by your Tech Level.

Governors
Keep an eye on your Relation with your Governor.


If the relation is above 50 you get a sizable production bonus, while it being below 50 gives a penalty. Consider paying Governors well (you can set salaries by calling your secretary).

Apart from your Relation with a Leader, also consider which guy to pick for governor as his Skill set can impact production positively as well as help a lot with some troubles that can occur in Zones.

Take care with events… as a lot of bad stuff can happen if Unrest is high or Happiness is low. Strikes, Protests can impact production. A strong army presence in the City of the Zone or an able Governor with good Interpersonal Skills can help a lot to mitigate negative effects.

Production Modifiers
Keep an eye on production Modifiers. Already mentioned are Governor Skill and Governor Relation, but there are some noteable others.

In case of Mining the Ease of Mining of a Deposit plays an important role. Some Deposits are not easy to extract because for example they are deep or in difficult geological layers.

But also in the case of Open Agriculture. Here the temperature and rainfall of the season will play a role. As well as Planetary conditions as Atmospheric compatibility and possible Biohazards.

Last example: Wind Traps for example perform better if there is more moisture in the air on your Planet.

Be sure to always read the description of an Asset Type before constructing it to avoid disappointments.

Mining
There are a number of resources that have to be mined to obtain them. These are: Metals, Rare Metals and Radioactives. On waterless Planets mining Water deposits is also a good idea.

It is important to know that you can only construct a Mine on top of a Deposit. And you need to find these Deposits first. This requires you to either add an Economic Council (with the Prospecting Task) to your administration or to appoint a Governor that has the Prospecting Skill.

Logistics
There will be a separate chapter on Logistics. Especially once you have multiple Zones you need to pay attention to the Logistics as one Zone might produce surpluses for the shortages of another Zone. But for your single Zone you’ll just need to keep track of one thing concerning your Assets.

For a Public Asset to have unimpaired production or construction progress it needs to be on a Hex that has at least 100 Logistical Points for each Asset Level at the start of the turn on its trajectory to its City. (for Private Assets its only 50 Logistical Points per Asset Level)


Above we see the Logistical Points at the start of turn. And we can see that the road from the Farm Level 1 in Monroe to its City (Junotop) has always at least 193 Logistical Points. Its production is at 100%.

Workers
You need enough Workers in your Zone to fill all the positions at your Public Assets. The default mode of Worker recruitment is to recruit if shortage and fire if surplus. However you can fine tune your Zone Worker policy by calling your Governor and giving him Zone Orders.


You can also improve the Workers’ salaries which will help a lot in improving their happiness as well as with their recruitment.

You should keep a special eye on if you are not paying your Workers less than the average revenue made by your Population in the Private Economy. Because that might tempt Workers to quit and seek their fortune working in a Private Asset.

Techs
Many Assets can be unlocked or benefit from increased production by adding an Economy Council to your administration.


If you have the Bureaucratic Points (BP) to spare you can discover and research plenty of more civilian Techs (compared to the Military Research Council) here.


Note in the Tech tree that early Assets you can unlock are: Power Plant, University, Solar Panels, Hospital, Barracks and a whole family of Storage Assets. The “Ec” in the screenshot above notifies you need the Economic Council to discover and research the Tech and the “Mi” notifies you need the Military Research Council.

Dev Diary #2 - Military Conquest

In the previous DevLog, we looked at how to generate a Planet and start a game.

In this one, we’ll take a look at the most important and immediate task that you’ll have: Expanding your little empire and ensuring its safety against possible attack.

Though in theory it is possible to co-win the game by making an alliance with the winning player, in practice that is a very risky strategy and you’d be better focusing on military conquest to win the game.

Inspecting your initial forces
A default game starts drops you in the game with only a few Militia forces under your command.


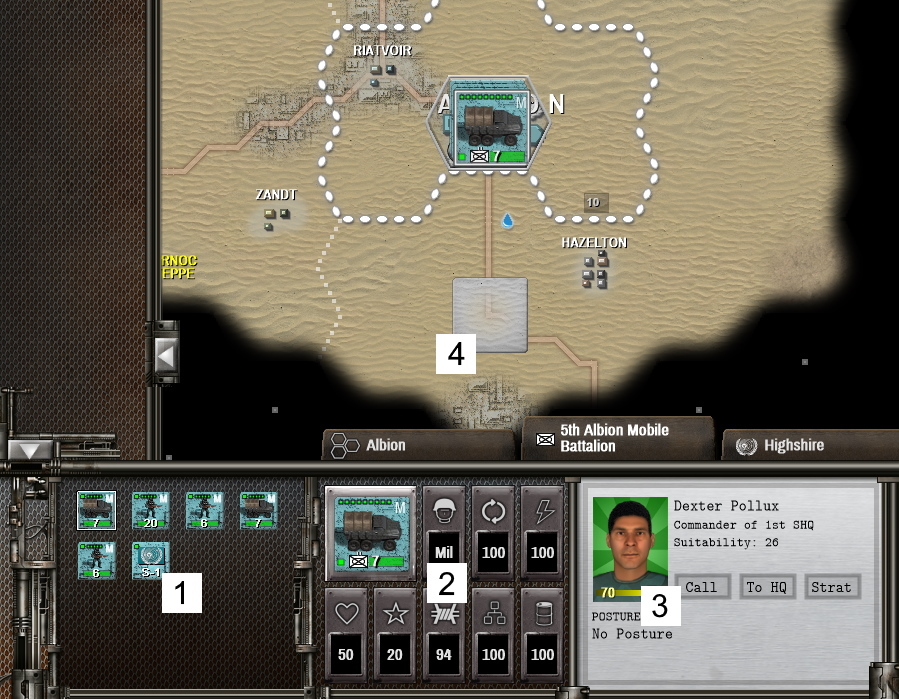
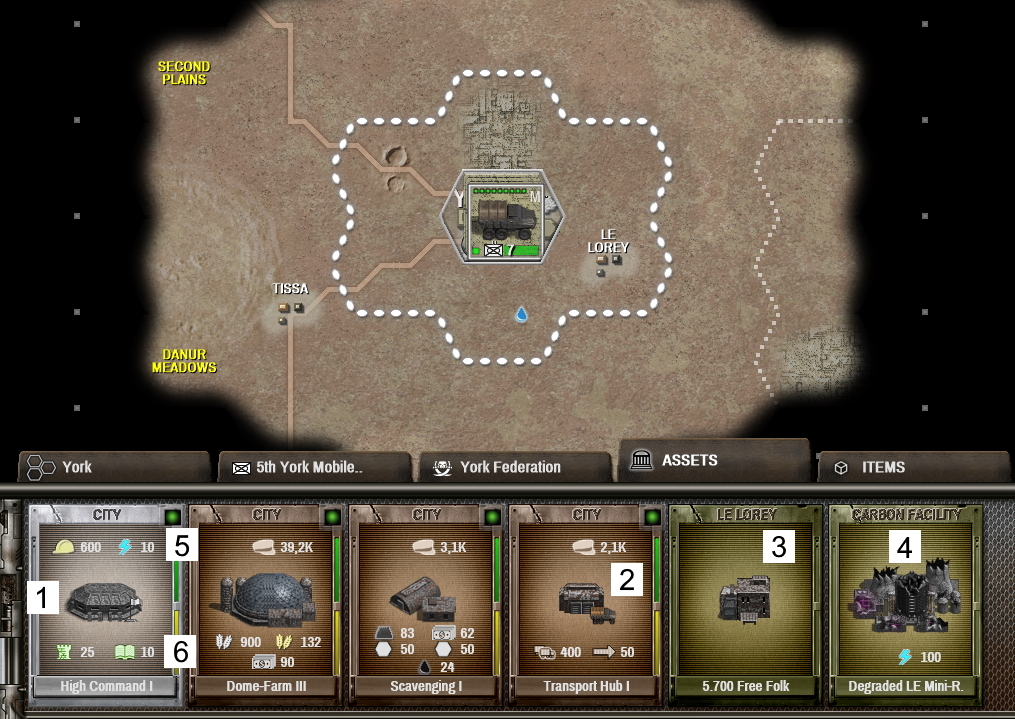
Above we see a typical game start state.

1. The Units initially at your exposure are 4 Militia battalions and 1 Militia regiment (note it has more troops) as well as your Strategic HQ (SHQ).

2. When selecting a Unit you can see if it contains Regular Troops (REG) or Militia Troops (MIL).

3. As long as your Militia Units stay within your HQ Power Range they’ll be able to receive positive effects from Operational HQ Skill Rolls. (note that SHQ Skill Rolls always apply irrespective of range between Unit and HQ)

4. Note that non-aligned Unit close to our City.

Militia forces
Militia forces might be relatively weak,. but they have one big advantage. Their recruitment and support is completely autonomous. As long as a Zone has enough Militancy score it will keep recruiting new Militia and sending you the supplies and/or replacement forces that the Militia in the field requires.

With time, the Militia will be able to improve the statistics of their Troops and they might even well start using older Models which you have developed for your Regular Troops.

Militia are rather sensitive, however, to your empire creating large amounts of Regular Troops. You can offset this by making certain Decisions, but as a rule of thumb the Militancy levels will start declining once you have constructed a sizeable Regular force.

Create some safe space around your City
Having enemy Units (like non-aligned Units) close to your City will give your initial Zone so-called Danger Points. Claiming about 2 Hexes around your City should remove any such effect.


Your Militia forces are relatively weak and are best used for defence. So, when you use them in an offensive role always try to mass them. Also, for optimal success chances try to attack with Units that have full Action Points available.

Each Combat Round costs 10 Action Points, and the more Combat Rounds the fight can continue the more chance you’ll win the fight and take the Hex. Furthermore, in the initial 2 Combat Rounds the defender has an extra advantage (as your Troops are closing the distance), so that is another reason to avoid short indecisive battles.


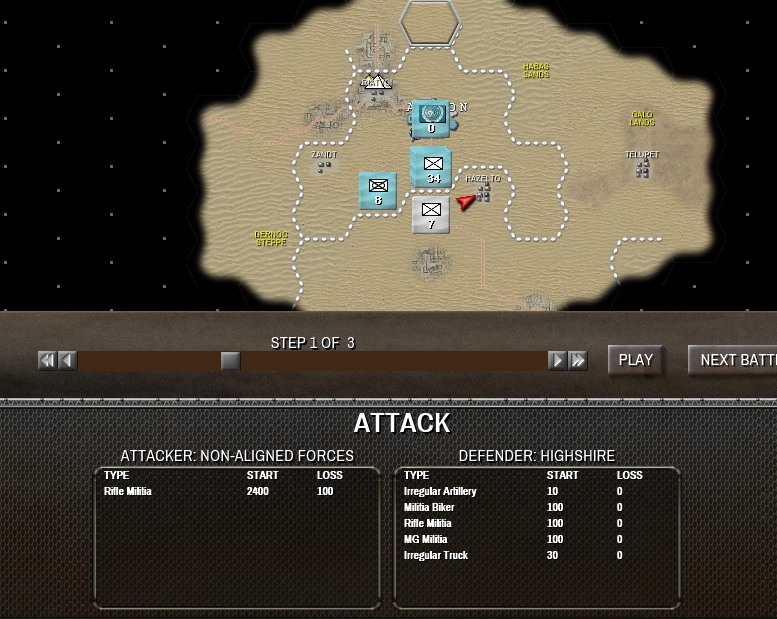
During the AI turns the non-aligned forces launched their own attack against one of the Militia Battalions. As you can see our recon was faulty, their Unit did not contain 700 troops, but 2400 troops instead! Always keep this FOW effect in mind (unless you have really a lot of Recon Points on the Hex).


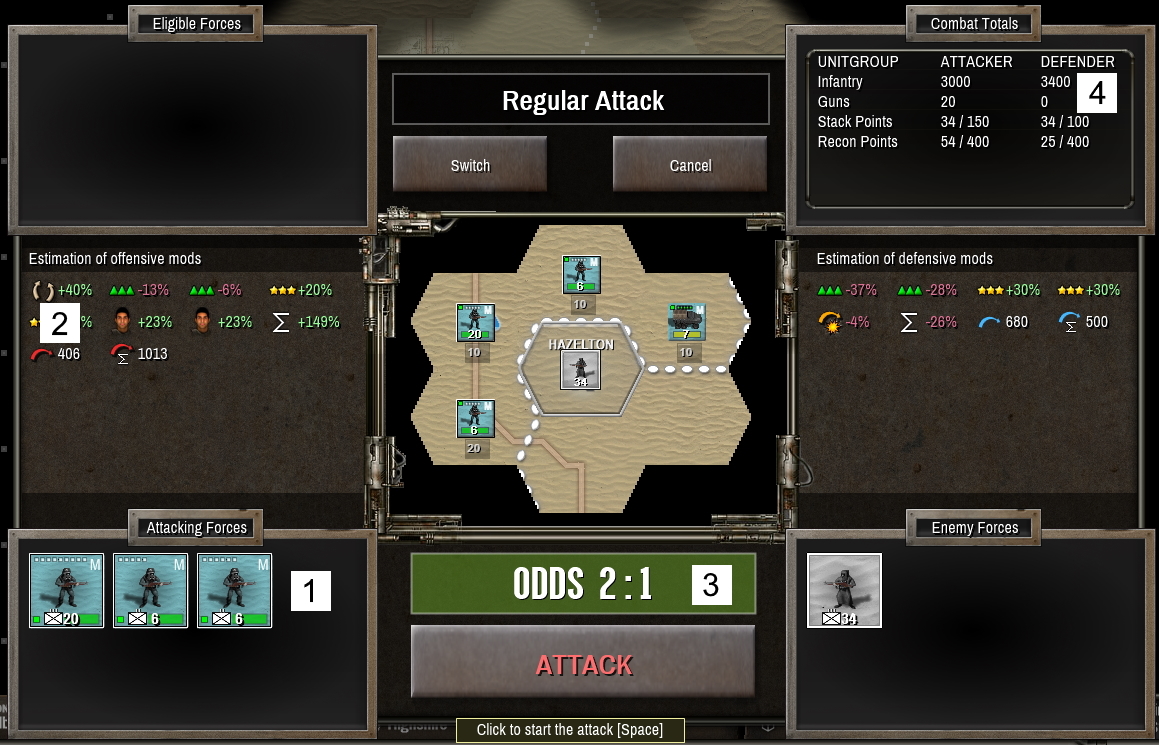
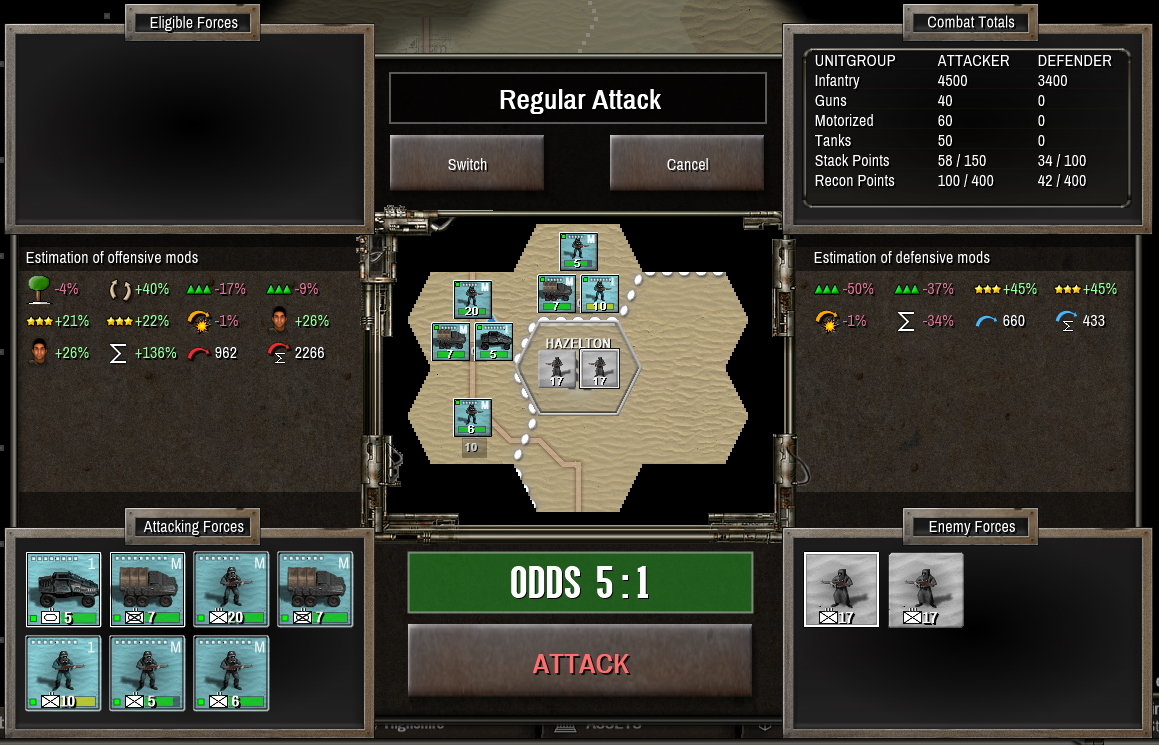
After you order an attack the Combat Selection Popup will appear, giving you a wealth of information on the modifiers as well as an estimate of the combat odds. These odds are an estimate, not a prediction, and you should always take them with a grain of salt. However, if the color turns bright green you’ll be sure you’ll win and if turns bright red you’ll be sure you’ll lose.

1. Note that all our Militia forces are ordered to join the attack, we are trying to mass as many troops as possible. The Motorized Militia Unit (truck symbol on counter) sadly does not have the Action Points to enter a sand Hex (trucks don’t drive well in loose sand) and so cannot join the combat.

2. Whenever possible, try to attack from as many angles as you can. By attacking from three sides in this example the Militia has secured a +40% bonus. That might just make the key difference.

3. At 2 : 1 odds this is going to be a very “iffy” battle. It could still work for us however.

4. Also note that due to our lousy Recon we are probably overestimating the size of the enemy unit (which in the history report was at 2400 troops).


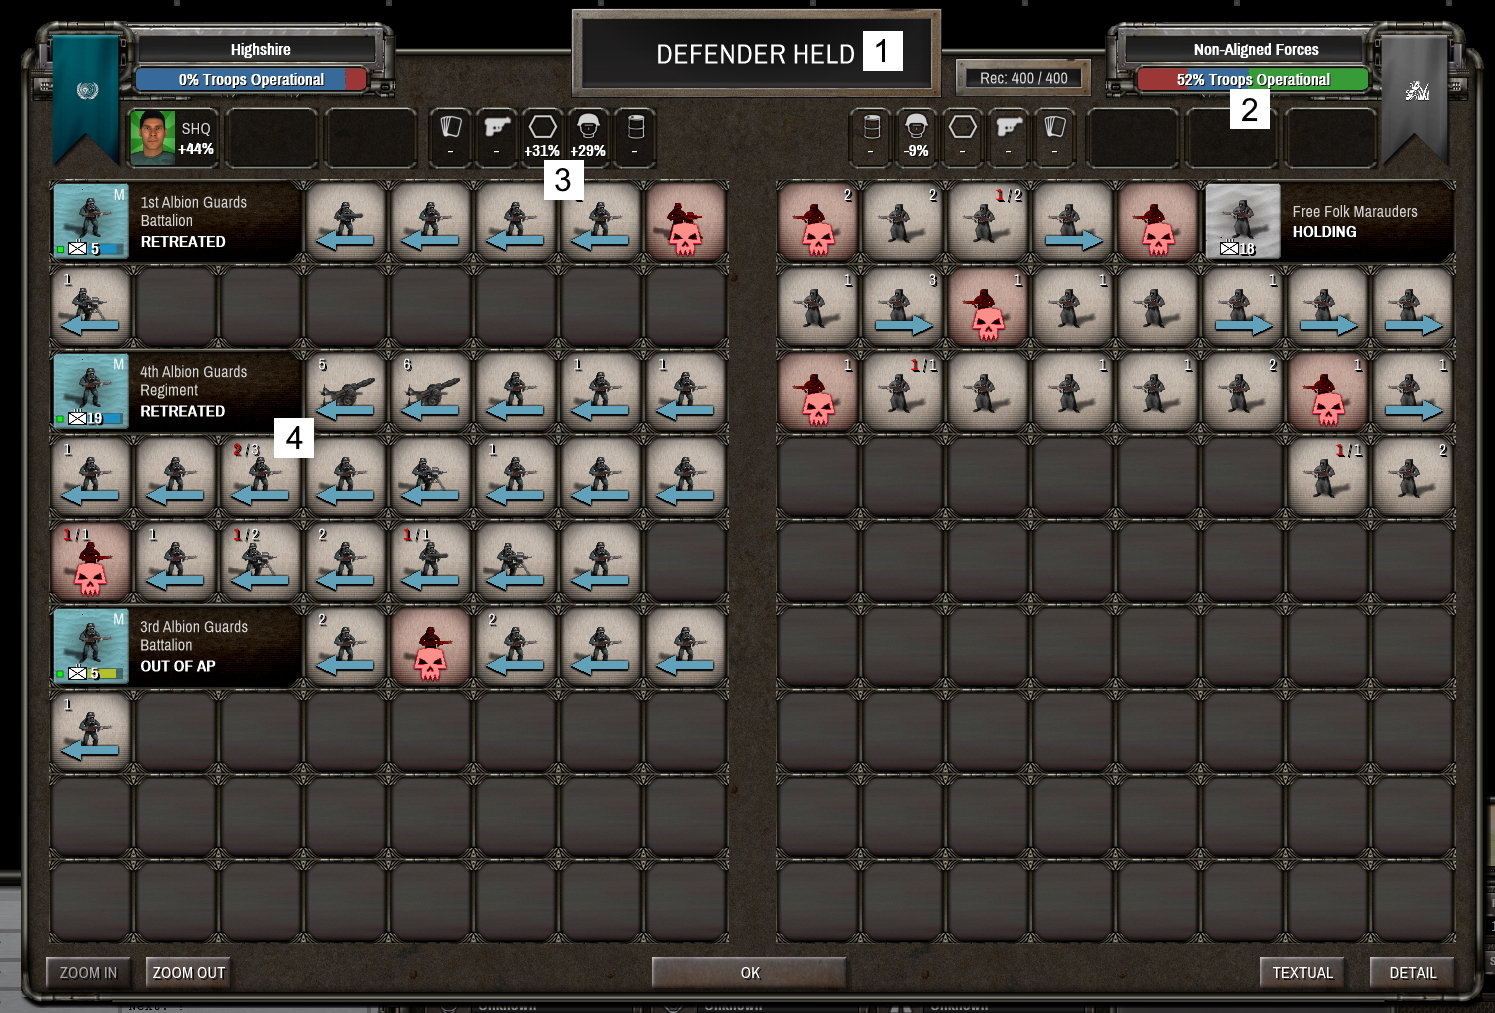
The battle was almost won…

1. The defender held. The Hex has not been taken.

2. Note that it was a close call though. The defender would probably have retreated if its operational troops would have dropped below 50%.

3. Our troops got some good modifiers from the SHQ Commander, Concentric Attack and Experience.

4. Note this particular heroic subunit that scored 5 hits on the enemy (of which 2 were kills).
Raise some Regular Troops
I think the above section illustrates the limited value of Militia Troops in an offensive role.


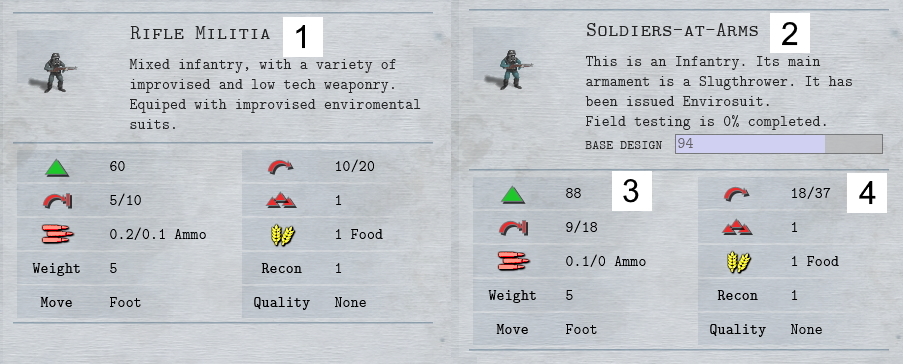
1. To the left we see the statistics of Militia Infantry.

2. To the right we see the statistics of the Regular Infantry Troops.

3. Note that Regular Infantry has almost 50% more hit points.

4. Note that Regular Infantry has almost double the attack values.

For these reasons it is a good idea to Raise some Regular Troops Units. They’ll perform about 2.5 times better than their Militia brothers. (however, keep in mind they’ll be recruited at 0 experience points)


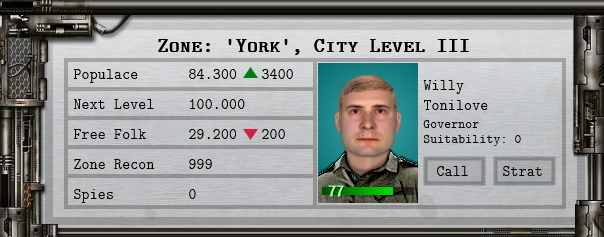
Using the “Raise Formation” order we can raise some new Units. We do not have enough Recruits available at the moment to recruit a multi-unit Brigade under its own HQ so an Infantry and a Buggy (car with MG) Battalion are raised. Note that you can increase the recruitment of Recruits by calling the Governor of a Zone to tell him/her to recruit more.

These buggies are an excellent complement to the existing Militia since they have good attack values.


Above is an attack that much more likely to succeed. Note the newly recruited Regular Units augment the Militia forces enough to have enough punch to brush aside those pesky Free Folk Marauders.

Improve Morale of Regular Troops
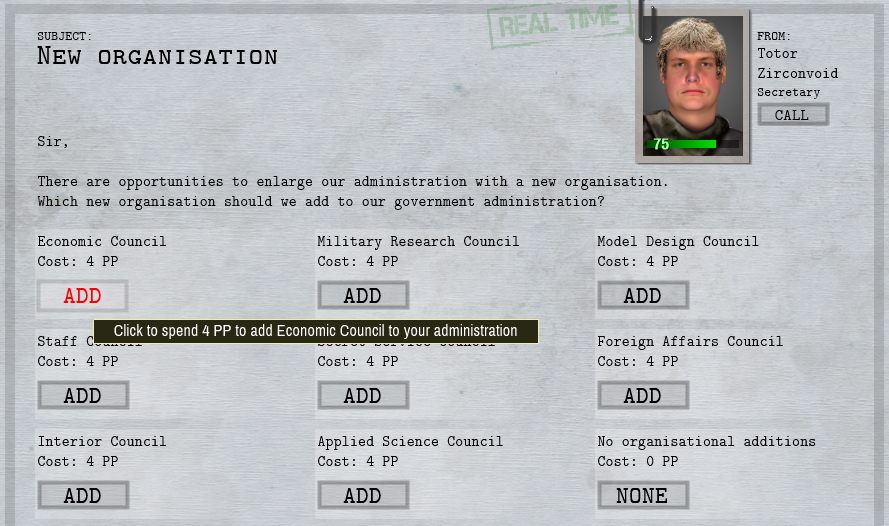
While waiting for our Zone to produce some more Recruits, let’s try to improve the Morale of our Regular Troops. You can do this by calling your Secretary and asking him/her to prepare a Decision on salaries.


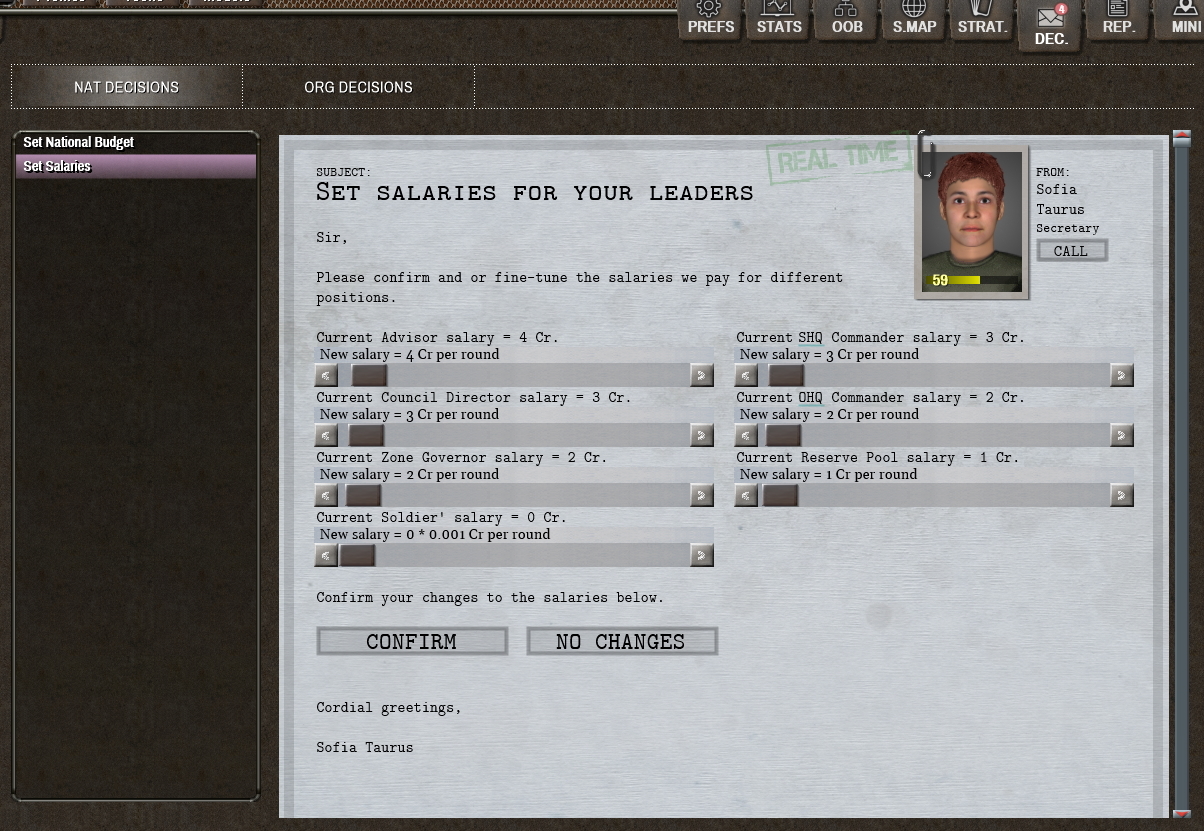
On default mode your Regular Troops get their rations and the rest is payment in gratitude and the honor to serve the nation.


If you give them several Micros of salary (a 1/1000th of a Credit) per round that will improve their Morale. Higher morale will keep them in the fight longer and they will be less prone to panicking, this will be especially important with certain Postures.
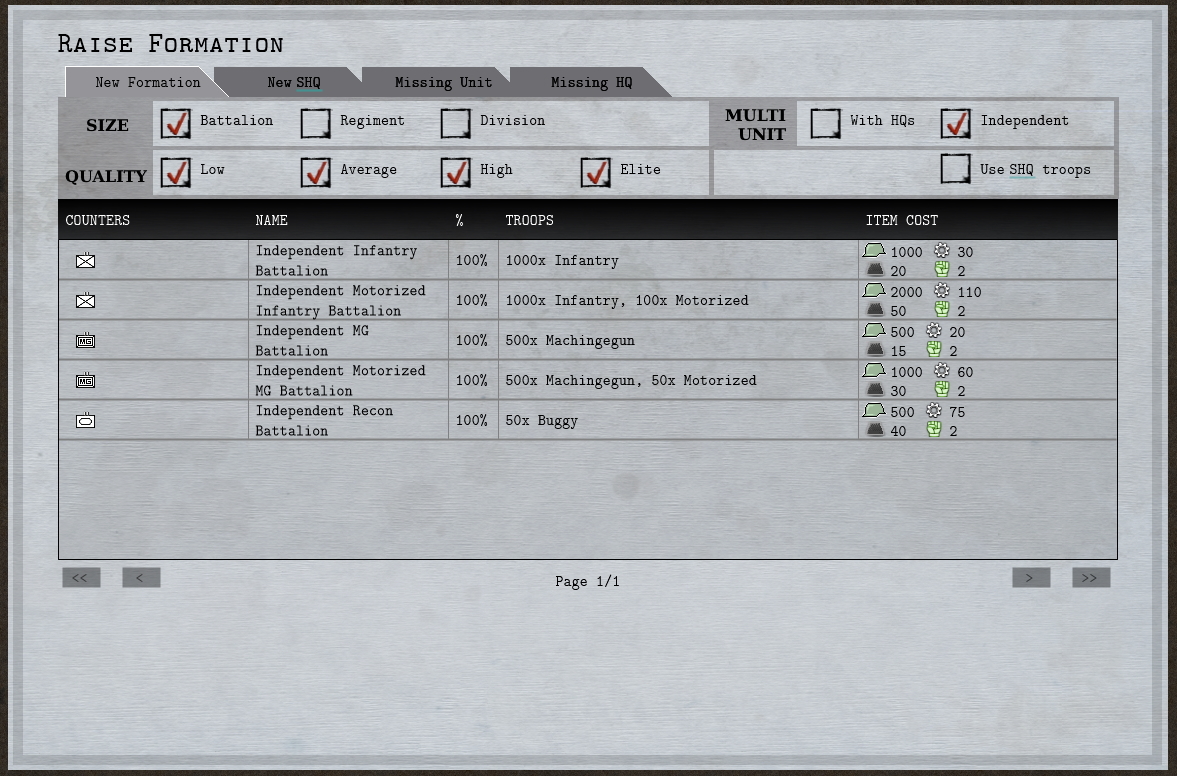
Raise a multi-unit Formation
Once you have enough Resources (Items) and Recruits you will do well to recruit a multi-unit Formation with its own Operational HQ (OHQ).

You’ll be able to assign a Commander to an OHQ and Skill Rolls will add to your combat bonuses. Furthermore, you can play Posture Stratagems on your OHQs that can also give combat bonuses. The combined effect of OHQ Commanders and Postures is such that you should try (in the future) to have the majority of your forces under OHQ command.


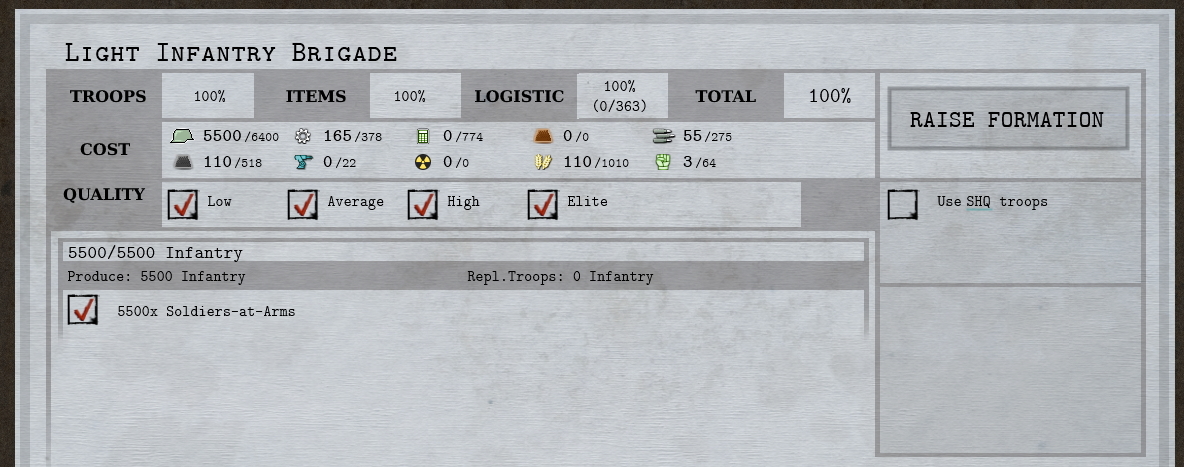
There is not too much choice at the start of the game, so an Infantry Brigade is an economic choice.

Note that to get more Formation Types to choose from you’ll have to discover and develop more Models (like Light Tanks, Artillery, etc..) using the Model Council and also operationalize new Formation Types using the Staff Council.
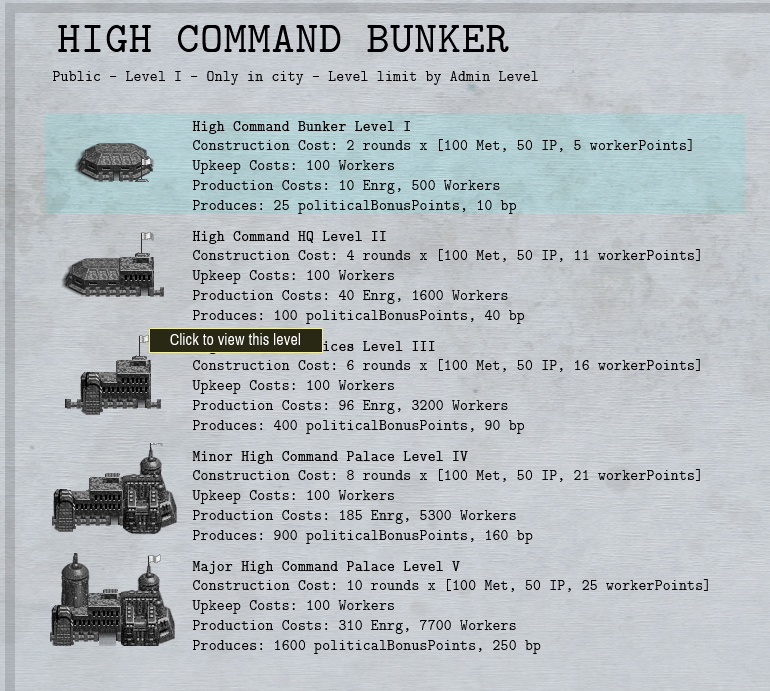
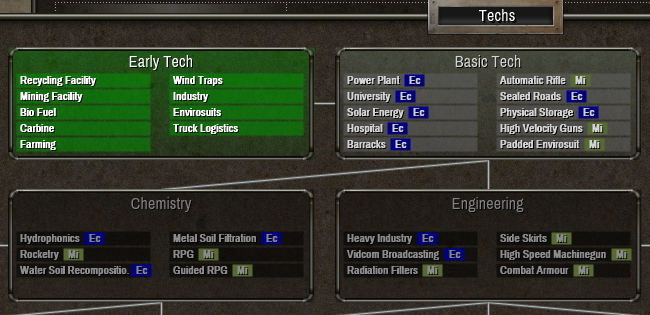
Quick look at Models that can become available
Once your technology advances and you make an effort to discover new Model Types, more types of Formations will be available to choose from.


The Model Types you have already discovered are shown in green.
Assign a Commander


1. Here we see our newly raised 1st Light Infantry Brigade.

2. When newly raised there is no Commander assigned.

3. The round after you raised the Unit a selection committee will have prepared a Commander selection list for you to choose a Commander from.

4. Note that sometimes the most suitable candidate is not presented to you for political reasons of the selection committee. You can dismiss candidates at a small Political Point cost.

Keep in mind that if you want to change a Commander you’ll have to call and dismiss him/her.

Play a Posture Stratagem
In the Stratagem Tab under the “HQs” category you’ll often have some Posture Stratagems available that can be played on OHQs.

To generate more Posture Stratagems you need to get a Staff Council operational and assign a lot of budget to their Posture Task.


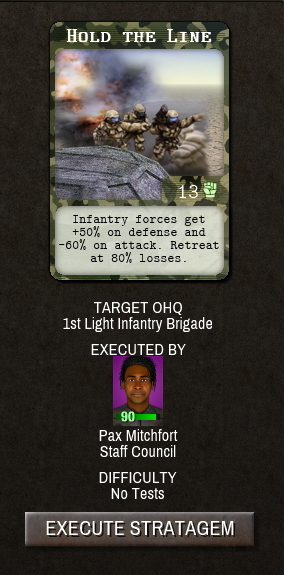
In the Stratagem Tab you pick the Posture Stratagem you want to play and select the OHQ to receive it.

Here we are assigning a Posture that is going to give a big boon on defensive operations. +50%. However, the flipside is it will be hard to use Units with this Posture in offensive operations.


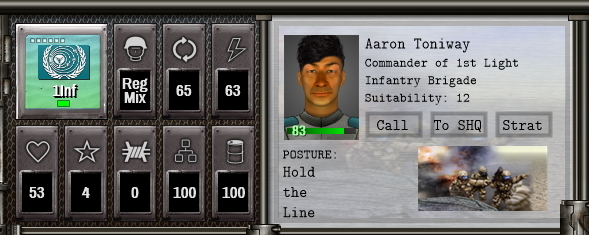
Our 1st Infantry Brigade is ready to hold the front! Commander and Posture present.
Assigning Auxiliary Units to an OHQ
Individual Regular Units start under an SHQ, but each OHQ has a limited number of slots (usually 2) to take command of auxiliary Individual Regular Units.

To do this select the Individual Unit and click the Unit Admin Order to assign it to an OHQ of choice.


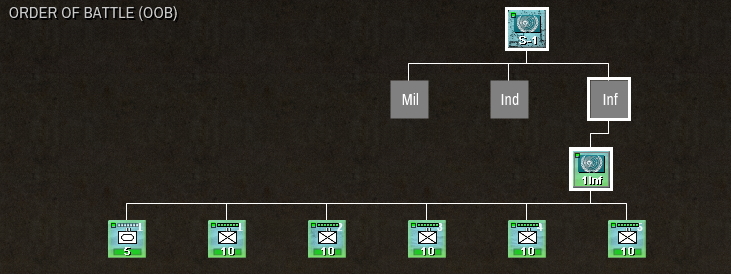
Our 1st Infantry Brigade can also be inspected in the OOB Tab, like above, and here we see it and its 5 battalions, but with an added Auxiliary Unit. This Auxiliary Unit will now also benefit from the Commander and Posture bonuses.
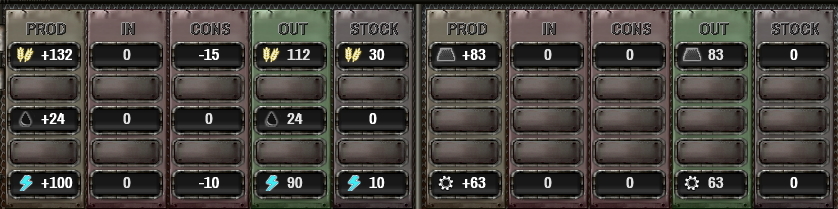
Keep an eye on Ammo, Fuel and Food
Every round your Troops consume Food and when they move or fight they can use Fuel. During battle (especially offensive action) they’ll use Ammo.

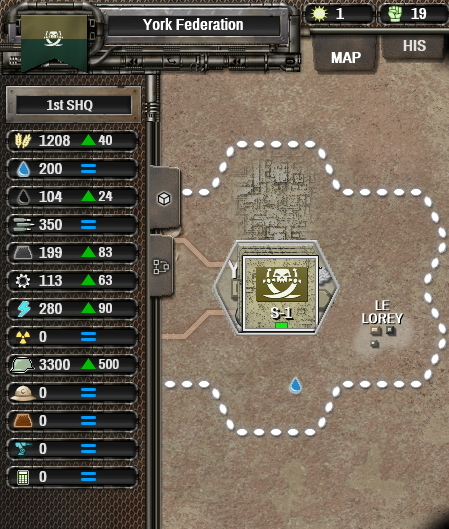
Keep an eye on your SHQ Item stocks:


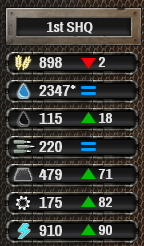
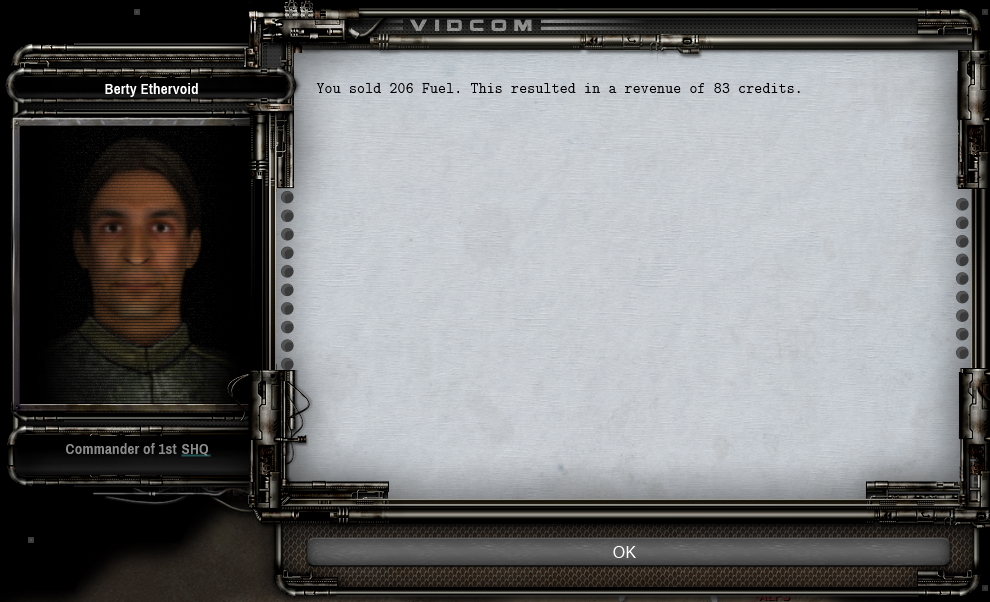
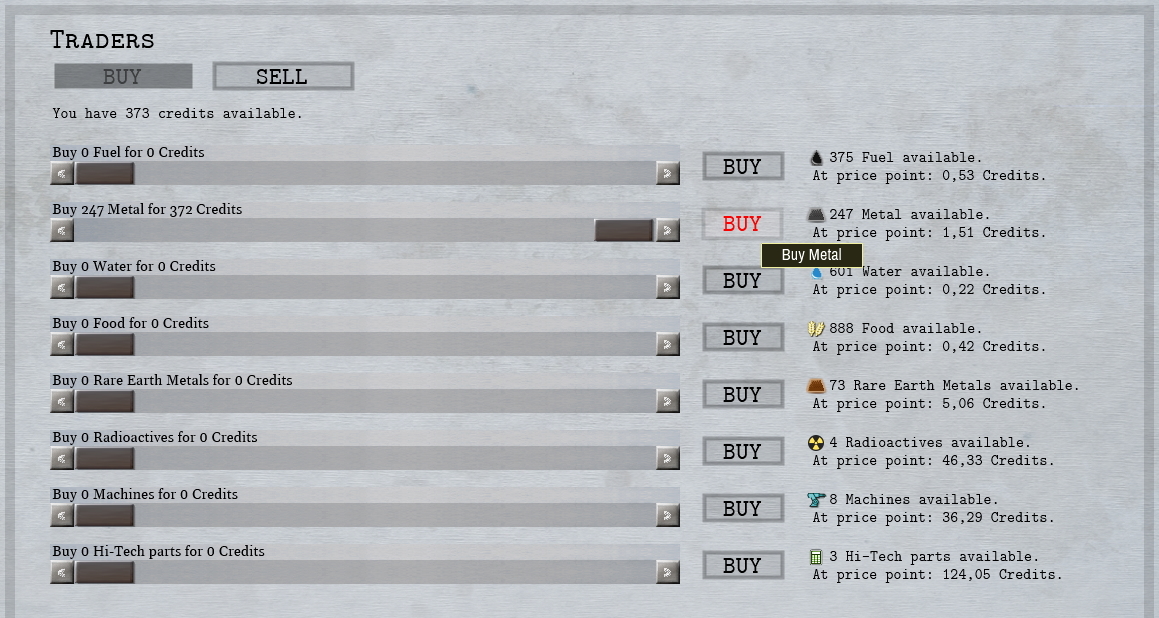
You can produce Items using your Assets or buy Items from the Traders.

Also, some Items (like Ammo and Machinery) can be produced by using the Workshop Order.
Keep an eye on your Logistical Network
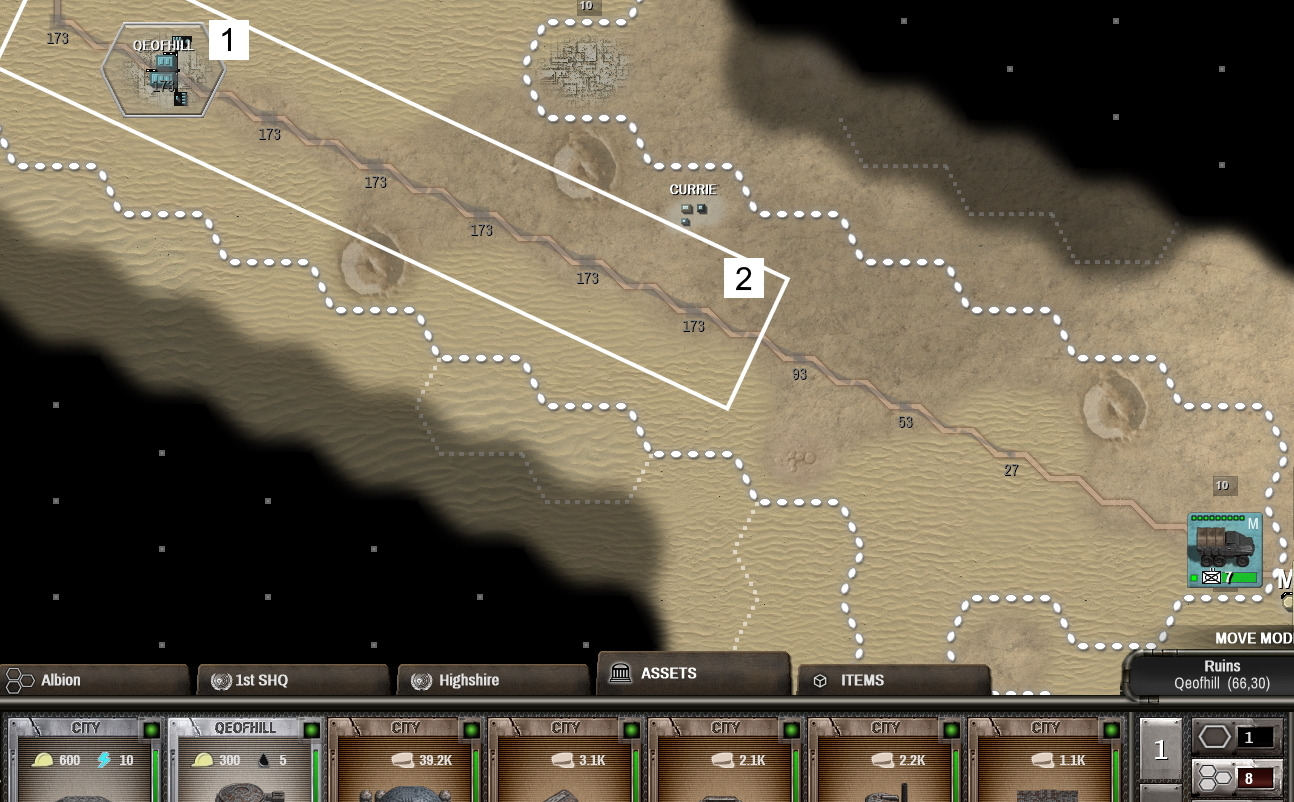
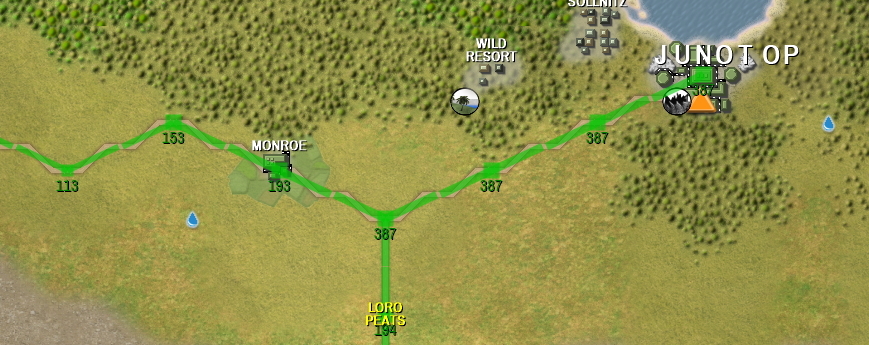
By using the Logistics Layer Buttons in the Layers Tab to the right of the screen you can inspect your Logistical Network as it formed at start of your turn.


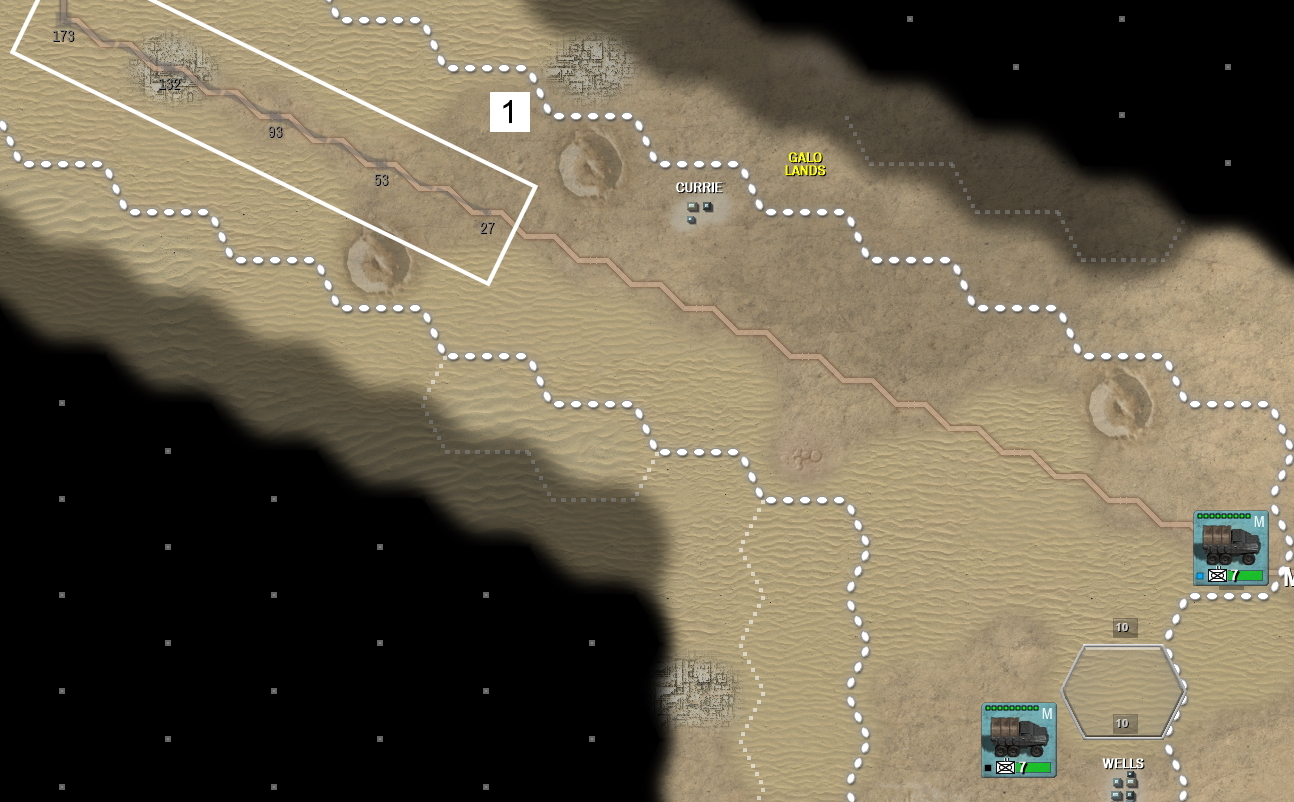
1. Above we see the Logistical Points that have been generated in your Logistical network. Note they stop well short of the Advanced motorized Militia Units to the South-East.


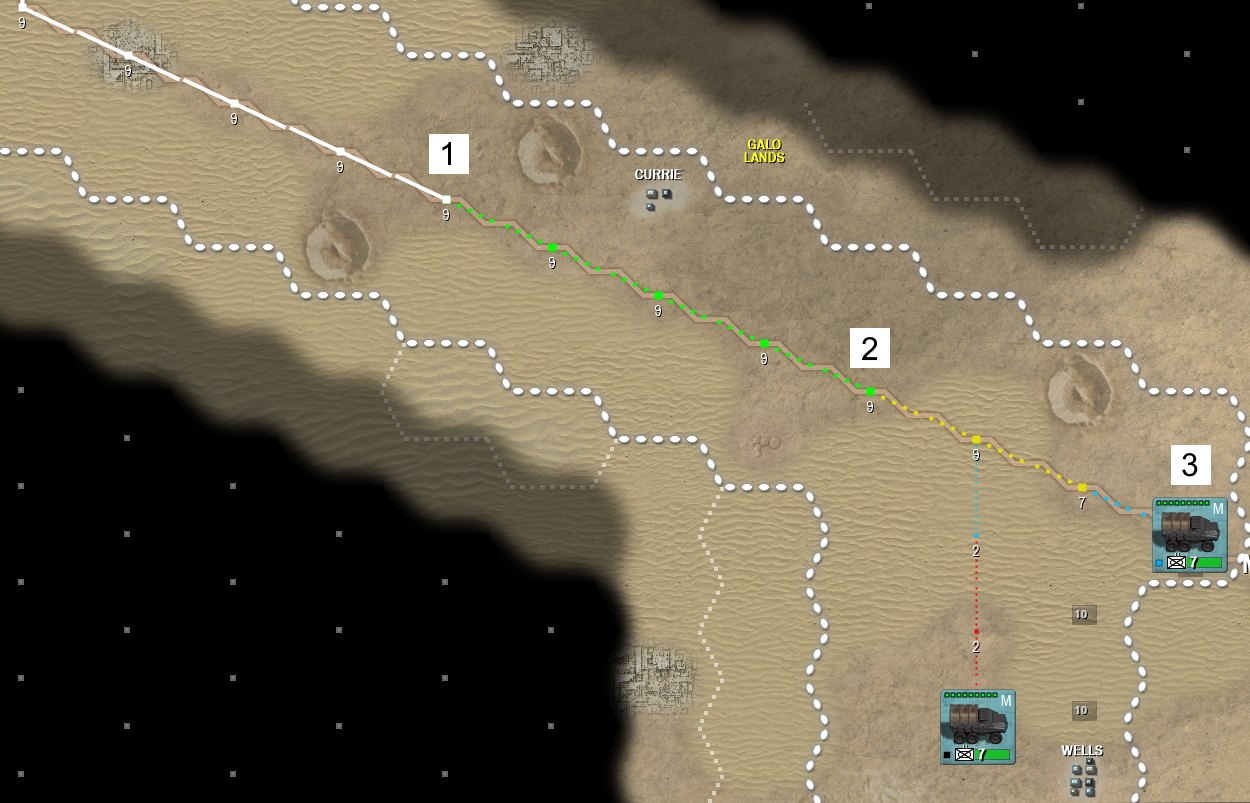
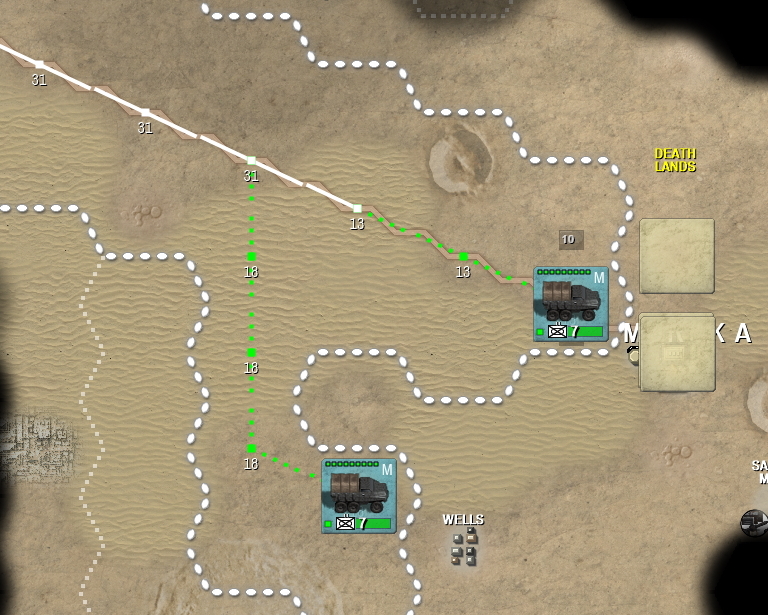
Here we see the actual Logistical Points that have been used to supply our Units (and possibly Zones)

1. This is the last Hex that has Logistical Points on it. This is the point where the Units will need to pick up the supplies they need.

2. The dotted lines show Organic Logistics of the Units. At this point a Unit would have been able to use its own Organic Logistics to pickup all the supplies it might need at point 1.

3. The actual location of the Units however is to far away from pickup point 1 and hence it is receiving less than it is requesting.


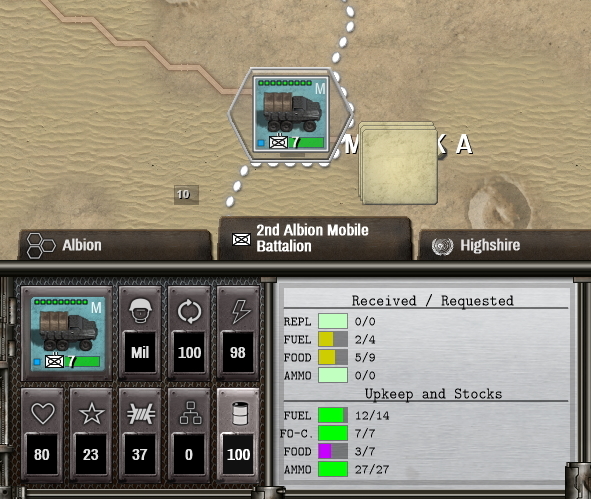
Note that this Militia Unit only received 2 of the 4 Fuel and 5 of the 9 Food that it requested.

There are two solutions here… For the present it would be wise to move the Units back to point 2 so that they will be fully supplied again. But after that it would be wise to extend the Logistical Network to facilitate further conquest.
Extending your Logistical Network
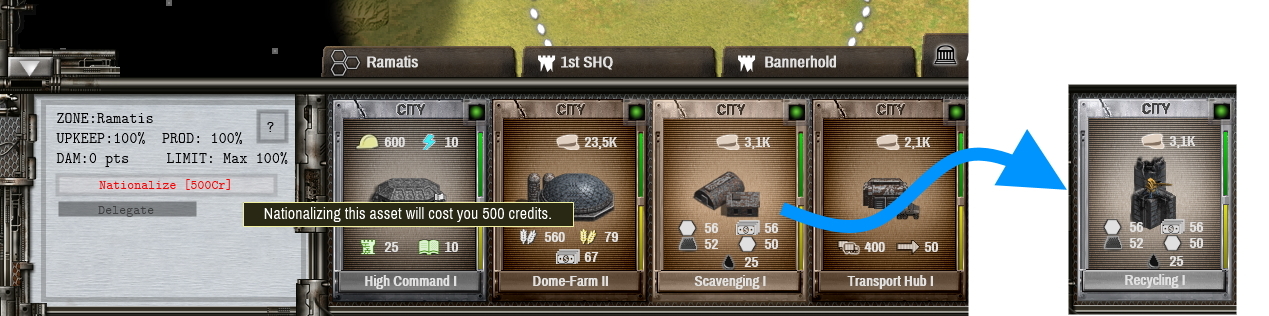
This you can do buy constructing either (1) new Logistical Point Sources like Truck or Train Stations or by (2) extending the range of existing Logistical Point Sources by construction of Supply Bases.

To construct a new Logistical Point Source use the Construct Asset Order. Probably preferably on the City Hex of the Zone.

To construct a Supply Base pick a Hex that is still receiving a good number of Logistical Points (they go down quickly after they go beyond the AP Range of their source).


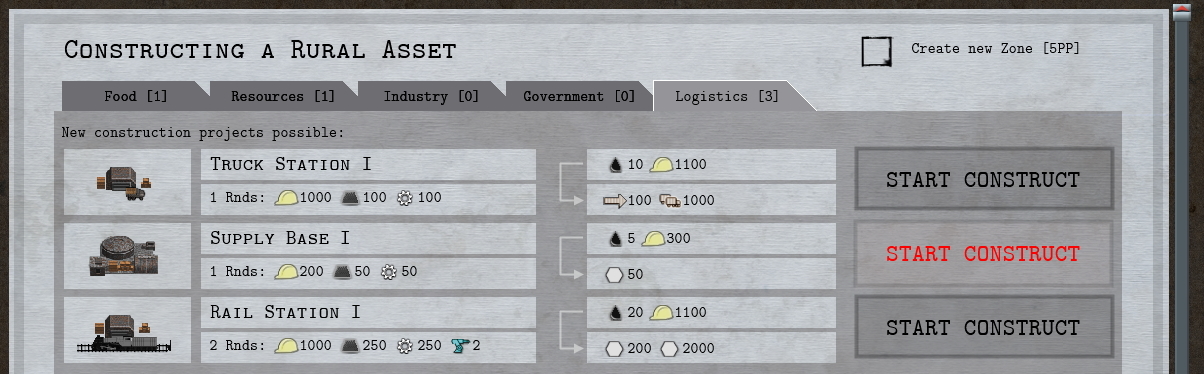
As you can see Supply Bases are cheap and quick to construct. They do not actually add any Logistical Points to your Network, but they extend the range of the existing points entering the Hex with the Supply Base.


After the Supply Base has become operational and its effect applied to the Logistical Network we see we have extended our range.

1. The Logistical Points that enter the Hex with the Supply Base are receiving +50 AP extra range.

2. Allowing plenty of points to arrive 5 Hexes further. After which they decline quickly again.

Dev Diary #1 - Planet Generation

by Victor Reijkersz

I am going to take you along on a visit to Shadow Empire. Shadow Empire is my upcoming new game. It is a hardcore turn-based 4X game. It mixes 4X elements, role-playing, sci-fi, post-apocalyptic with traditional hex&counter wargames. Honestly there is nothing else like it on the market.

It is a tough cookie of a game to win, but it is immersive, deep and full of promise.

In this first blog we’ll start at the beginning. Before you can start playing you’ll have to generate a new Planet.

Shadow Empire is a game that has a lot of procedural content. And since you’ll be playing on a planet this planet will of course be procedurally generated as well.

That is the topic for this first dev blog.

Rolling a new Planet

Rolling? Yes.. rolling. I use this word because there is a lot of similarity with rolling a character (with dice) in a role-playing game.

The reroll button will be prominently present during planet generation. During almost all phases of generation you’ll be able to use it.

Picking a planet class

The first thing to do when generating a planet is picking a planet class.

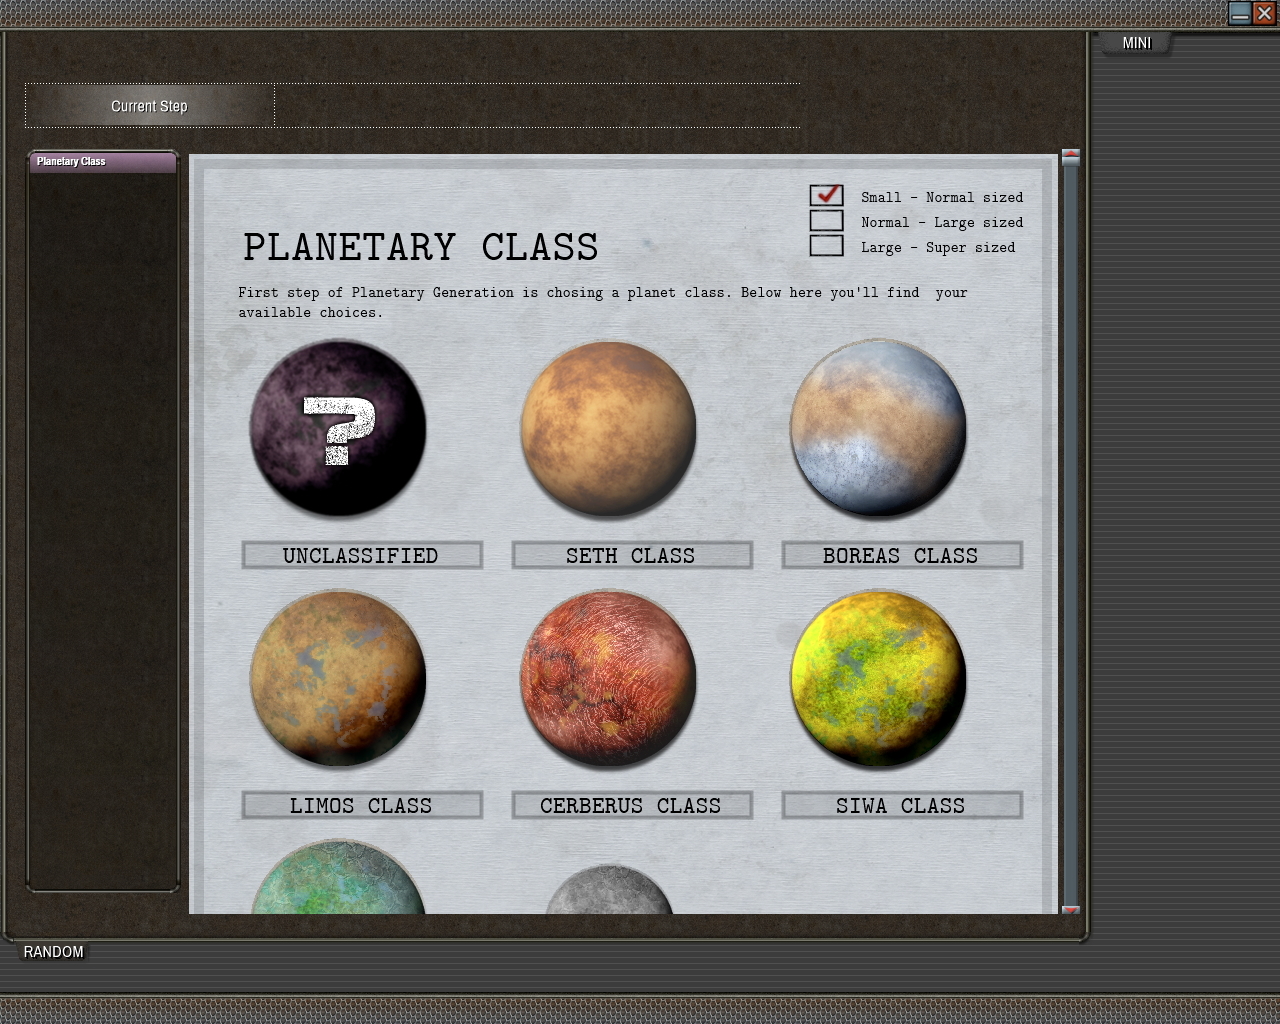
A true aficionado of random will of course chose the Unclassified class.

Here you can choose if you want a true random planet or one that is sure to have certain features. The Seth Class for example always ensures a desert planet, much like Mars. The Cerberus planet ensures volcanos, magma lakes and rivers. The Siwa Class ensures a biosphere and atmosphere that is (mostly) compatible with humans.

Planetology phase

After a class has been selected the astrophysical planet characteristics will be rolled.

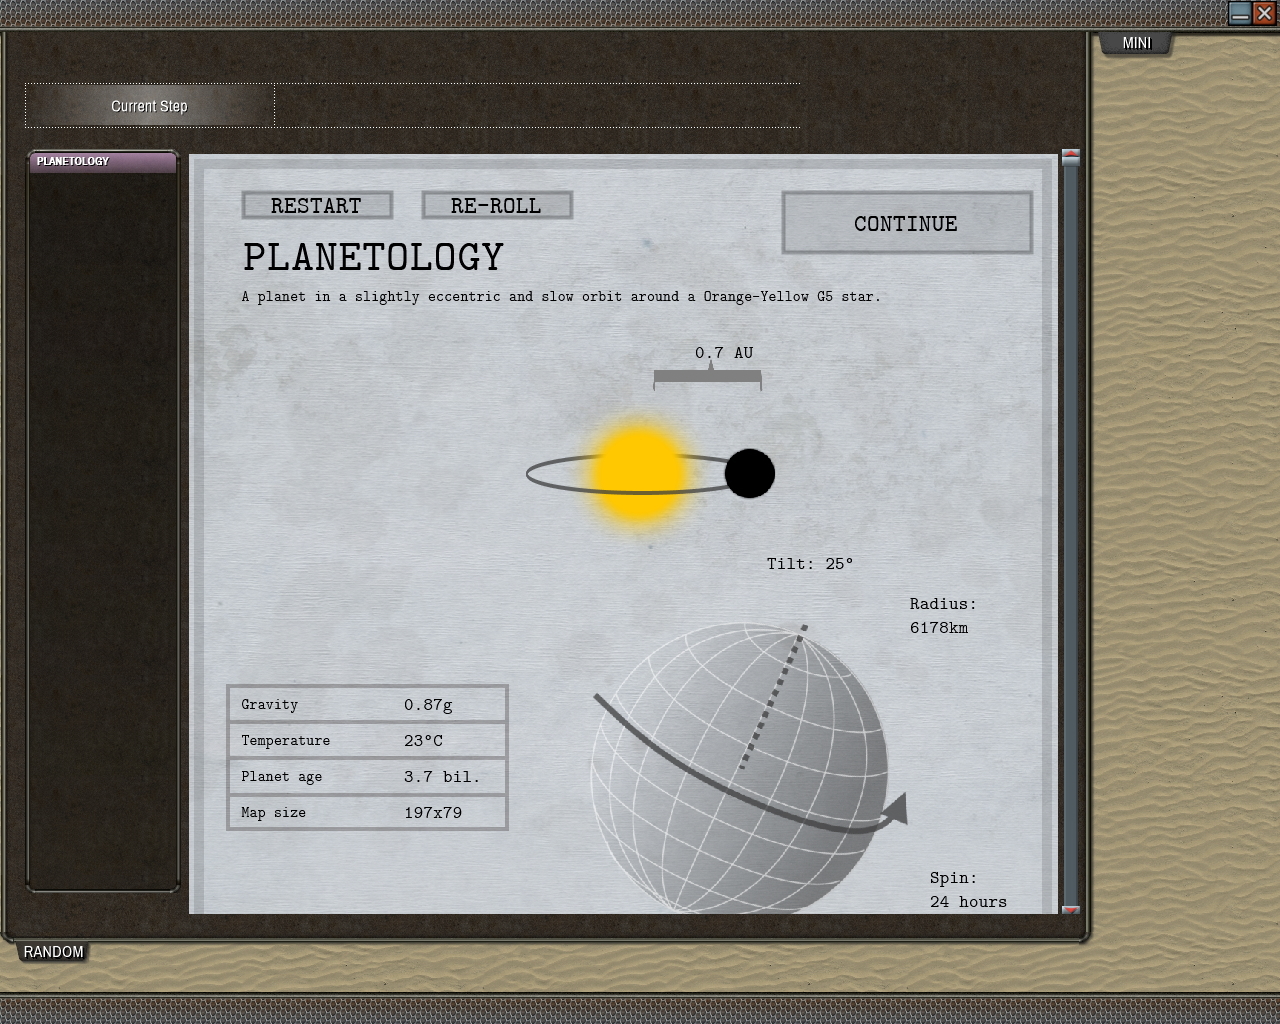
This one looks almost like Earth except that it is 8 degrees hotter and has less gravity.

If you do not like these characteristics just press the reroll button.

This planet is 3.7 billion years old, that is enough time for evolution to take place. Furthermore, I think it will have enough gravity to not have lost all its water.

Geology phase

After the planetology data has been confirmed the map will be generated.

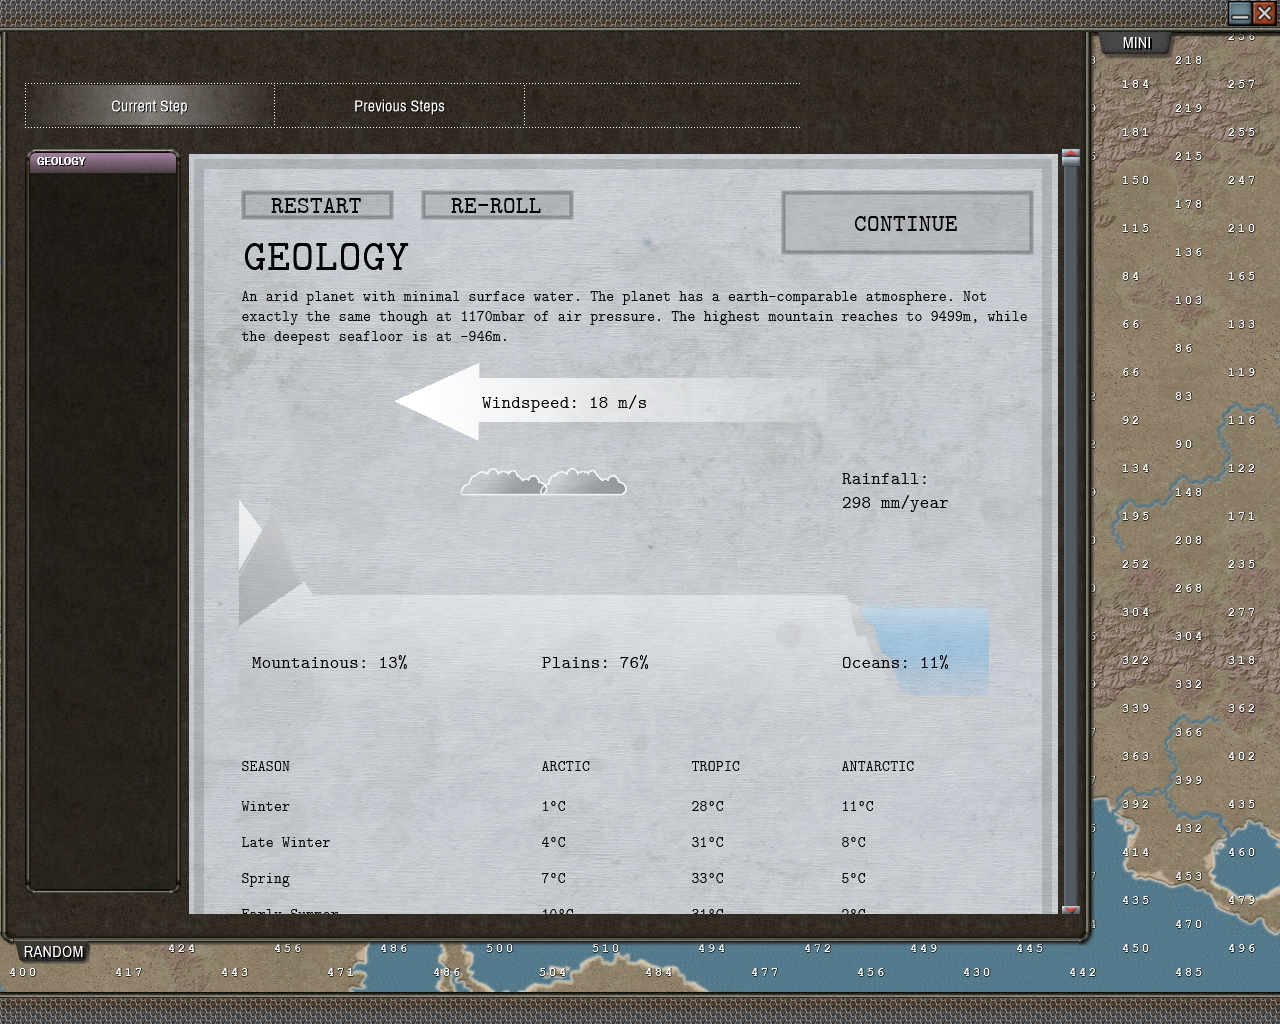
Some oceans and a nice mild climate. What more could I want?

If you do not like the map generated just press the reroll button.

The numbers shown on the map in this phase correspond with the annual rainfall in millimetres.

Biosphere phase

After the geology data has been confirmed evolution (if any) will be simulated.

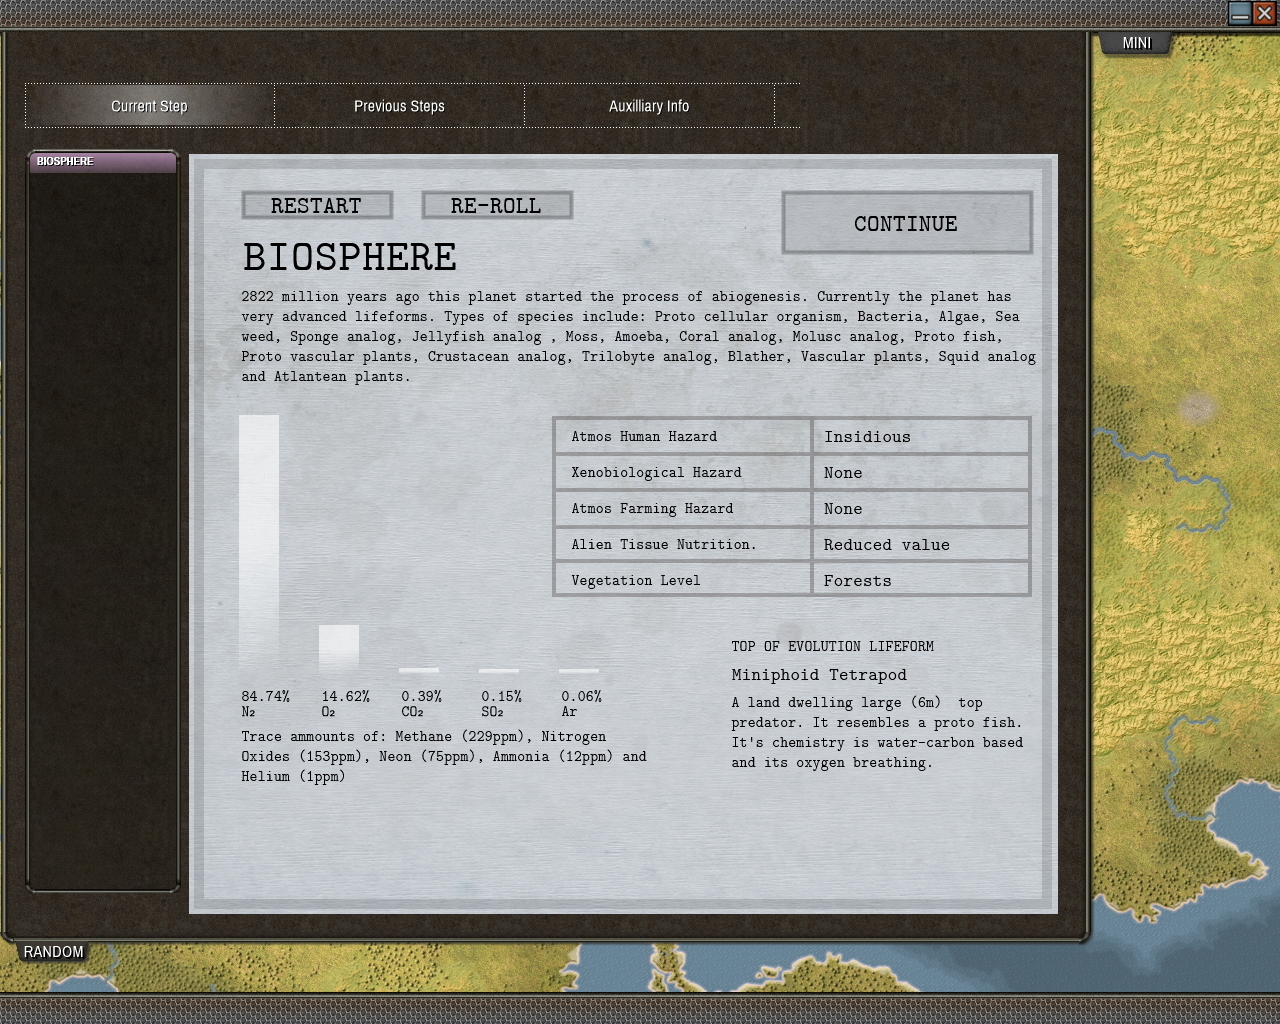
Plenty of life! And big land-dwelling predators on top of that.

If you do not like the evolution results just press the reroll button.

Note that the atmospheric composition has been impacted by the emergence of life. Almost 15% oxygen in the atmosphere will help humans living here. Though I am afraid the Sulphur Dioxide is going to require the people living here to wear some sort of breathing masks.

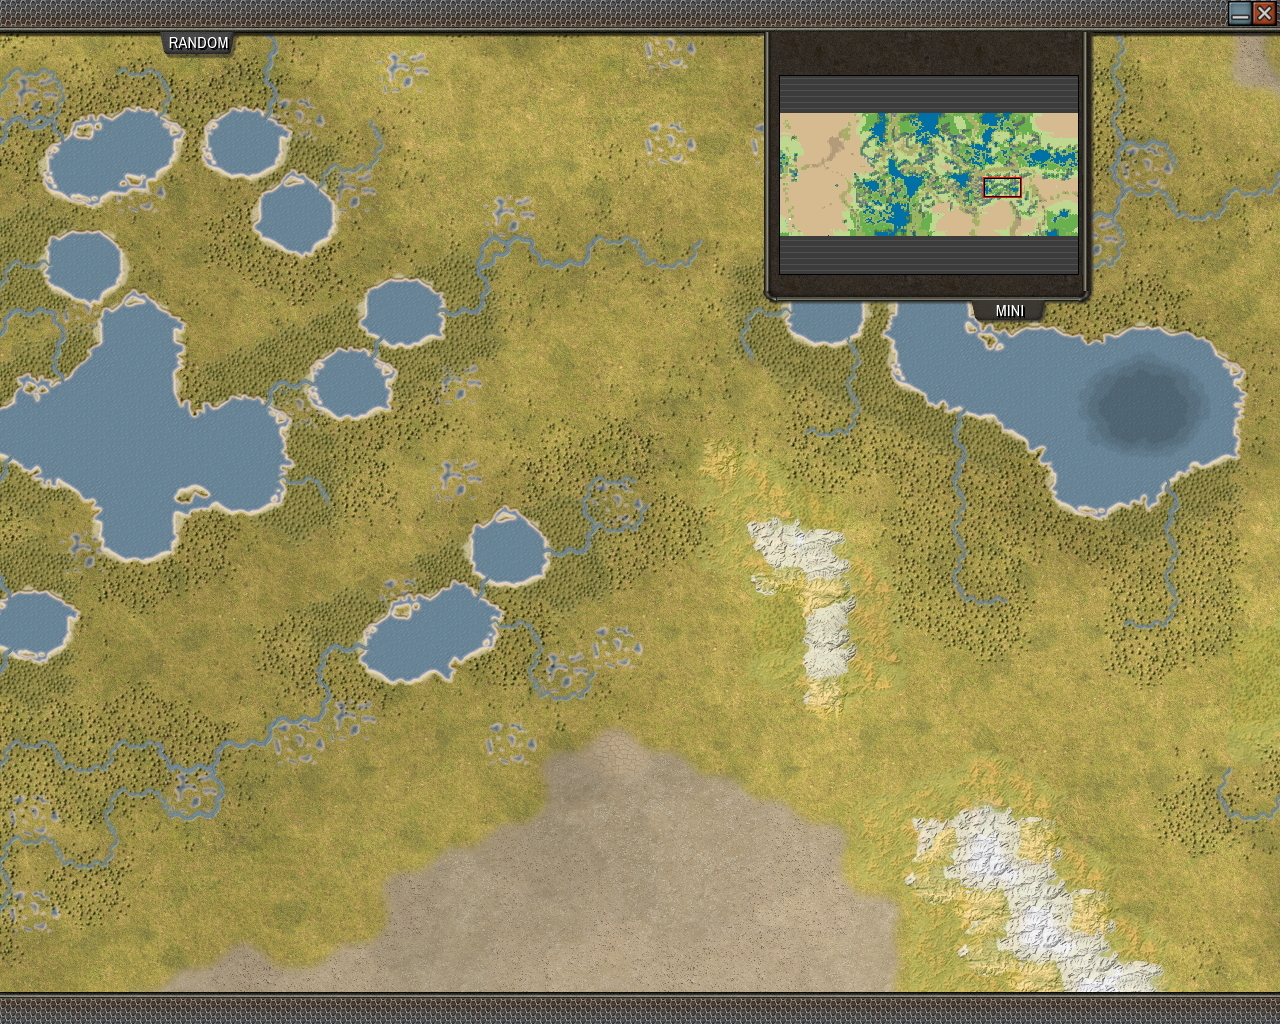
Note that this planet has some sizeable deserts as well. And the high mountains seem to be covered in eternal snow.

Colonization phase

After the evolution and biosphere data has been confirmed the Colonization of the Planet will be simulated.
You will be playing about 6000 years in the future. The by that time defunct Galactic Republic has been colonizing innumerable planets. The planet shown in this blog, Zosira C, is one of them.

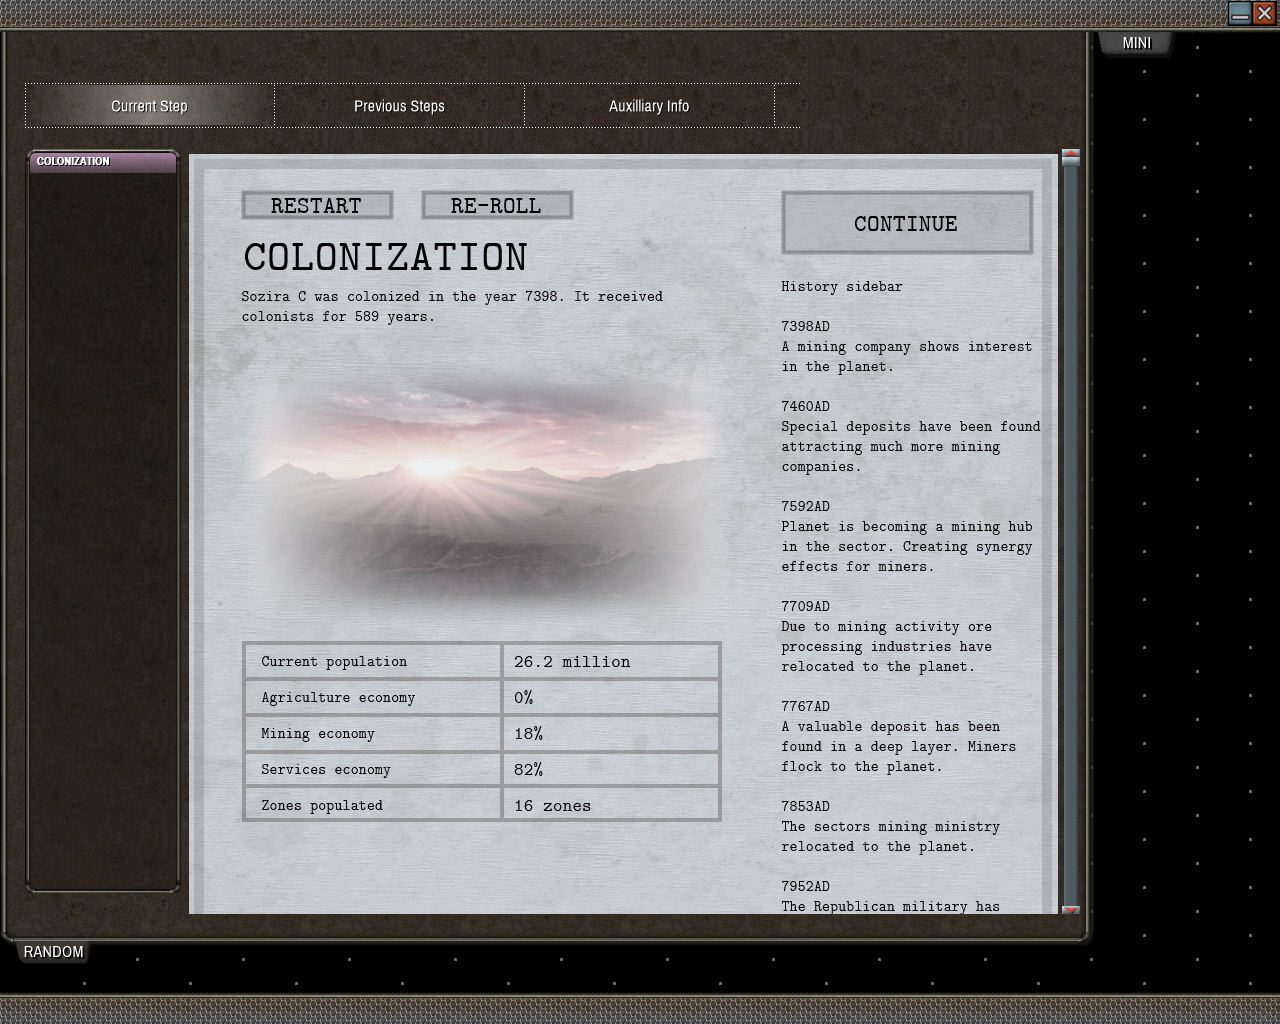
It must have been a happy place for miners.

If you do not like the colonization results just press the reroll button.

Note that the larger the initial population is before the Dissolution War is simulated, the more chance you’ll have to have more numerous survivors.

Apocalypse phase

After the colonization data has been confirmed the Dissolution War will be simulated.
Around the start of the 9th millennium the Galactic Republic was torn in parts and completely obliterated. This phase simulates the impact of this war on our planet.

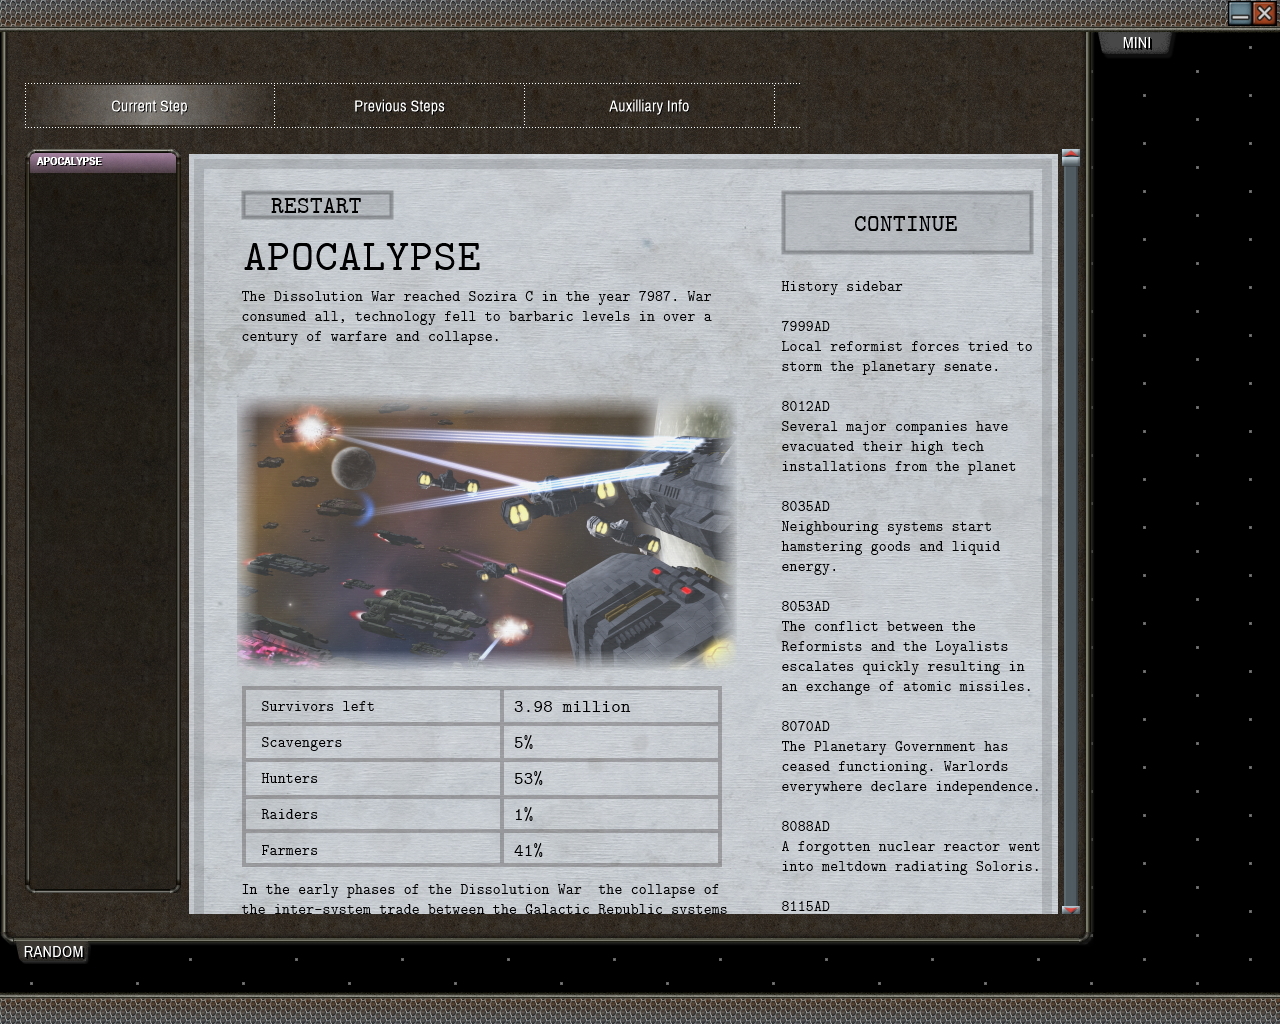
That is quite a population drop.

Note that a lot of people managed to survive by becoming hunters. Remember those big animals from the Biosphere phase? They must have helped the poor miners of Sozira C to sustain themselves. Do not expect to see the same results on a desert world.

Final Review

After the apocalypse data has been confirmed you’ll get a chance to play on this planet or to throw it in the garbage bin and roll another one.

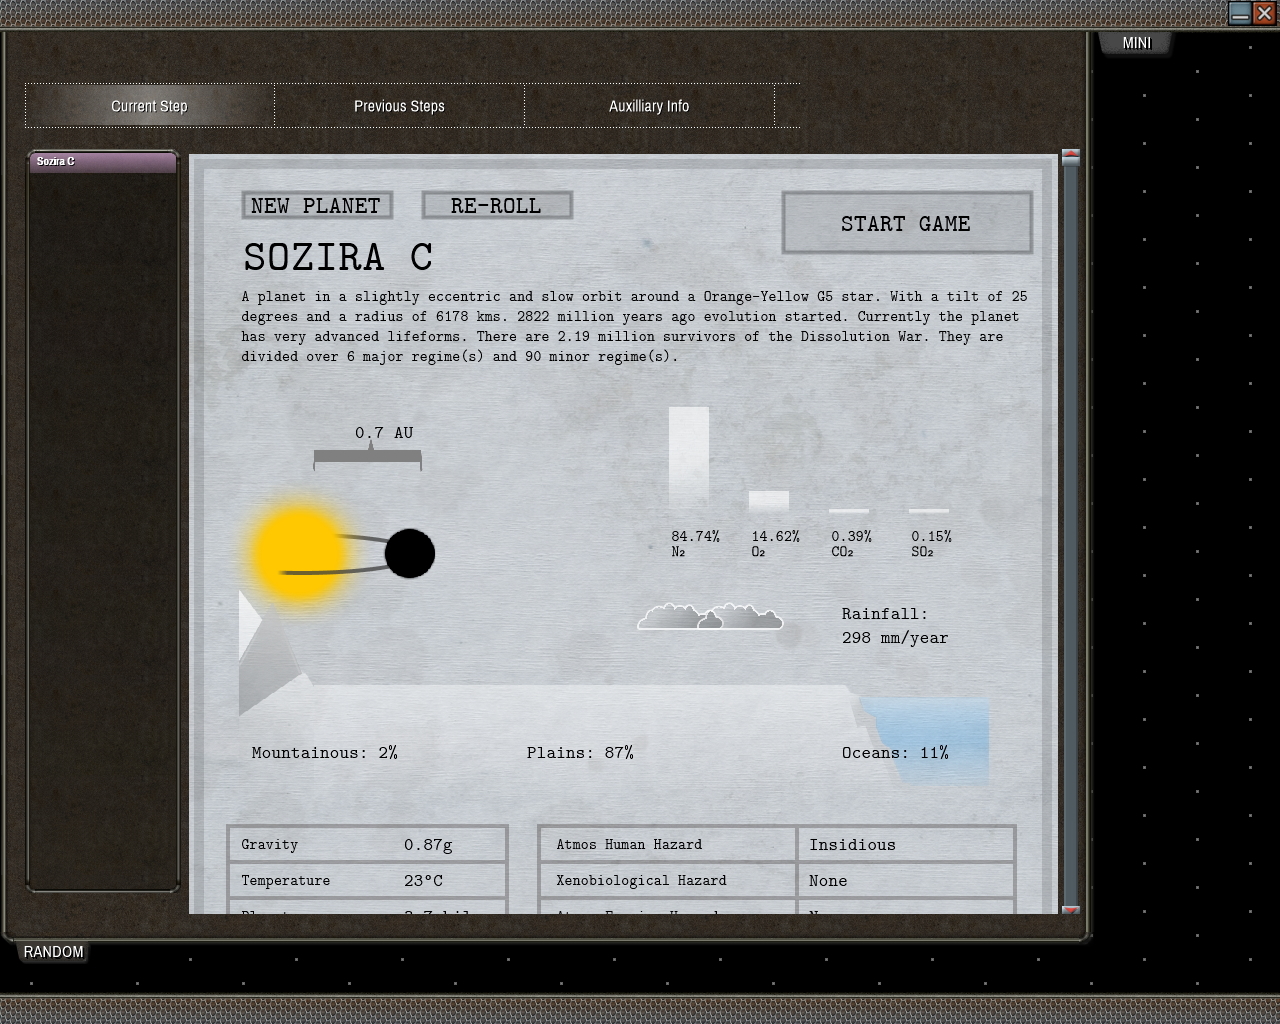
Looks good to me! Let’s start a game!

Note that since the colonization phase the map has been shrouded. This is because during game setup I chose to generate it with partial shrouding. It is also possible to generate a planet using full shroud so you will have no clue of the planets map once the game starts.

Your history

After you have started a game from the final review screen you’ll be able to customize your Regime a bit.

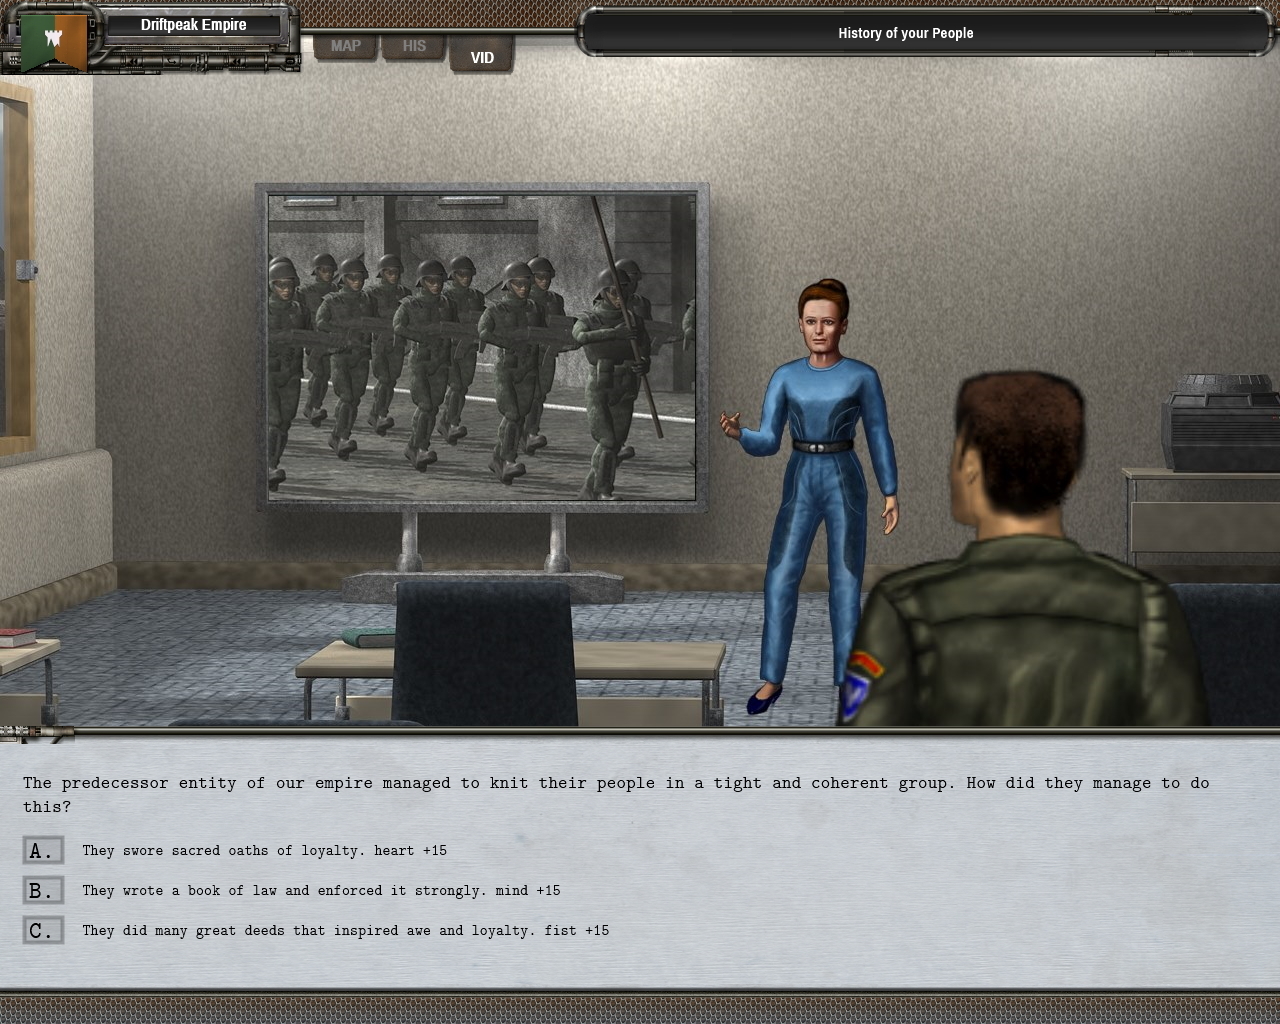
Of course my people wrote a book of law. Raising one of my 9 regime profiles.

Note that there are multiple options to generate a planet. One of them called ‘drop me in game’ will skip all of the above steps and immediately drop you into the start of a game.

Game start

After your regime has been customized and your history has been determined the game will actually start.

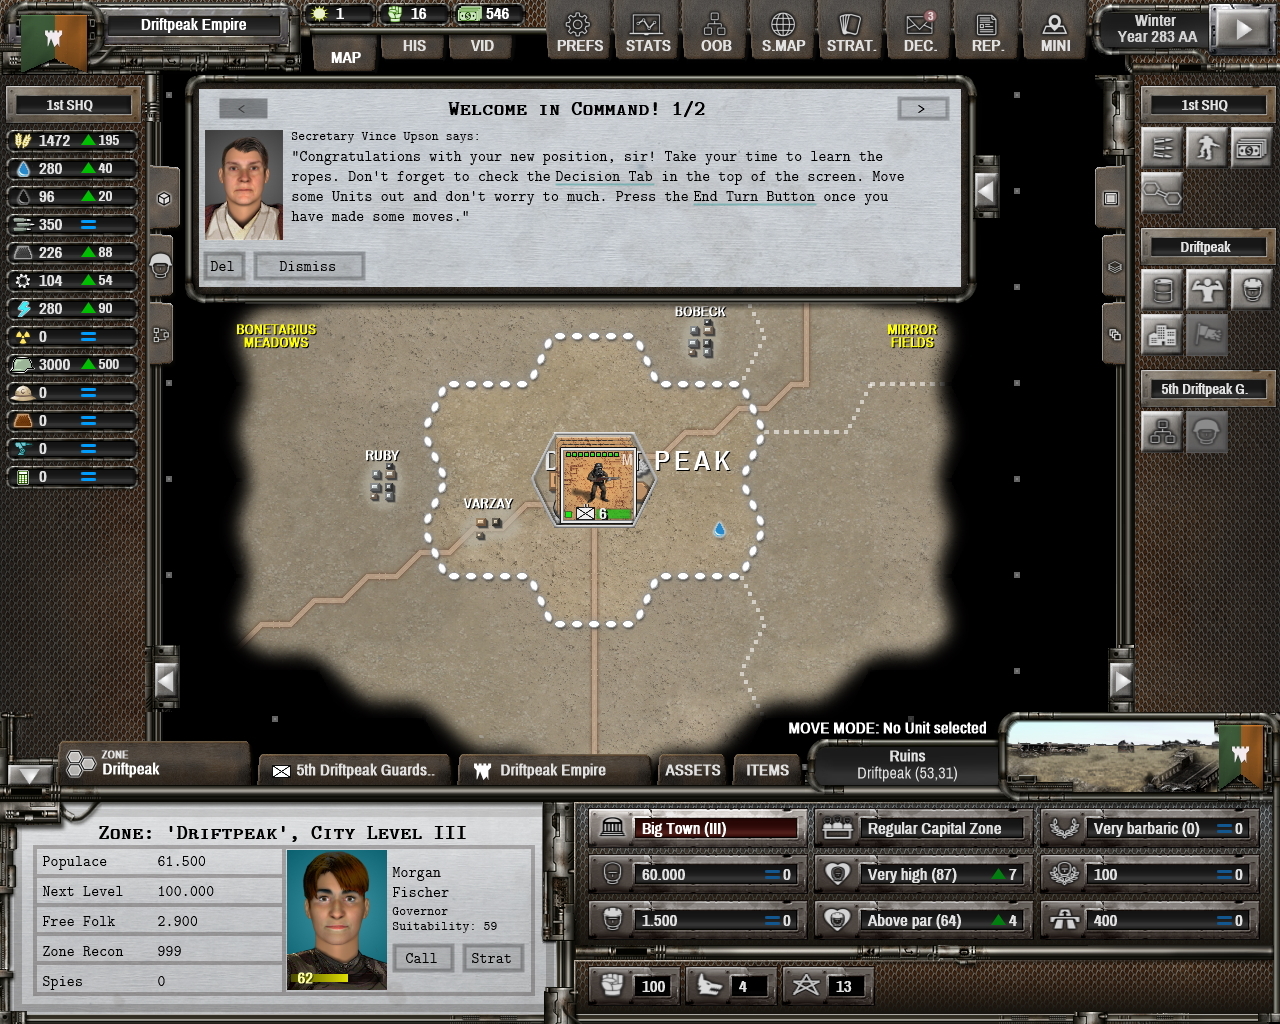
I am playing the Driftpeak Empire.

So there my game starts. With a small militia force and a tiny empire. Planetary conquest will be my goal, but it won’t be easy…

More in the next dev blog.

Shadow Empire Beta

A wasteland drawn by merciless wind. Ancient ruins dead as stones. The only living thing is this city you call home, one of the few settlement Humanity rebuilt after the apocalypse brought by the Dissolution Wars.

 Will you take its banner when destiny calls, trying to reunite the Planet and establish a new Civilization?

Shadow Empire, the upcoming sci-fi wargame in developing by VR Design, has reached the Beta Phase, and we’d like to invite players to take part in it.

If you want to help polishing and giving feedback on the game feel free to click here.


Shadow Empire is an original mix of genres. It is an immersive and rather complex turn-based game with a unique mix of military wargame, 4X, procedural generation and role playing elements.