1. Isonzo
  2. News

Isonzo News

Dev Blog #19 - Meet the engineer (not that one)

[h2]Engineer[/h2]
The Engineer supports the team by handling engineering tasks such as constructing static weaponry, cutting wire efficiently and deploying extra defenses and obstacles around the battlefield.

Italian engineers constructing wire on Monte Sabotino.

Military engineers have been a feature of armies for a long, long time. Since early siege engines required specialists to build and operate them, engineers have accompanied armies. Also responsible for field defenses, engineers were vital throughout the First World War for all sides. On the Italian Front, the mountainous terrain would pose a constant challenge to both sides as they struggled to build defenses, supply their troops, and launch attacks in the rugged terrain. Engineers were responsible for more permanent fortifications, logistics systems like cranes or cable cars, and their work was important for offensive actions too.

Part of the Austro-Hungarian tunnel complex carved out from the Marmolada Glacier in 1916.

In the Dolomite region, there were more than 30 mines detonated between 1916 and 1918, with explosions large enough to change the landscape: peaks lowered, cliffs shifted. The tunnels for these mines would be dug by engineers. We also saw back in Isonzo Intel #12 how Italian engineers prepared mountainside walkways to get the jump on defenders!

Austro-Hungarian engineers.

[h2]Equipment and Skills[/h2]
Engineers can choose from a few different rifles, sidearms, and grenades if they wish, but combat isn’t their primary task. Instead they should be focused on supporting their team in a few different ways. First off, engineers can build heavy weapons in pre-set locations on each map. This includes heavy machine guns and mortars - the firepower of these weapons can be game changing.

Second, they can very effectively build and cut wire - often there will be nearly impenetrable lines of wire facing attackers when the battle begins, only needing defending engineers to close up a few gaps. These chokepoints will be high priority areas for both sides. Attacking engineers can more quickly cut wire, or potentially even blow it up to prevent the defenders repairing it.

But engineers are not limited to these pre-set points of interest when building…

[h2]Construction System[/h2]
In Isonzo, certain classes are able to build fortifications which can be freely placed anywhere with enough clear space. The Engineer has the widest variety of things to build, all focused on providing cover to allies or providing obstacles to enemy movement. All buildable items in Isonzo have a maximum amount which can be built at once - there is a per team limit, and a per player limit. So as an Engineer your team might be able to build 20 sandbag positions, and you personally can place 5 of them. It takes a short time to put things together, and you can deconstruct them as well (including enemy items). Let’s look at what kind of things you can build…

An engineer built sandbag position.

Sandbags
There are two forms of sandbag available, one straight piece of sandbag wall, and one curved sandbag position. The curved sandbags are ideal for standalone defensive positions where you want to provide a little cover against flanking enemies. The straight sandbag walls work better when combined into a larger position, or as an extension to map features like buildings, stone walls, and ruins. In some places you might be able to use sandbags to hinder enemies trying to climb onto ledges.

Construction UI.

Barbed Wire
Barbed wire works exactly as you’d expect, slowing and hurting soldiers who get caught up in it. There are two types available, but we’ll go into more detail in a future dev blog.

Sniper Shields
These specialist items are small metal shields with a firing slot in them. When carefully positioned they will protect a soldier from enemy fire while allowing them to shoot back. However, finding a good spot with a decent field of view through the tiny slot is not easy!

An engineer constructs a sniper shield.

[h2]Perks[/h2]
Engineer perks tend towards construction and demolition. The Sapper Company perk gives a bonus to planting and defusing sabotage bombs, making it equally useful when attacking or defending. Support Company gives a bonus to operating heavy weapons: for instance faster reloading and aiming. This has natural synergy with the Engineer’s job of constructing those heavy weapons, allowing them to then provide better fire support to their team. The Death Company perk gives players body armor they can equip during battle. As with the marksman armor, it protects from explosions and suppression - useful when trying to build or sabotage under fire!

Armored engineers in action.

[h3]We hope you enjoyed meeting the engineer…[/h3]
See you next time and don’t forget to wishlist Isonzo!

Dev Blog #18 - Call in the big guns!

[h2]Artillery[/h2]
Artillery must feature heavily in any WW1 game worthy of the name. It is generally considered to be the largest cause of military casualties during the war - perhaps more than 50% - and it affected tactics and strategy alike. Since Verdun artillery has been a gameplay feature of the WW1 Game Series. Then it was called in by squad leaders, while in Isonzo it is the Officer class who handle support requests, as detailed in a previous Isonzo Intel.

Artillery such as this 149mm Italian piece also appears on the battlefield in Isonzo, as sabotage objectives or incidental detail. There are also the mortars which are functional weapons!

[h2]Types of Artillery Support[/h2]
Every support category in Isonzo has five different options, ranging from short cooldown to long cooldown. For the artillery, mortars and field guns are the two shortest cooldown options. They fire four shells (medium for mortars, heavy for field guns) at the targeted flare marker. As you’d expect, they will kill, injure and suppress nearby soldiers, with the heavier field gun shells having a larger area of effect.

A mortar impact from the most basic artillery call-in option.

Having good cover will protect infantry from artillery shells, so artillery call-ins will be less effective when targeted on trenches, ruined buildings, and areas with a lot of large rocks. Of course there’s always the chance that a shell will land in a trench, with predictably gruesome results. In addition, because of the rocky landscapes in Isonzo, artillery will cause stone fragments to fly around and therefore has a larger range in which players are wounded.


Heavy artillery
The third artillery call-in option is the heavy artillery. This represents the super-heavy siege howitzers used by each side, with their enormous shells. The Austro-Hungarian Škoda 30.5 cm Mörser M.11 fired 305mm shells, while the Italian Mortaio da 210/8 D.S. uses 210mm. Only a few shells are fired but the power of them is enormous.

Left: Austro-Hungarian Škoda 30.5 cm Mörser M.11, Right: Italian Mortaio da 210/8 D.S.

The trend at the start of WW1 had been towards lighter, fast firing artillery pieces. These were devastating against enemy troops in more open ground, but as the war of movement ground to a halt and trench networks were constructed, the militaries involved quickly realized they had a need for heavier guns which could penetrate fortifications. You can expect the super-heavy shells of this call-in option to be more effective even against fortified positions like trenches or ruins - even if they don’t kill everyone present, injury and suppression effects can make them vulnerable to an infantry charge.

A super-heavy shell from a siege mortar.

Barrages
The last two options for artillery call-ins are the barrage, and the creeping barrage. The barrage calls in 10 heavy shells on an area, which will almost certainly eliminate any defenders outside of cover in a larger area than the earlier call-in options. The creeping barrage fires 16 shells, but has a special feature - it is aimed, and the shell impact locations will gradually move from the starting point in a direction specified by the officer calling it in.

You’ll choose the direction of the creeping barrage as you call it in, using the flare location as the starting point.

Creeping barrages were a technique developed to allow friendly infantry to advance behind the cover of the barrage, so that defenders would have to stay in cover until the attackers were almost on top of them. They were ‘creeping’ because they had to move forward slowly, at the rate of an advancing infantryman. This was a complicated business to organize with WW1 technology and didn’t always come off correctly, but when it did work out it was very effective.

A 6x speed version of a creeping barrage in action. These can be truly devastating

As a final note on artillery barrages, remember that officers targeting a second flare on a location will boost the next call-in aimed there, which for artillery means more shells fired. This has a greater impact on the two barrages, with 25% more shells coming down during a boosted creeping barrage.

Bombardment on the Carso with rocks flying about

[h2]Particles[/h2]
We spent a lot of time on making artillery impacts feel powerful, and our particle system plays a large role in that. The dirt thrown up, the smoke left behind, it’s all particles. And it’s not only useful for explosions! We’ve used it for tree leaves fluttering through the air, ambient dust to capture the feel of certain environments and weather conditions, and much more.

Particles in action on the wooded slope of the Gorizia map. The leaves at the start of the GIF are particles.

[h2]Albini & Figlio Binoculars[/h2]
The Italian officers and mountaineers in Isonzo can make use of these Albini & Figlio binoculars for observation and spotting - often a good idea before calling for artillery support! You don’t want to waste your creeping barrage on a section of trench with only a handful of enemies after all…

Italian Albini & Figlio binoculars.

Binoculars (also called field glasses) were in huge demand during WW1 with many officers buying privately when they could. Not only useful in ground combat, they were also vital for sailors to spot other ships or submarines, and used for aerial observation from balloons. In Isonzo they are useful for observing the battlefield, and you can also ‘spot’ enemies which marks them on the mini-map for your entire team.

[h2]More call-ins to come![/h2]
There are two more categories of call-in that officers can utilize, the feared Chemical Regiment and the dashing Aviation Corps. We’ll get to those in future dev blogs. See you next time!

Dev Blog #17 - The Marksman Class

[h2]Marksman[/h2]
Assist your team by eliminating high value enemy targets from a distance, or breaking up enemy attacks with lethally accurate short range fire.

Bersaglieri
The Kingdom of Italy’s Marksmen are the Bersaglieri, who have a storied history going all the way back to 1836. Originally formed to serve in the Royal Sardinian Army as mobile infantry in place of expensive cavalry, they are renowned for their running - they continue to run today during parades and when on barracks duty! Combined with high standards for marksmanship, they served well as skirmishers and shock troops as required. Back in the 1800s the bersaglieri were envisioned as being mountain troops in addition to their other roles, and so the formation of the Alpini Corps in 1872 led to quite a rivalry between the two elite groups.

A bersaglieri sharpshooter, with the distinctive feathered hat named the moretto da bersagliere or “vaira” in honor of Giuseppe Vayra.

The distinctive black capercaillie feathers in their hats and helmets were traditionally worn in combat - originally to provide camouflage and keep the sun out of the eyes when shooting. During WW1 there were many different bersaglieri formations raised, including cyclist units.

Kaiserschützen Kaiserschützen in their natural habitat, note the characteristic “Spielhahnstoß” feather on their “feldkappe” caps.

The Kaiserschützen originated in a very different form back in 1511, which required the state of Tyrol to be able to muster 20,000 volunteer troops on request to defend their home. These Landesschützen became known as excellent soldiers. The transformation of the Austrian Empire into the Austro-Hungarian Empire in 1867 shook up the organization of the military, and in 1890 the troops of the Landesschützen-Kaiserschützen became part of the Austrian national army (the Imperial-Royal Landwehr), and ceased to be drawn exclusively from Tyrol, with men being drawn from Salzburg, Austria, and Vienna among other places. They maintained their excellent standards, however.

A grizzled Kaiserschützen.

There is often confusion between the Kaiserschützen and the Kaiserjäger - who will be in Isonzo as the Austro-Hungarian mountaineer, already featured in a previous dev blog. We chose the Kaiserschützen to fill the marksman role since they were the more elite of the two units, and both were effectively mountain units even if the Kaiserjäger didn’t receive an official designation as such.

Although they were territorial forces (generally meaning reservists intended for local service) the Kaiserschützen were called to fight on the Eastern Front in Galicia, against the Serbians, and of course on the Italian Front closer to their homes. They were highly decorated and fought well.

[h2]Marksman Equipment and Perks[/h2]
The Marksman can choose from a variety of rifles, either with scope or with bayonets. While the Marksman fills the ‘sniper’ role, we explicitly chose to name them differently because they aren’t always most effective when hanging back at long range and thus not all marksmen have access to scoped rifles. Sometimes you need a sharpshooter to get into the thick of it as well, especially when on the attacking team!

Closeup on the moretto da bersagliere “Vaira”, without its canvas cover.

To this end Marksmen can also choose from a few different sidearms, from a revolver to semi-automatic pistols. In close combat, accurate pistol fire can be the difference between victory and defeat for your team. And the Marksman is especially well placed for this because of their perks, which apply to their sidearms as much as their primary weapons.

[h2]Marksman Perks[/h2]
The default perk allows spotting through a sniper scope, ideal for when you have a commanding view of objective areas and can identify foes for your allies closer to the action. But Specialist and Elite Marksman are perks which increase your potential accuracy by removing weapon sway when crouched or prone and by allowing unlimited aiming focus respectively. Having no weapon sway when crouched by an objective with a pistol makes you a lethal threat to anyone trying to get close, and will often have a much bigger impact than if you’re half the map away picking off the odd enemy soldier who comes into view.

Sniper gameplay.

The Stalker perk can be used multiple ways - it makes you unspottable, and while the first thing that comes to mind might be using it to hide out safely away from the action, you can also use it to sneak into trenches and buildings and ambush opponents who thought their recon flight had spotted everyone nearby. Last but not least, body armor reduces damage from explosions and suppression from bullets - both very useful when sitting on an objective, allowing you to keep fighting even under artillery bombardment or heavy fire. It also slows your movement a little.

Body armor is something you have to put on in-game and which visually appears on your character.

Body armor is tied into the customization system and you can see when friends and foes are wearing armor. They were a notable feature of the war on the Italian Front, being very useful for sentry and sniper duties while offering protection from the deadly rock fragments thrown out by shelling. For example, the Italians use the famous farina body armor worn by the Company of Death.

So don’t be afraid to really get stuck in as a Marksman! There are times where sniping officers, engineers and heavy weapon gunners at range is invaluable, but also times where having a cold blooded sharpshooter holding the objective is exactly what the doctor ordered.

An armored marksman using a firing slot in a stone wall. The armor will help protect him against grenades and artillery.

[h2]Steyr-Mannlicher M95 with C.Reichert Scope[/h2]
This is the workhorse Austro-Hungarian rifle fitted with Viennese made optics by C. Reichert - a company who also made microscopes.

The Steyr-Mannlicher M95 was a very effective rifle with an unusual straight-pull bolt action, meaning the user would pull it back then push it straight forward again, saving two motions compared to more typical bolt actions where the user had to go up-back-forward-down. This gave the M95 a very solid 20-25 rounds per minute rate of fire. Austro-Hungarian soldiers nicknamed it the ‘Ruck-Zuck’ rifle (meaning ‘back and forth’ rifle).

M95 with scope.

[h2]So ends another Isonzo Intel[/h2]
There’s plenty more to come, don’t worry! Our Isonzo closed beta tests are still ongoing as well, and we’re open for more applicants! If you’re interested, you can sign up here.

You can wishlist Isonzo on Steam already!

https://store.steampowered.com/app/1556790/Isonzo/

Dev Blog #16 - Gorizia Part Two

Welcome back to our reveal of the Gorizia map, including the complete flyover video! Our last blog left off at the river - now it’s time to force a crossing.

[h2]Crossing the Isonzo[/h2]
The final two objectives are both on the far side of the river: a capture point in the train station and a sabotage objective in the town square. However, this final part of the Gorizia map is a large combat area, so the construction and destruction of forward spawn points will be a top priority for both sides!

The Isonzo river (now commonly known as the Soča river) was shallow where it ran past Gorizia, and much like in the final stages of Monte Sabotino it is easy to ford it. But just because it’s easy to move across doesn’t mean it’s safe to do so! Both cover and concealment are limited on the water, and both banks of the river have buildings or defensive positions prepared.

The Austro-Hungarian trenches on the city side of the river. There are spots for both an Austro-Hungarian and an Italian forward spawning point, so expect heavy fighting here.

The attackers and defenders alike will find themselves crossing the river - the Austro-Hungarians first, as they try to counterattack and prevent the Italians establishing a foothold near the factory. Assuming they fail to do so, the Italians will then need to force a crossing on their way to the final objectives of the map - the railway station and a courtyard full of supplies.

A dugout alongside (and underneath) the railway line. In-game the Italians can build a forward spawn point here.

Historically there wasn’t a great deal of resistance at this point, with most of the fighting taking place on the Monte Calvario beforehand (covered in last week’s dev blog). Austro-Hungarian commander Svetozar Boroević - a skilled senior officer who was nicknamed ‘the Lion of the Isonzo’ for his defensive operations in the theater - did want to try and hold a line along the river, but simply didn’t have the troops or equipment to do it. In Isonzo you can expect to face firm resistance when playing as the Italians!

Attacking into the park that houses one of the final objectives.

[h2]City Streets[/h2]
If they make it across the river and can establish their forward spawn points, the Italians will be well positioned to continue to the objective zones. The sabotage objective is a gun position in a park, and to reach it the Italians will need to attack across a courtyard from the train station, or navigate ruined buildings and battle scarred city streets. This was an interesting change of scene for us, being the first urban environment to be featured in the WW1 Game Series.

A comparison of our in-game city to historical photographs.

As always we made plentiful use of references to make sure everything is as authentic as possible. We have recreated parts of the fortresses of Douaumont and Przemyśl before, as well as Russian village buildings, but these are the first larger civilian buildings outside of churches to be in-game. The painted walls combined with the bright greens of the park come together to form a very different environment to most First World War battlefields. It’s certainly no less dangerous, however. The attackers will have to decide if they want to concentrate on destroying the heavy guns in the park first, or if they want to try to take and hold the train station first…

A view over the city park and courtyard towards the train station. The sabotage objective is in the park.

[h2]The Train Station[/h2]
Another route forward is via the railway yard instead of through the streets. This leads up to the railway station where Second Lieutenant Aurelio Baruzzi would raise his flag. The station is designed for a large flow of people in peacetime, and as such has multiple entrances on all sides, as well as plenty of windows which now serve as extra entryways. Inside there is an Austro-Hungarian command post and sandbags which provide cover from enemies outside the building, but also can hide ambushers.

The train yard and station interior.

As one of the rare structures with the roof still intact, you won’t be able to bomb out the train station defenders. More work for grenades and bayonets! That isn’t to say that supporting artillery or gas won’t be useful in deterring counter-attacks and reinforcements. Stay alert and be prepared for attacks from any direction.

Comparison of the in-game train station to historical photo.

As you can see, these final two objectives will not be easy ones for the Italians. Success will hinge on securing the forward spawn points across the river, and then making use of the multiple routes forward to keep the Austro-Hungarian defenders off balance so that they cannot simply camp out and fortify one or two paths. For the Austro-Hungarians, it’s always worth trying to raid and destroy the Italian forward spawn points, but especially the gun pit should be well defended - the train station can be recaptured if lost, but once that dynamite goes off the guns are gone for good.

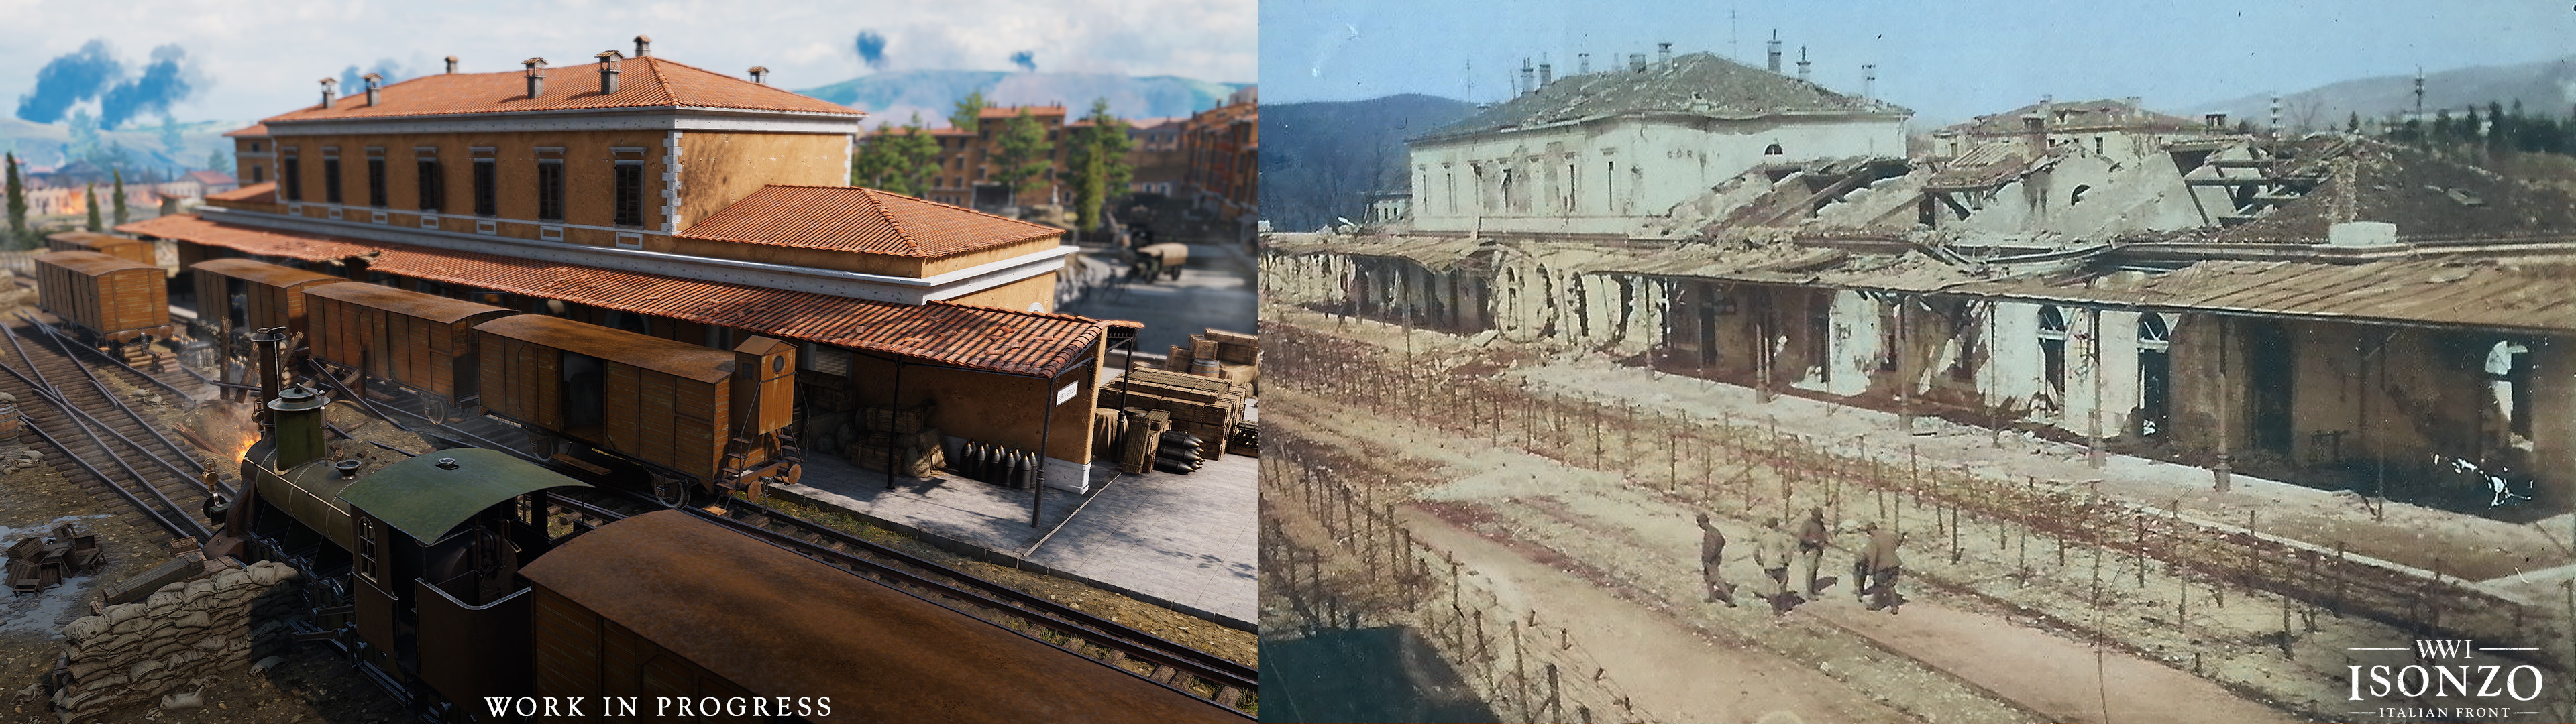
Attacking the station through the train yard.

[h3]We’ll close off with the complete Gorizia flyover video! Enjoy, and we’ll see you next time for another class deep dive…[/h3]

[previewyoutube][/previewyoutube]

[h2]Verdun Free Weekend![/h2]
Today is Verdun’s seventh year anniversary (it was launched into Early Access back in 2013!) and to celebrate the game is free to play on Steam this weekend and highly discounted to buy and keep. Check it out, invite your friends who haven’t experienced the mud and blood of trench warfare, and stay sharp out there!


And talking about sharp, you can win yourself some great goodies by testing how sharp your Verdun knowledge is, by taking this quiz.

Enjoy the weekend and don’t forget you can wishlist Isonzo on Steam already!

https://store.steampowered.com/app/1556790/Isonzo/

Dev Blog #15 - Gorizia Part One

[h2]Prepare for battle this summer![/h2]
Before we jump into this week’s dev blog, we would like to announce that Isonzo will be released this Summer, 2022! We needed a bit more time to ensure a great experience on all devices. As always, we’ll give you a more precise date as soon as we have it. Now, onto…

[h2]Gorizia[/h2]
Gorizia is the third map in the Sixth Battle of the Isonzo Offensive - as we explained back in our very first dev blog, battles will be fought on Monte San Michele and Monte Sabotino first, and if the Italians win those battles they will enjoy more reinforcements when fighting on Gorizia. We’ve relaxed the original plan where the Italians would need to win at least one of the preceding battles before being able to attack Gorizia. Here’s Robin, one of our developers, discussing Gorizia:

[previewyoutube][/previewyoutube]
The battle for Gorizia begins with Mount Calvario just outside the city, considered for more than a year as a stronghold that could not be overcome by Italian troops - however, it fell during the night between the 7th and 8th of August, shortly after the Italian conquest of Sabotino. Austro-Hungarian counterattacks, even after the arrival of the first reinforcements on 11th August, did not change the course of this battle.

Monte Calvario - as you can see, the Italian facing side is heavily damaged and fortified, while the city facing side still has bushes and trees.

It was August 8th, 1916 when the Italians began their attack on Gorizia itself. Austro-Hungarian commander Svetozar Boroević wanted to mount a strong defense at the river, but his reserves were exhausted from attempting to contain earlier attacks at Monte San Michele and Monte Sabotino. They did the best they could, but ultimately had to withdraw in the night.

The first stage of the Gorizia attack is to crest Monte Calvario outside the city. The Austro-Hungarians have dug-in heavily on the slopes, and unlike the rockier mountains of Sabotino and San Michele there is plentiful greenery to offer concealment to defenders and attackers alike… at least once you get through the area which has been strung with barbed wire and heavily shelled. Historically this was some of the toughest fighting the Italians faced in the push for Gorizia.

The fortified slope facing away from the city - the first obstacle the Italians must defeat.

Next is reaching the city itself. Once they have control of the hill, the Italians will be able to construct heavy machine guns of their own overlooking the next objectives, and this fire support will be much appreciated because the ground is somewhat exposed. A lumberyard and graveyard offer cover, but wide streets separate these from the hill and then from the paper factory that sits on the bank of the river.

The elevated view over the factory and city beyond, compared to a historical image. You can see the lumber yard and the graveyard.

A closer look at the graveyard in-game.

There is a railway underpass near the city named after the first Italian soldier to enter - 19 year old Second Lieutenant Aurelio Baruzzi. The developer video at the start of this Isonzo Intel tells Baruzzi’s story, and it’s a fascinating one. Not only did Baruzzi and his comrades capture hundreds of Austro-Hungarian soldiers in the tunnel along with artillery pieces, but he was also the one to raise the Italian flag over the train station - that’s an important objective that we’ll get to in next week’s dev blog…

Aurelio Baruzzi.

In Baruzzi’s own words: “I have sworn to my flag that it will fly over the houses of Gorizia. Now the flag helps me for the second time. I unfurl it and shake it open. Our gunners see it and lengthen their fire. We run across the field to the station…[Soon after], the flag is flying from the highest roof-beam under the hot August sun.”

The next capture points are in and adjacent to the paper factory on the banks of the Soča river (also known as the Isonzo). Getting to the factory is only step one, and securing it may prove challenging.

The entrance to the factory, in Isonzo and as it was.

The factory is a series of buildings connected by large courtyards, where everything from machinery and collapsed ceilings to discarded shells and ammo crates provides cover and hiding places. You should be ready for close quarters action, and bayonets, pistols and melee weapons will likely prove very useful here. Just outside the factory is another objective location: the gun position between the factory and the railway line.

The riverbank gun position outside the factory.

There are abandoned Austro-Hungarian guns here, but the Italians can construct a functional mountain gun to bombard the opposite bank. The river is shallow, and doesn’t pose much of an obstacle so you can expect Austro-Hungarian counterattacks across the water. Another key terrain feature is the railway bridge you can see in the GIF above. It offers an alternate route across the river, while providing a view (and firing lines) down over the riverbank gun position.

[h2]Play Isonzo at PAX East, or join the beta![/h2]
We are at PAX East this year until April 24. Isonzo is playable there too - come find us at booth 10050! Be sure to stop by, fight on the Italian front and have a chat!


If you aren't attending PAX, the Isonzo closed beta tests are still ongoing, and we’re looking for more participants! If you’re interested, you can sign up via this link on our Discord.

There’s no guarantee that everyone who signs up will get a chance to be part of the closed beta, since we pick people based on various criteria from hardware and server region to playtime. But given that we’re keen for more people to try the game, the odds are good. Don’t forget to wishlist Isonzo as well!

https://store.steampowered.com/app/1556790/Isonzo/

[h2]Crossing the river[/h2]
Join us next time as we enter the city proper - the city streets, the train station where Baruzzi would raise his flag, and the full flyover video of the map! We’ll close out with a video comparison of our in-game Baruzzi tunnel, and drone footage of how it looks today. See you next time!

[previewyoutube][/previewyoutube]