1. Isonzo
  2. News

Isonzo News

Dev Blog #27 - Mountain Guns

[h2]Mountain Guns[/h2]
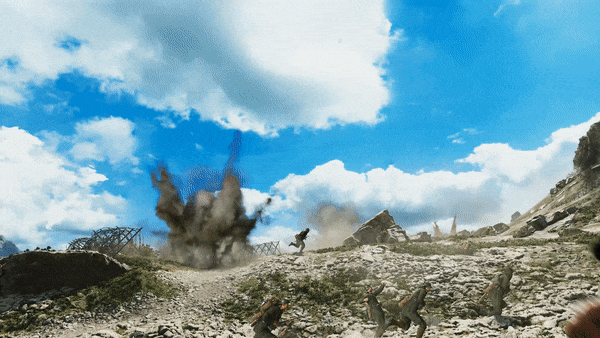
Mortars and heavy machine guns aren’t the only static heavy weapons you’ll be able to operate in Isonzo!

Italian mountain gun in action.

Mountain guns are specifically designed to be more portable than regular artillery pieces for use in areas where it isn’t practical to tow an entire gun. They can usually be broken down into smaller pieces that can be carried by mules, horses, or people. They take their name from mountains - the prime example of difficult terrain - though they’re also called pack guns or pack howitzers because they can be ‘packed up’. Nowadays there are standard artillery pieces light enough to be transported by helicopter which removes the need for dedicated mountain guns - not to mention the variety of other weapons which can serve the same purpose as artillery.

Italian troops manning a Cannone da 65 near the Sass di Mezdi.

In-game engineers can construct them at preset locations, like mortars and heavy machine guns. Once built, they are used to provide direct fire support - they’re too long ranged to be used in an indirect fire role on Isonzo’s battlefields, but that’s what you have mortars for! They pack more punch than mortars, and when aimed carefully their splash damage can hit enemies in cover that would be impossible to hit with machine guns. Just make sure to have a rifleman or two with ammo box equipment to keep them supplied, because they have a relatively high rate of fire!

[h3]Italian Cannone da 65 Model 13[/h3]


Beginning service with the Italian army a year before the war started in 1913, it was used throughout the First World War by mountain troops. Firing 65mm shells, the Cannone da 65 could be broken down into five loads, or moved by horse with the simple trailing arm.

It was also used in the Fiat 2000 heavy tank (only two of which were made), and was given to regular infantry when the mountaineers got new guns after the war. It was popular thanks to being lightweight and reliable.

[h3]Austro-Hungarian Gebirgskanone Model 1915[/h3]


This Austro-Hungarian artillery piece had a somewhat troubled beginning. Originally designed by the Skoda company before the First World War began to fill a request to standardize and replace existing mountain guns, it was found to be the best candidate available… but it didn’t quite meet one of the design specifications. It broke down into six pieces rather than five, and so Skoda were asked to produce a lighter 7cm version instead of their initial 7.5cm design.

They did this, but testing indicated that their new 7cm design was inferior to the 7.5cm version. At that point Austro-Hungarian command decided to go ahead with the original design (after all, six versus five pieces didn’t make that much difference). Because of this delay, the first Gebirgskanone Model 1915s started to arrive in April 1915, a whole year later than they were first planned to be delivered! Although perhaps a little physically fragile, the Gebirgskanone Model 1915 was a capable gun and earlier production would have been beneficial for the Austro-Hungarians.

[h2] Enlist to fight on the Italian Front! [/h2]
Before we start our recon of the upcoming dev blogs, we wanted to share a new competition to celebrate the announcement! You can win a game key and other Isonzo goodies by entering our raffle - all you have to do is sign up for the WW1 Game Series newsletter on our website to enter the raffle and get all the latest news from the development frontlines! Who knows... maybe one of you’ll be the lucky soldier who’ll be receiving an Isonzo goodie pack, including one of the first Isonzo game keys and a special Isonzo poppy grenade!

You'll also find WW1 inspired Isonzo propaganda posters! You can download them and use them as your wallpaper, banner or even print them out and hang them up!


[h3]More dev blogs to come before launch day![/h3]
Isonzo is releasing on September 13th, and you can already wishlist it. Until then we have plenty more dev blogs lined up, including another map, melee weapons, and more!

https://store.steampowered.com/app/1556790/Isonzo

Dev Blog #26 - Progression System and Unlocks

As we’ve explained before, Isonzo has a different progression system to our previous games. In Verdun and Tannenberg you gained points as you fought which could be used to unlock new loadouts for any role or squad. So how does it work in the new Isonzo class system?


[h2]The Barracks[/h2]
From the main menu (and during battles) you can visit the barracks to choose how to visually customize each of your classes, see your level per class, and track your progression through the challenges for each class. These challenges are how you unlock new weapons, equipment and perks, while leveling up means new challenges become available.

Switching between classes in the Barracks.

[h2]Unlocking More Choices[/h2]
In Isonzo, you unlock new class options by leveling up through battle experience, then completing class challenges. These challenges teach players how to use the strengths of their class, e.g. Engineers have challenges relating to construction, heavy weapons, and sabotage objectives, while Officers need to use their flares, call in support, and issue orders. Completing these challenges will unlock new weapons, equipment, and perks for the class. You unlock weapons for both factions regardless of which side you’ve been playing most - the challenges are class based, not faction based.

Here’s a WIP view of the Mountaineer class’s first set of challenge rewards. Since they haven’t reached level two, the challenge isn’t yet active.

You will also still earn experience points and ranks as you play, up to rank 20. Challenges are unlocked when you reach certain levels. For instance in the current design the first challenge for each class is unlocked once you reach level two. As we said above, the challenges are designed to encourage people to play the classes in ways that make use of their unique advantages and benefit their team, so they also take on something of a tutorial role and are paced with that in mind.

The Rifleman
As an example, when playing as a Rifleman you’ll first need to gain a level. You do this by simply playing the game - almost everything you can do will gain you some XP. Once you reach level two, the first challenge will unlock: Combat Experience I, which simply requires you to kill 10 enemies and participate in capturing or recapturing an objective. That challenge will unlock the ammo box equipment along with two rifles, one Italian and one Austro-Hungarian. Further down the line, another challenge will require you to use that newly unlocked ammo box to resupply your comrades.

The rifleman’s level 10 challenge screen. When completed, Grenadier I will unlock rifle grenades!

A later challenge unlocks grenades as secondary weapons, which leads on to the next challenge where you must make use of those grenades to achieve Grenadier I, which calls for you to kill 20 enemies with grenades and 20 enemies with the bayonet. You can see how this can help new players learn by doing - as they go to complete the challenges, they’ll come to understand the tools at their disposal. As a final treat, players who reach level 20 with a class will unlock late war uniforms for that class!

The late war Italian Marksman uniform unlocked at level 20.

[h2]Isonzo will release September 13th[/h2]
Launch day is drawing closer! Remember that you can already wishlist Isonzo:

https://store.steampowered.com/app/1556790/Isonzo

Dev Blog #25 - Death from above

Today we’re looking at the third set of support options available to officers in Isonzo: the Aviation Corps! We explained artillery support available and the Chemical Regiment options for gas and smoke in previous dev blogs. The Aviation Corps has the same format of five options, with each tier being relatively more powerful but also having a longer cooldown before it becomes available. Let’s jump in!

[h2]Recon[/h2]
The Recon flight is a staple WW1 Game Series aviation call-in since Verdun, and for good reason. The early aircraft used in WW1 simply didn’t have the ability to carry a large quantity of explosive ordinance, and so had much more impact by performing reconnaissance missions. In particular the ability of aircraft to spot for artillery batteries could allow more accurate artillery fire at greater distances, though communication between the aircraft and the batteries was a problem.

Italian SPAD VI Recon over Monte Calvario, 1917.

In Isonzo as in our earlier games, recon flights identify enemy positions, highlighting enemy infantry on your minimap. This information is useful for everyone, whether they’re a rifleman assaulting a trench, an officer deciding where to call for artillery support, or a sniper looking for targets. The recon flight has the fastest cooldown of the aviation powers, so can be used plentifully. However, if you have good officers or mountaineers who are using their ability to spot enemies, you’d do better to hold off until more direct impact call-ins are available…

[h2]Strafing Run[/h2]
The third of the five options is the Strafing Run. A fighter will strafe in a line from the target point, direction chosen by the officer making the support call. These bullets don’t have the raw firepower of the heavy artillery which is the third artillery call-in option, but the strafing run is the lowest tier call-in which targets a line! If you place your flares right, this makes it lethal for hitting straight trench lines. Place a flare at one end of the line, then call a strafing run to go all the way along the trench. Given that a lot of the trenches in Isonzo lack much in the way of roofing, enemies in a targeted trench won’t be able to avoid the attack.

Italian aircraft strafed enemy positions in late December, 1917 - a young Erwin Rommel reported it as such in his diaries, during the fighting for Grappa: “Enemy air formations drop down to a few meters above the ground and strafe our positions and those of the contiguous units.”

[h2]Bombing[/h2]
As we said before, early WW1 aircraft weren’t very effective bombers. Technology advanced rapidly though, and in Isonzo we got to represent some of the huge biplane bombers like the Italian Caproni! Compared to modern bombers their bomb load was a little lacklustre, but they made a big impact on public and military opinion at the time, and used right could still influence battles.

Austro-Hungarian Hansa I bomber - those cross markings might appear German, but they are ‘cross pattées’, which were used by Germany but also other countries at various points in history. This includes the Austro-Hungarians, from 1916 onwards - in part because aircraft supplied from German factories came with it already applied!

In fact, Italy was something of a pioneer in military aviation, having used aircraft in combat during a war with the Ottoman Empire in 1911. The Italian Corpo Aeronautico Militare conducted a large number of ground attack missions, with the aforementioned Caproni bombers starting raids on Austro-Hungarian cities in 1915. During 1916 some of the Capronis were diverted to supporting frontline troops in the Battle of Caporetto since there was such demand from Italian infantry for close air support. While the imprecision of this bombing (no modern bomb sights, for instance) limited the real damage done, an Austro-Hungarian officer’s diary described the sight of planes flying so low that bombs could be seen dropping from the fuselage as having a significant impact on morale!

The first bombing option available is the second tier: a small area bombing, where a fighter biplane will drop 10 bombs in an area. This is effectively a slightly more accurate and concentrated area attack than the low tier artillery call-ins, but with less total firepower. Useful if your artillery is still on cooldown or you want to knock out specific points like heavy machine guns.

An Italian Caproni Ca. 3 dropping bombs.

Heavy Bombers
At tiers four and five though, you get access to the heavy bombers. Tier four is a single bomber targeting a line, and tier five is a three aircraft bomber squadron which does the same thing with more firepower and a wider spread. The single bomber is again an earlier line targeting call-in you can get earlier than the creeping barrage, but both bombing runs distinguish themselves from the artillery by producing a faster series of explosions. While the creeping barrage is designed to allow infantry to advance behind it and so moves slowly, bombing runs are intended to deal as much damage as possible before enemies can react. Of course, you can also combine call-ins from different categories - lead with a bombing run to clear an enemy frontline trench, then have the creeping barrage start behind it to destroy enemy reinforcements while your allies advance!

Heavy bombers in action!

[h2]Support roster complete[/h2]
That’s all the support options in Isonzo explained! Officers will have access to all three categories of support, and since they each have independent cooldowns it’s vital to make use of them all. Which call-ins are you most excited to try out when Isonzo launches this September 13th?

https://store.steampowered.com/app/1556790/Isonzo

Dev Blog #24 - Dolomites in Depth

As we explained last week, the Dolomites map officially has two defensive lines, each with a single capture point objective. In reality, however, the attacking Italians will need to break through more than just two lines of defense - they just don’t all have objective points. To illustrate, the first thing attackers will see on leaving their jump-off points is a strip of barbed wire along the length of the rocky hillside ahead of them. They’ll need to cut the wire and climb the slope while under fire from the Austro-Hungarian defenders.

The first line of wire the Italians must breach.

If they make it up there, they’ll find a second line of wire and another steep and rocky hillside to scale. It’s at the top of this slope that the first capture objective lies: the Dreizinne Hutte refuge. The ruins of it, anyway…

Some of the trenches that must be conquered.

There are multiple heavy machine gun positions amidst the remains of the refuge, and enough of the building is still standing to provide a little cover from artillery. It is also used by officers to call in support - first the Austro-Hungarians, then the Italians once they take control. As you can see from the gif above, there are multiple routes up to the objective: you should avoid getting tunnel vision and only attacking or defending one route. The strongest defensive position can crumble when attacked from an unexpected angle.

The Dreizinne Hutte is a capture objective, so the Italians will need to take and then hold it for some time, while taking fire and facing counter attacks from the Austro-Hungarian positions higher up the mountain. The good news is the slope doesn’t offer a lot of cover for such counter attacks. The bad news is, as the attackers you’ll have to be crossing that dangerous slope on your way to…

The Dreizinne Hutte - the capture zone is in the main cluster of ruins.

[h2]The Sasso di Sesto[/h2]
The second and final objective is the command post at the peak of the mountain. To get there, the Italians have to make another uphill assault on a rocky trenchline overlooking the Dreizinne Hutte refuge.

Looking down on the Dreizinne Hutte at advancing Italian infantry.

Both sides can construct forward spawning points in these trenches so they’ll be hotly contested. There’s a lot of scope for engineers to place wire and sandbags to hinder enemy movement, while the Assault class and their grenades will also be able to do a lot of damage. To support their attack, the Italians can build a mountain gun just outside the Dreizinne Hutte, but depending on how organized the Austro-Hungarians are it might be wise to wait for their Officers to prepare intense fire support from creeping barrages, smoke screens, and/or bombing runs (more on those in a future dev blog!) before starting their attack.

The peak of the Sasso di Sesto.

Once they reach the top, the Italians still need to evict the Austro-Hungarians from the collection of wooden lodges serving as barracks and command post. A combination of rocky outcrops, stone walls, and the buildings themselves mean that there aren’t a lot of long sight-lines, so sniper rifles and light machine guns are probably less useful than bayonets and pistols. Enemies can appear from almost all sides so you’ll have to trust your teammates to have your back.

Fighting on the peak.

Some of the hut interiors.

[h2] Don't forget to enlist [/h2]
We called for your help on the Italian Front by enlisting for the war last week. You enlist by signing up for the WW1 Game Series newsletter on our website to enter the raffle and get all the latest news from the development frontlines! You can win a game key and other Isonzo goodies by entering our raffle.
Who knows... maybe one of you’ll be the lucky soldier who’ll be receiving an Isonzo goodie pack, including one of the first Isonzo game keys and a special Isonzo poppy grenade!


[h2]That’s all for today![/h2]
Don’t forget that Isonzo will be released on September 13th! We'll close out with the complete Dolomites flyover video! There's plenty more dev blogs on the way before the release, so watch this space!

https://store.steampowered.com/app/1556790/Isonzo/

[previewyoutube][/previewyoutube]

Dev Blog #23 - The Dolomites

[h2]Isonzo is coming September 13th![/h2]
Following Isonzo's release date announcement yesterday (the battle begins on September 13th!) we wanted to share more about the map featured in the trailer: the Dolomites! Here's the trailer again if you missed it...

[previewyoutube][/previewyoutube]
[h2]Enlist to fight on the Italian Front![/h2]
Before we start our recon of the new map, we wanted to share a new competition to celebrate the announcement! You can win a game key and other Isonzo goodies by entering our raffle - all you have to do is sign up for the WW1 Game Series newsletter on our website to enter the raffle and get all the latest news from the development frontlines! Who knows... maybe one of you’ll be the lucky soldier who’ll be receiving an Isonzo goodie pack, including one of the first Isonzo game keys and a special Isonzo poppy grenade!

It'll look something like this...

[h3]Propaganda Posters[/h3]
We've also created some WW1 style propaganda posters if you'd like to help us spread the word about Isonzo! Some of you might’ve seen them at our expo visits in April this year - we’ve created some amazing looking propaganda posters! Feel free to share these images, online and offline. We can always use more soldiers at the front!


[h2]The Dolomites[/h2]
We’ve seen some literal uphill battles in previous dev blogs (see the hill outside the city of Gorizia and the first few defensive lines on Sabotino) but the Dolomites are on a whole different level. Historically the Italians attacked early in the war during August 1915 aiming to take control of Torre di Toblin: a rocky tower dominating the area. They got as far as capturing the Sasso di Sesto, where they established a base which would remain until the end of the war despite Austro-Hungarian assaults - particularly one in 1917 where tunnels and a night time raid led to the recapture of the Sasso di Sesto… for a short time. The Italians counterattacked in the morning and retook the peak. In Isonzo it’s the initial Italian capture of the Sasso di Sesto in 1915 which you will experience.

Comparison images, with photo on the left and in-game on the right! In both the Sasso di Sesto is in the foreground on the left, with the Torre di Toblin looming over it.

Italian troops advancing under fire.

Although the Sasso di Sesto is not that high (for a mountain) the paths leading up to it are very steep. This mountaintop battlefield also has some incredible scenery - in the background are the stunning Tre Cime di Lavaredo, also called the Drei Zinnen, known in English as the Three Peaks of Lavaredo. As you climb higher the views only get more impressive!

The Tre Cime di Lavaredo as seen in real life and in-game.

In-game there are two defensive lines, each line with a single capture objective. First up is the Dreizinne Hutte refuge, and after that is the Sasso di Sesto itself. Don’t be fooled into thinking that makes things simple though! The attackers have an extremely steep mountainside to climb that poses some unique challenges.

One of the routes up the mountain.

Italian officers will need to be bold if they want to get flares past the very frontlines of the battlefield - because while you can normally use a shallow angle on your flare gun to cover a large distance, here the mountain is so steep that you’ll need to be quite far forward or your flares will hit the mountainside rather than getting up above the enemy positions! Naturally the Austro-Hungarians will have no such trouble, and their commanding height advantage will enable them to easily place flare markers anywhere they choose from relative safety.

When attacking you’ll need to be careful with grenades since they could end up sliding back down the hill at you - this influences the defenders too though since they’ll need to cook off their grenades or risk them sliding down past their targets.

Close quarters action assaulting a trench line.

We’ll return to the Dolomites to cover each objective in more detail. Don't forget you can already wishlist Isonzo ahead of the September 13 release!


[h2]Until next time soldiers![/h2]

https://store.steampowered.com/app/1556790/Isonzo/