Dev Blog #17 - The Marksman Class
[h2]Marksman[/h2]
Assist your team by eliminating high value enemy targets from a distance, or breaking up enemy attacks with lethally accurate short range fire.
Bersaglieri
The Kingdom of Italy’s Marksmen are the Bersaglieri, who have a storied history going all the way back to 1836. Originally formed to serve in the Royal Sardinian Army as mobile infantry in place of expensive cavalry, they are renowned for their running - they continue to run today during parades and when on barracks duty! Combined with high standards for marksmanship, they served well as skirmishers and shock troops as required. Back in the 1800s the bersaglieri were envisioned as being mountain troops in addition to their other roles, and so the formation of the Alpini Corps in 1872 led to quite a rivalry between the two elite groups.
 A bersaglieri sharpshooter, with the distinctive feathered hat named the moretto da bersagliere or “vaira” in honor of Giuseppe Vayra.
The distinctive black capercaillie feathers in their hats and helmets were traditionally worn in combat - originally to provide camouflage and keep the sun out of the eyes when shooting. During WW1 there were many different bersaglieri formations raised, including cyclist units.
Kaiserschützen Kaiserschützen in their natural habitat, note the characteristic “Spielhahnstoß” feather on their “feldkappe” caps.
The Kaiserschützen originated in a very different form back in 1511, which required the state of Tyrol to be able to muster 20,000 volunteer troops on request to defend their home. These Landesschützen became known as excellent soldiers. The transformation of the Austrian Empire into the Austro-Hungarian Empire in 1867 shook up the organization of the military, and in 1890 the troops of the Landesschützen-Kaiserschützen became part of the Austrian national army (the Imperial-Royal Landwehr), and ceased to be drawn exclusively from Tyrol, with men being drawn from Salzburg, Austria, and Vienna among other places. They maintained their excellent standards, however.
 A grizzled Kaiserschützen.
There is often confusion between the Kaiserschützen and the Kaiserjäger - who will be in Isonzo as the Austro-Hungarian mountaineer, already featured in a previous dev blog. We chose the Kaiserschützen to fill the marksman role since they were the more elite of the two units, and both were effectively mountain units even if the Kaiserjäger didn’t receive an official designation as such.
Although they were territorial forces (generally meaning reservists intended for local service) the Kaiserschützen were called to fight on the Eastern Front in Galicia, against the Serbians, and of course on the Italian Front closer to their homes. They were highly decorated and fought well.
[h2]Marksman Equipment and Perks[/h2]
The Marksman can choose from a variety of rifles, either with scope or with bayonets. While the Marksman fills the ‘sniper’ role, we explicitly chose to name them differently because they aren’t always most effective when hanging back at long range and thus not all marksmen have access to scoped rifles. Sometimes you need a sharpshooter to get into the thick of it as well, especially when on the attacking team!
 Closeup on the moretto da bersagliere “Vaira”, without its canvas cover.
To this end Marksmen can also choose from a few different sidearms, from a revolver to semi-automatic pistols. In close combat, accurate pistol fire can be the difference between victory and defeat for your team. And the Marksman is especially well placed for this because of their perks, which apply to their sidearms as much as their primary weapons.
[h2]Marksman Perks[/h2]
The default perk allows spotting through a sniper scope, ideal for when you have a commanding view of objective areas and can identify foes for your allies closer to the action. But Specialist and Elite Marksman are perks which increase your potential accuracy by removing weapon sway when crouched or prone and by allowing unlimited aiming focus respectively. Having no weapon sway when crouched by an objective with a pistol makes you a lethal threat to anyone trying to get close, and will often have a much bigger impact than if you’re half the map away picking off the odd enemy soldier who comes into view.
 Sniper gameplay.
The Stalker perk can be used multiple ways - it makes you unspottable, and while the first thing that comes to mind might be using it to hide out safely away from the action, you can also use it to sneak into trenches and buildings and ambush opponents who thought their recon flight had spotted everyone nearby. Last but not least, body armor reduces damage from explosions and suppression from bullets - both very useful when sitting on an objective, allowing you to keep fighting even under artillery bombardment or heavy fire. It also slows your movement a little.
 Body armor is something you have to put on in-game and which visually appears on your character.
Body armor is tied into the customization system and you can see when friends and foes are wearing armor. They were a notable feature of the war on the Italian Front, being very useful for sentry and sniper duties while offering protection from the deadly rock fragments thrown out by shelling. For example, the Italians use the famous farina body armor worn by the Company of Death.
So don’t be afraid to really get stuck in as a Marksman! There are times where sniping officers, engineers and heavy weapon gunners at range is invaluable, but also times where having a cold blooded sharpshooter holding the objective is exactly what the doctor ordered.
 An armored marksman using a firing slot in a stone wall. The armor will help protect him against grenades and artillery.
[h2]Steyr-Mannlicher M95 with C.Reichert Scope[/h2]
This is the workhorse Austro-Hungarian rifle fitted with Viennese made optics by C. Reichert - a company who also made microscopes.
The Steyr-Mannlicher M95 was a very effective rifle with an unusual straight-pull bolt action, meaning the user would pull it back then push it straight forward again, saving two motions compared to more typical bolt actions where the user had to go up-back-forward-down. This gave the M95 a very solid 20-25 rounds per minute rate of fire. Austro-Hungarian soldiers nicknamed it the ‘Ruck-Zuck’ rifle (meaning ‘back and forth’ rifle).
 M95 with scope.
[h2]So ends another Isonzo Intel[/h2]
There’s plenty more to come, don’t worry! Our Isonzo closed beta tests are still ongoing as well, and we’re open for more applicants! If you’re interested, you can sign up here.
You can wishlist Isonzo on Steam already!
https://store.steampowered.com/app/1556790/Isonzo/
Assist your team by eliminating high value enemy targets from a distance, or breaking up enemy attacks with lethally accurate short range fire.
Bersaglieri
The Kingdom of Italy’s Marksmen are the Bersaglieri, who have a storied history going all the way back to 1836. Originally formed to serve in the Royal Sardinian Army as mobile infantry in place of expensive cavalry, they are renowned for their running - they continue to run today during parades and when on barracks duty! Combined with high standards for marksmanship, they served well as skirmishers and shock troops as required. Back in the 1800s the bersaglieri were envisioned as being mountain troops in addition to their other roles, and so the formation of the Alpini Corps in 1872 led to quite a rivalry between the two elite groups.
A bersaglieri sharpshooter, with the distinctive feathered hat named the moretto da bersagliere or “vaira” in honor of Giuseppe Vayra.The distinctive black capercaillie feathers in their hats and helmets were traditionally worn in combat - originally to provide camouflage and keep the sun out of the eyes when shooting. During WW1 there were many different bersaglieri formations raised, including cyclist units.
Kaiserschützen
Kaiserschützen in their natural habitat, note the characteristic “Spielhahnstoß” feather on their “feldkappe” caps.The Kaiserschützen originated in a very different form back in 1511, which required the state of Tyrol to be able to muster 20,000 volunteer troops on request to defend their home. These Landesschützen became known as excellent soldiers. The transformation of the Austrian Empire into the Austro-Hungarian Empire in 1867 shook up the organization of the military, and in 1890 the troops of the Landesschützen-Kaiserschützen became part of the Austrian national army (the Imperial-Royal Landwehr), and ceased to be drawn exclusively from Tyrol, with men being drawn from Salzburg, Austria, and Vienna among other places. They maintained their excellent standards, however.
A grizzled Kaiserschützen.There is often confusion between the Kaiserschützen and the Kaiserjäger - who will be in Isonzo as the Austro-Hungarian mountaineer, already featured in a previous dev blog. We chose the Kaiserschützen to fill the marksman role since they were the more elite of the two units, and both were effectively mountain units even if the Kaiserjäger didn’t receive an official designation as such.
Although they were territorial forces (generally meaning reservists intended for local service) the Kaiserschützen were called to fight on the Eastern Front in Galicia, against the Serbians, and of course on the Italian Front closer to their homes. They were highly decorated and fought well.
[h2]Marksman Equipment and Perks[/h2]
The Marksman can choose from a variety of rifles, either with scope or with bayonets. While the Marksman fills the ‘sniper’ role, we explicitly chose to name them differently because they aren’t always most effective when hanging back at long range and thus not all marksmen have access to scoped rifles. Sometimes you need a sharpshooter to get into the thick of it as well, especially when on the attacking team!
Closeup on the moretto da bersagliere “Vaira”, without its canvas cover.To this end Marksmen can also choose from a few different sidearms, from a revolver to semi-automatic pistols. In close combat, accurate pistol fire can be the difference between victory and defeat for your team. And the Marksman is especially well placed for this because of their perks, which apply to their sidearms as much as their primary weapons.
[h2]Marksman Perks[/h2]
The default perk allows spotting through a sniper scope, ideal for when you have a commanding view of objective areas and can identify foes for your allies closer to the action. But Specialist and Elite Marksman are perks which increase your potential accuracy by removing weapon sway when crouched or prone and by allowing unlimited aiming focus respectively. Having no weapon sway when crouched by an objective with a pistol makes you a lethal threat to anyone trying to get close, and will often have a much bigger impact than if you’re half the map away picking off the odd enemy soldier who comes into view.
Sniper gameplay.The Stalker perk can be used multiple ways - it makes you unspottable, and while the first thing that comes to mind might be using it to hide out safely away from the action, you can also use it to sneak into trenches and buildings and ambush opponents who thought their recon flight had spotted everyone nearby. Last but not least, body armor reduces damage from explosions and suppression from bullets - both very useful when sitting on an objective, allowing you to keep fighting even under artillery bombardment or heavy fire. It also slows your movement a little.
Body armor is something you have to put on in-game and which visually appears on your character.Body armor is tied into the customization system and you can see when friends and foes are wearing armor. They were a notable feature of the war on the Italian Front, being very useful for sentry and sniper duties while offering protection from the deadly rock fragments thrown out by shelling. For example, the Italians use the famous farina body armor worn by the Company of Death.
So don’t be afraid to really get stuck in as a Marksman! There are times where sniping officers, engineers and heavy weapon gunners at range is invaluable, but also times where having a cold blooded sharpshooter holding the objective is exactly what the doctor ordered.
An armored marksman using a firing slot in a stone wall. The armor will help protect him against grenades and artillery.[h2]Steyr-Mannlicher M95 with C.Reichert Scope[/h2]
This is the workhorse Austro-Hungarian rifle fitted with Viennese made optics by C. Reichert - a company who also made microscopes.
The Steyr-Mannlicher M95 was a very effective rifle with an unusual straight-pull bolt action, meaning the user would pull it back then push it straight forward again, saving two motions compared to more typical bolt actions where the user had to go up-back-forward-down. This gave the M95 a very solid 20-25 rounds per minute rate of fire. Austro-Hungarian soldiers nicknamed it the ‘Ruck-Zuck’ rifle (meaning ‘back and forth’ rifle).
M95 with scope.[h2]So ends another Isonzo Intel[/h2]
There’s plenty more to come, don’t worry! Our Isonzo closed beta tests are still ongoing as well, and we’re open for more applicants! If you’re interested, you can sign up here.
You can wishlist Isonzo on Steam already!
https://store.steampowered.com/app/1556790/Isonzo/
 The Austro-Hungarian trenches on the city side of the river. There are spots for both an Austro-Hungarian and an Italian forward spawning point, so expect heavy fighting here.
 Attacking into the park that houses one of the final objectives.

 A view over the city park and courtyard towards the train station. The sabotage objective is in the park.
 The train yard and station interior.
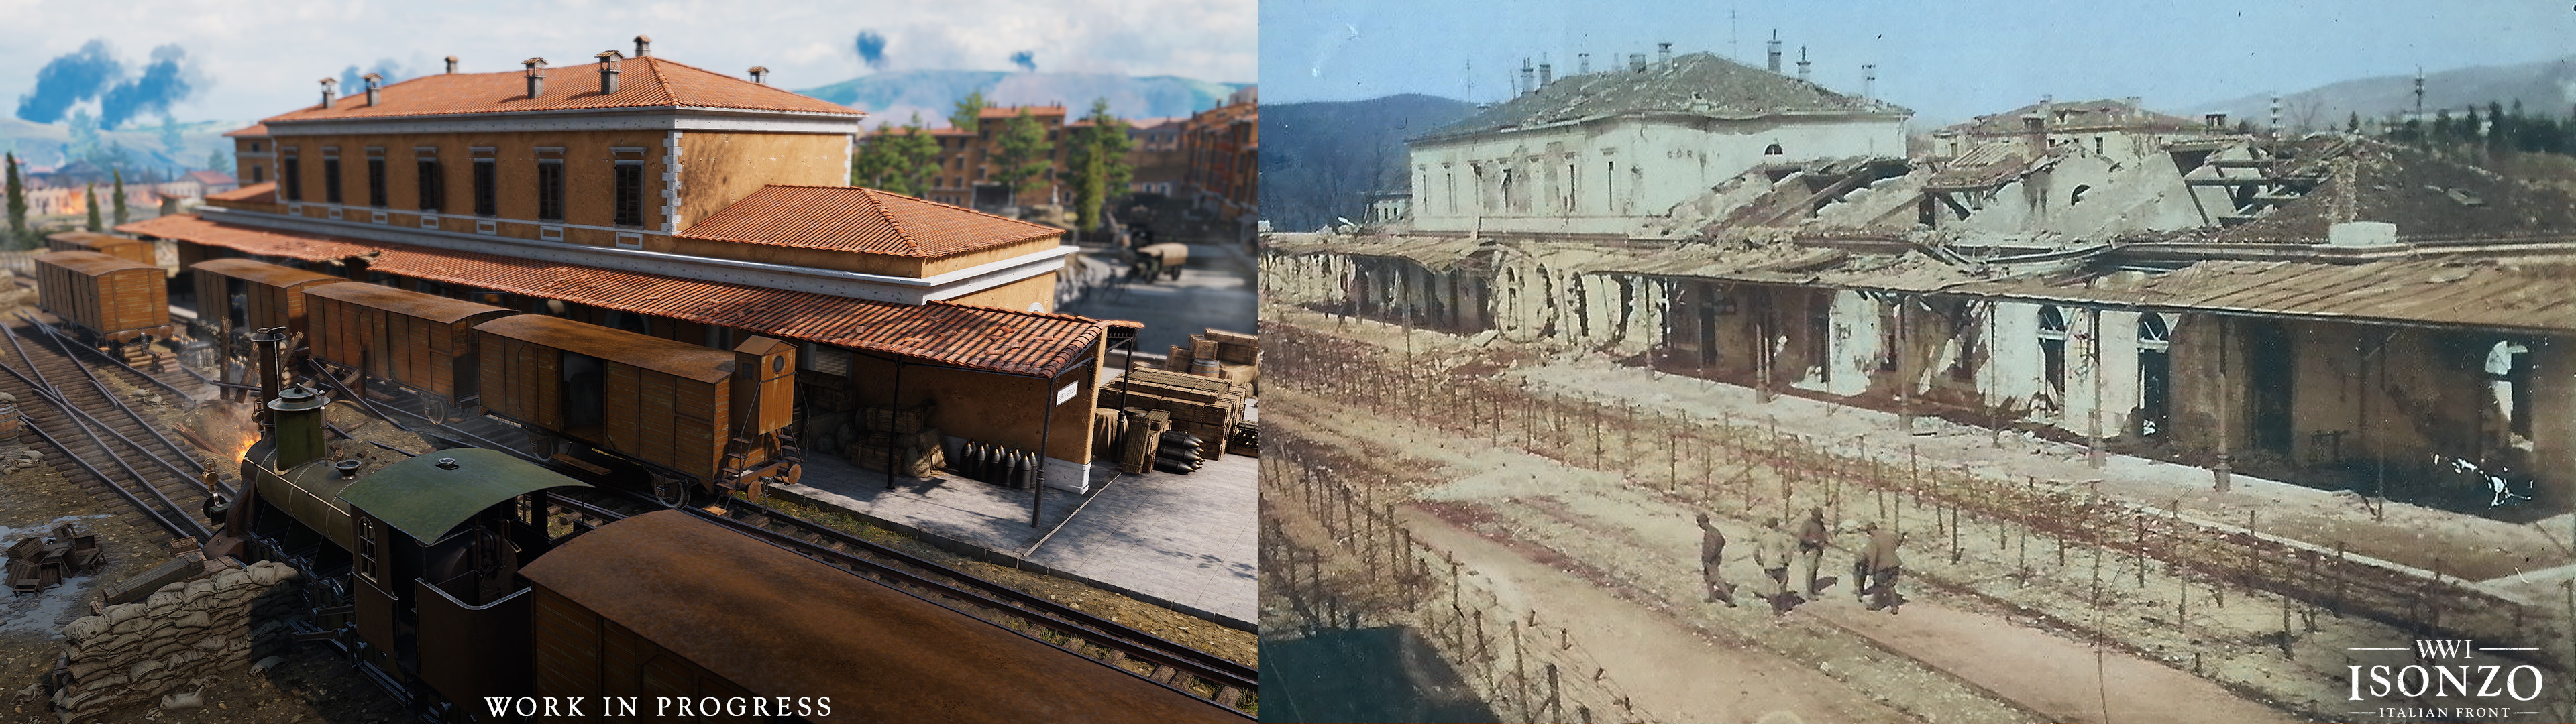
 Attacking the station through the train yard.
 Monte Calvario - as you can see, the Italian facing side is heavily damaged and fortified, while the city facing side still has bushes and trees.

 A closer look at the graveyard in-game.
 Aurelio Baruzzi.
 The riverbank gun position outside the factory.


 An interior view of one of the Sabotino houses. A nice place, were it not for the war.


 Mannlicher–Schönauer in use assaulting the Solkan church.
 Diagram showing the rotating spool magazine.