Dev Diary - Issue #11 "Planet-O-Matic"
Hi folks!
As promised, this week's (Oct 28th 2019) dev diary will focus more on the technical side of things and lay out how we solved the issue of populating our galaxy with planets. Stalwart code-junkie One Eyed Jeremy here, and I'm here to explain everything in gory detail.
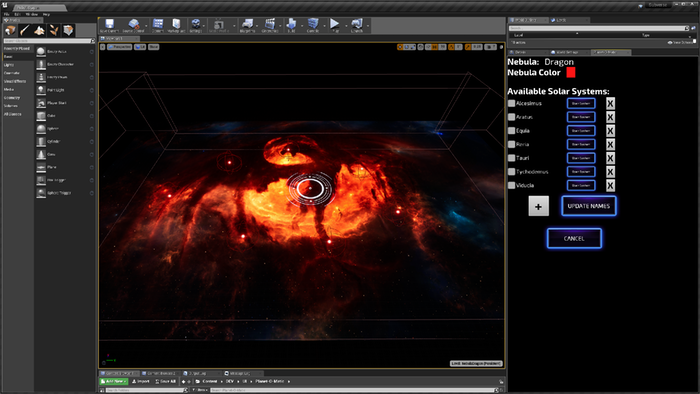
Our resident madman/director DC came down to our basement some time ago (was it weeks? Months? It has been so long we last saw the light of day…) and asked us to write some form of development tool to help us efficiently put all of your awesome planet ideas into the game. Because there are over 600 planets and nearly 100 systems in Subverse we needed a kind of easily-usable-editor to plot the galaxy out for the benefit of progression. The editor would allow the director to populate the world, essentially. He named it the Planet-O-Matic.

Eagerly we obliged and started work on it. Since we’re all about Data Driven Programming (a quick explanation for those of you who don’t know: https://en.wikipedia.org/wiki/Data-driven_programming), we figured we only needed to write a GUI to display/edit data: planets, and other orbiting objects, their respective loot events, their encompassing solar systems and nebula. All of these were already described in different Data Tables (Unreal Engine’s equivalent of good ol’ Data Sheets: https://docs.unrealengine.com/en-US/Gameplay/DataDriven/index.html).
Logically, we came up with the architecture depicted in the stack diagram:

Figure 1 Planet-O-Matic Stack Diagram
Possibly one of the least complex systems we devised, the Planet-O-Matic strives for its simplicity: It features 2 levels in the UI layer (depicted in green), 3 in the application layer (shown in blue) and one data layer level (illustrated in yellow). The first layer, the UI, strongly depends on Editor Utility Widgets (https://docs.unrealengine.com/en-US/Engine/UMG/UserGuide/EditorUtilityWidgets/index.html). These utilities allow us to extend the UE editor and even run Editor-only code. They even come with several convenience methods (e.g. changing assets’ names, selecting all actors inside a umap, save a umap, etc.). In our current architecture, this widget-type comprises several other regular widgets, responsible for input and showing the planets/objects/solar systems’ attributes. However, it is worth noting that, Editor Code cannot run on regular widgets, even if they are components of Editor Utility Widgets.
Making our way toward the second layer, we start with its upmost level: Widget Blueprints. As you Unreal Engine techies already know, user widgets (and their editor utility counterparts), already come equipped with the ability to edit/run blueprint logic. This is where the magic happens, namely which widgets to show, what happens when you click on a button, reading Data Tables, etc. Unfortunately, while Editor Widgets have some exposed code to manipulate aspects of the editor itself, it didn’t have available what we wanted. As such, we developed our own wrapper to expose ( ͡° ͜ʖ ͡°) what we needed. This came in the form of a C++ Blueprint Function Library (so we could reuse this on other dev tools). This was easily achieved by creating a class deriving from UBlueprintFunctionLibrary and writing static methods for it (As a side note, editor-only code cannot go with code used in the game or the project won’t build, our solution to this revolved around creating an Editor plugin: https://docs.unrealengine.com/en-US/Programming/Plugins/index.html).

In the end, we were able to write methods that allowed us to update data tables, delete assets, access UE4’s color picker and asset selector, play a umap in PIE mode, etc. While the latter 2 tasks helped improve our tool’s usability, the first one, updating data tables, provided us with a means to write on the data layer since UE4 already exposes data table reads.
This way, we could directly transcribe the user-inputted values on the layer’s data-tables without having to open them. In the end, it allows for users with limited UE4 experience to design rapidly and iteratively. With the foundation in place, our directors and artist can get down to the fun part, designing and implementing all the planets for you guys to explore. Thanks for reading!

- OneEyedJeremy
As promised, this week's (Oct 28th 2019) dev diary will focus more on the technical side of things and lay out how we solved the issue of populating our galaxy with planets. Stalwart code-junkie One Eyed Jeremy here, and I'm here to explain everything in gory detail.
Our resident madman/director DC came down to our basement some time ago (was it weeks? Months? It has been so long we last saw the light of day…) and asked us to write some form of development tool to help us efficiently put all of your awesome planet ideas into the game. Because there are over 600 planets and nearly 100 systems in Subverse we needed a kind of easily-usable-editor to plot the galaxy out for the benefit of progression. The editor would allow the director to populate the world, essentially. He named it the Planet-O-Matic.
Eagerly we obliged and started work on it. Since we’re all about Data Driven Programming (a quick explanation for those of you who don’t know: https://en.wikipedia.org/wiki/Data-driven_programming), we figured we only needed to write a GUI to display/edit data: planets, and other orbiting objects, their respective loot events, their encompassing solar systems and nebula. All of these were already described in different Data Tables (Unreal Engine’s equivalent of good ol’ Data Sheets: https://docs.unrealengine.com/en-US/Gameplay/DataDriven/index.html).
Logically, we came up with the architecture depicted in the stack diagram:
Figure 1 Planet-O-Matic Stack Diagram
Possibly one of the least complex systems we devised, the Planet-O-Matic strives for its simplicity: It features 2 levels in the UI layer (depicted in green), 3 in the application layer (shown in blue) and one data layer level (illustrated in yellow). The first layer, the UI, strongly depends on Editor Utility Widgets (https://docs.unrealengine.com/en-US/Engine/UMG/UserGuide/EditorUtilityWidgets/index.html). These utilities allow us to extend the UE editor and even run Editor-only code. They even come with several convenience methods (e.g. changing assets’ names, selecting all actors inside a umap, save a umap, etc.). In our current architecture, this widget-type comprises several other regular widgets, responsible for input and showing the planets/objects/solar systems’ attributes. However, it is worth noting that, Editor Code cannot run on regular widgets, even if they are components of Editor Utility Widgets.
Making our way toward the second layer, we start with its upmost level: Widget Blueprints. As you Unreal Engine techies already know, user widgets (and their editor utility counterparts), already come equipped with the ability to edit/run blueprint logic. This is where the magic happens, namely which widgets to show, what happens when you click on a button, reading Data Tables, etc. Unfortunately, while Editor Widgets have some exposed code to manipulate aspects of the editor itself, it didn’t have available what we wanted. As such, we developed our own wrapper to expose ( ͡° ͜ʖ ͡°) what we needed. This came in the form of a C++ Blueprint Function Library (so we could reuse this on other dev tools). This was easily achieved by creating a class deriving from UBlueprintFunctionLibrary and writing static methods for it (As a side note, editor-only code cannot go with code used in the game or the project won’t build, our solution to this revolved around creating an Editor plugin: https://docs.unrealengine.com/en-US/Programming/Plugins/index.html).
In the end, we were able to write methods that allowed us to update data tables, delete assets, access UE4’s color picker and asset selector, play a umap in PIE mode, etc. While the latter 2 tasks helped improve our tool’s usability, the first one, updating data tables, provided us with a means to write on the data layer since UE4 already exposes data table reads.
This way, we could directly transcribe the user-inputted values on the layer’s data-tables without having to open them. In the end, it allows for users with limited UE4 experience to design rapidly and iteratively. With the foundation in place, our directors and artist can get down to the fun part, designing and implementing all the planets for you guys to explore. Thanks for reading!
- OneEyedJeremy