1. Isonzo
  2. News

Isonzo News

Isonzo at Gamescom!

Hello soldiers!

We can't believe Isonzo's release is less than a month away! We're still busy with a lot of different actions relating to Isonzo and its launch, and one of those is the WW1 Game Series team going to Germany! From August 24 until the 26th, Isonzo will make an appearance at gamescom in Cologne, Germany!


You can find us at the Netherlands Pavilion | 4.1 A021g - B030g! This time, the game will be available for press/media and content creators at the B2B hall, so if you’re visiting gamescom on business related matters and you’re interested in Isonzo (or just want to say hi), be sure to visit us!
For our community players, don’t worry! We got some exciting things happening during gamescom, relating to Isonzo and our other games, so be sure to keep an eye out for the gamescom live streams, Steam store and our social media!

[h2] The wait is almost over [/h2]
Less than a month away from Isonzo’s release! If you haven’t already, be sure to wishlist Isonzo so you can be ready for when the game releases! Remember, you aren’t able to pre-purchase the game on PC, but if you buy Isonzo in the first week of its release, you get the special Avanti Savoia DLC pack !


[h2]Latest Isonzo Intel[/h2]
That Isonzo's release is getting closer, doesn't mean we stop giving you updates! Our latest devblog covers the Fior map! Named after the mountain which was the focus of the attack, this second map of the Strafexpedition in the game is quite the forest-y and green map! Be sure to read it!

https://store.steampowered.com/news/app/1556790/view/3385037625317078894
[h3]Wishlist Isonzo now![/h3]

https://store.steampowered.com/app/1556790/Isonzo

AVANTI 🍞

Dev Blog #31 - Fior Part One

In May 1916, Austria-Hungary launched a large offensive operation attacking across the Vicentine Alps into the Autonomous Province of Trento (known as Trentino). Despite their German allies refusing to assist with the attack - and even going so far as trying to dissuade General von Hötzendorf from carrying out the plan - the Austro-Hungarians massed thousands of guns and hundreds of thousands of men. If they managed to break through they would be in a position to outflank all the Italian troops fighting along the Isonzo river. This was called the Strafexpedition - punitive expedition - intended to punish the Italians for their betrayal of the Central Powers when they went against an earlier defensive agreement to join the Entente instead.

Facing them was the Italian First Army. Low on manpower and lumbered with some poor quality officers, the Italian defenders did not see the attack coming. The Strafexpedition did not come as a surprise to everyone though! The Italians did have intelligence suggesting a major offensive aimed at Trentino was in the works a month ahead… but General Luigi Cadorna refused to consider the possibility since it went against his own thinking.

Many WW1 generals get sometimes unfair criticism for their performance when you consider the unprecedented scale of the war and the new technologies used. Luigi Cadorna… was not one of them, and can be criticized for a great number of things.

In Isonzo the Strafexpedition is a two map offensive, of which Fior is the second map, named after the mountain which is the focus of the attack. The final objective is the Fior Peak, which stands at 1824m high (5984ft). An interesting feature of the area is the unusual limestone formations called the Città di Roccia (or ‘city of rock’). The Austro-Hungarian attackers will need to fight their way through these to reach their final objective at the peak of the mountain. But climbing a mountain takes time, and before they get anywhere near the Città di Roccia there are two other defensive lines to break…

Photograph of the Città di Roccia today.

The Austro-Hungarian attackers must first storm a forest to sabotage a gun position and capture a command post. The attackers begin sheltered in a treeline, but will need to force their way across a road and strip of grass before they can reach the shelter of more trees. Fortunately (for some) a convoy has been ambushed and destroyed on the road, providing useful cover in addition to the low stone walls running along the road.

The devastated convoy - the attackers are coming from the left side of this view.

Trenches and barbed wire positions lie throughout the forest on the other side of the road - some are proper dugouts with weapon emplacements and forward spawn points, while others are little more than rows of sandbags piled atop banks of dirt. The forest and undergrowth present on Fior mean it’s important to understand the distinction between cover and concealment: rocks, sandbags and fallen logs provide cover that will protect you from bullets, while the tree leaves and plants will conceal you from the enemy but not save you from gunfire or shrapnel.

Some of the Italian defensive positions in the forest.

One objective calls for the Austro-Hungarians to sabotage one of those forest defensive positions, but the other is a capture objective set among a trio of houses on the wooded slopes. The houses and stone walls are potentially a major challenge for the attackers, especially since the buildings are intact and will offer good shelter from artillery and aviation call-ins.

The hillside houses - the one on the right contains the command post.

However, should the attackers gain a foothold it may not be easy for the Italian defenders to counterattack. The main house has two stories, with the top story including windows facing towards the Italian positions - an excellent spot for an LMG! Additionally defending reinforcements are forced to route around the side of the house, or go down a narrow set of steps which could easily be blocked by wire or become a killing zone if a few enemies are watching it.

Viewed from above - you can see the narrow stairway down between the two closest houses.

The second defensive line also has one sabotage and one capture objective. Before reaching those is more forest, much of it heavily shelled and devastated (including a ruined building) and a series of forward spawn points. As always, it’s up to you and your team how much effort you want to put into dominating the forward spawn points - if the defenders are putting too much manpower into holding their forward spawn point, you might be able to sneak past and hit the main objectives while facing less resistance!

Defensive positions overlooking a shelled area of the forest.

If the Austro-Hungarians conquer the first two lines, before them lie those distinctive limestone cliffs, the Città di Roccia. We’ll get to them along with the final two defensive lines in our next blog post, and you can see them at the end of this first half of our Fior Flyover video!

[previewyoutube][/previewyoutube]

[h2]Isonzo goes to Germany [/h2]
One more thing this week - we’re happy to announce that the WW1 Game Series team will be attending Gamescom in Cologne, Germany! This will be our final big event before Isonzo’s release so it’s going to be extra exciting for us! This time, we’re highlighting Isonzo especially for the press/media and content creators - so if you’re attending Gamescom on business related matters, be sure to come find us at the Netherlands Pavilion | 4.1 A021g - B030g.

Furthermore, we'll showcase something special at Gamescom besides of our first hands-on for the press, so be sure to keep an eye out for the Gamescom live streams and our social media!


[h3] Don’t forget that Isonzo is available for wishlisting ahead of the September 13th release! [/h3]

https://store.steampowered.com/app/1556790/Isonzo

Dev Blog #30 - Melee Weapons

Bayonet charges are a staple image associated with the First World War, and while they rarely took the form of wild unsupported charges over No-Man’s-Land, melee combat remained a key element of WW1 combat until the end of the war. It was partly a holdover from older military doctrine that had bayonet drill as a basic skill for soldiers, but also still proved useful even in the age of artillery and the machine gun.

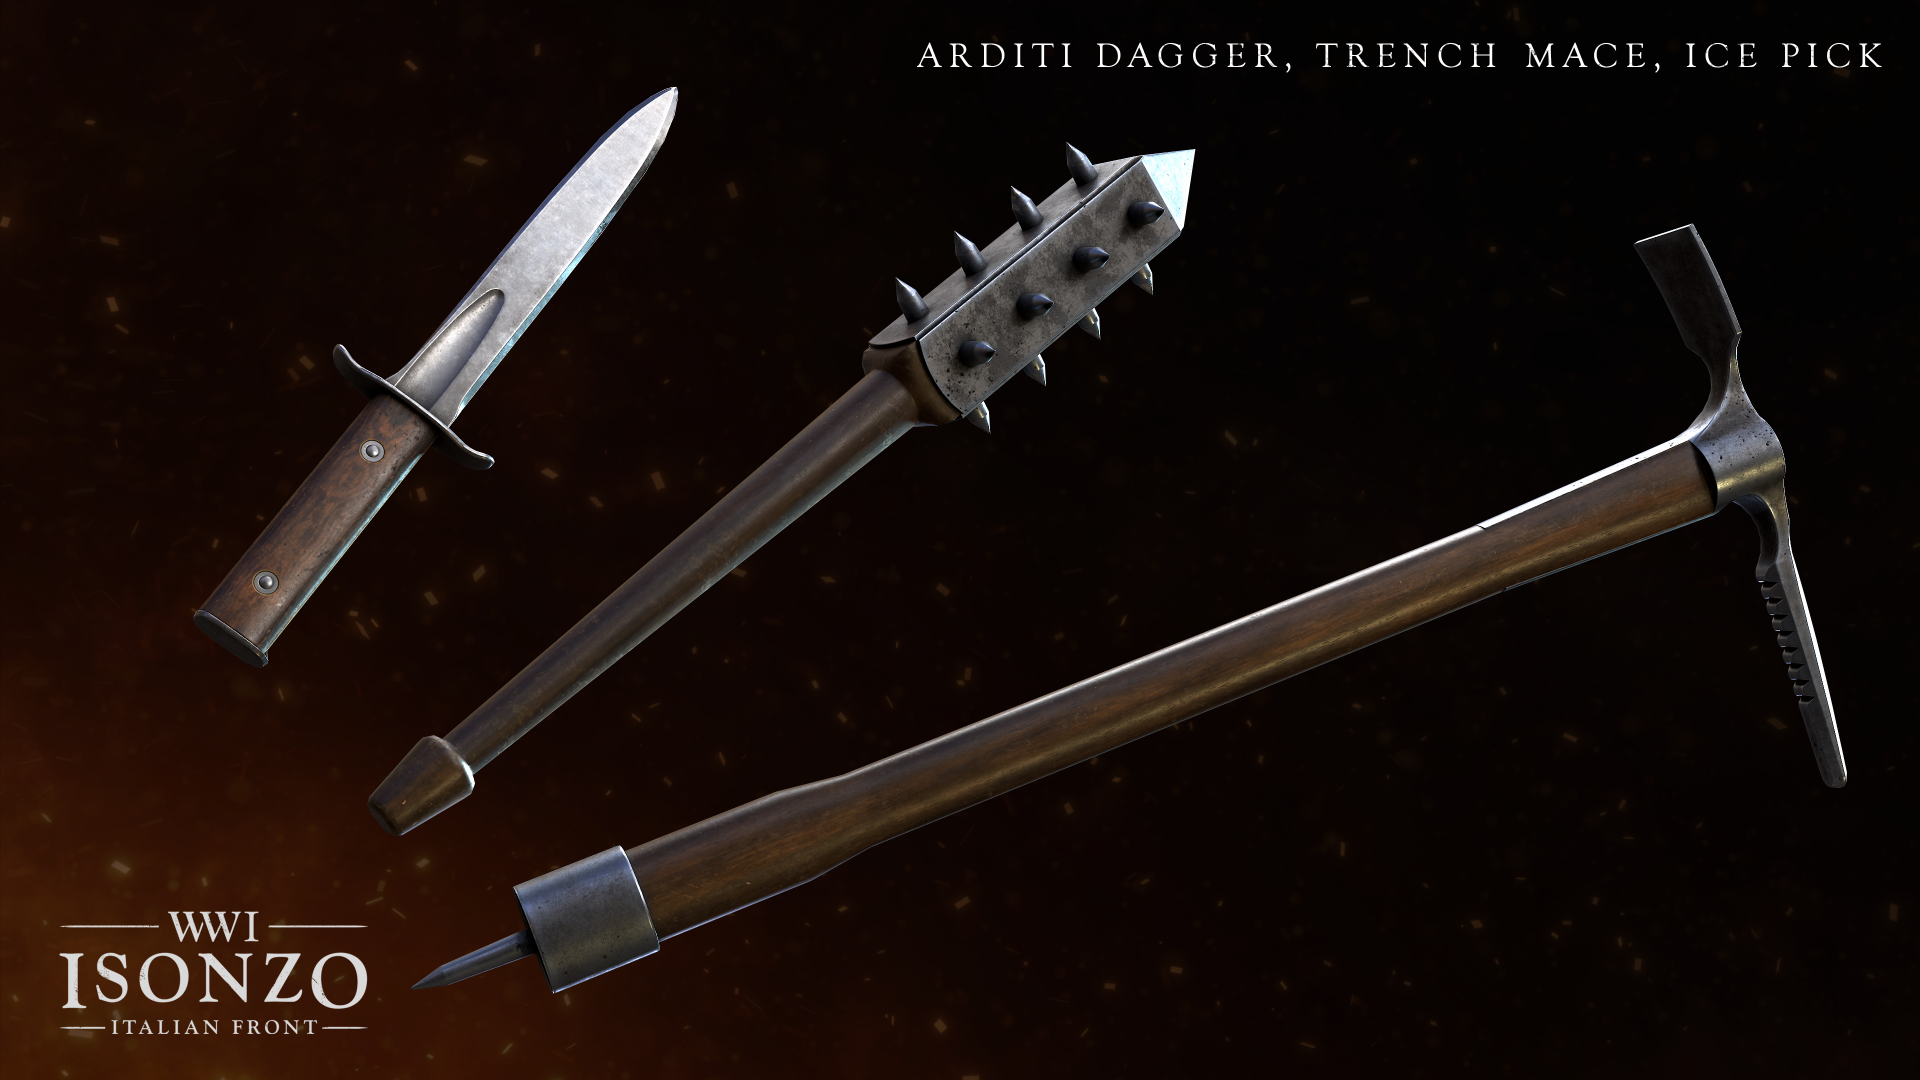
Soldiers showing off trench clubs.

Close combat was so important that many soldiers carried or improvised dedicated melee weapons. Raiding parties,and later specially trained stormtroopers, would use melee weapons (alongside guns and grenades) when infiltrating enemy lines both to stay quiet as long as possible and because it was practical in the close confines of the trenches. When your only gun is a long and heavy rifle with just five shots before you need to reload - not to mention working the bolt between each shot - you can see the appeal of a dedicated melee weapon if you’re planning to assault and enter an enemy trench.

[h2]Melee Weapons in Isonzo[/h2]
The melee options in Isonzo can be broken down into about four rough categories…

[h3]Bayonets[/h3]
Many rifles in Isonzo are fitted with bayonets, making it easy to alternate between shooting and stabbing. The length of the rifle gives bayonets good range, and those bayonet drills we mentioned above mean that soldiers are handy enough with them for the initial stab attack to be very quick. However, pulling back afterwards is slower, so if you’re facing more than one enemy you might be in trouble. It also makes it important to gauge your distance well - you want to use the range of the bayonet, but if you're too far away you've wasted your good chance!

Soldier with rifle and bayonet.

[h3]Melee Weapons[/h3]
Dedicated melee weapons in Isonzo include the Mountaineer class’s ice pick, Arditi daggers, and trench clubs. They are secondary equipment slot items (so taking one means not having other support items or weapons) and only available for the Mountaineer and Assault classes, but the payoff is deadly melee capabilities. Fast and lethal, if you can catch your opponents by surprise you're almost guaranteed victory.

Dedicated melee weapons.

[h3]Entrenching Tools[/h3]
During the war entrenching shovels were common weapons. They’re small enough to be easily wielded in one hand, with a sharp edge meant for cutting roots and similar impediments to entrenchment… but equally good at cutting people. In Isonzo every soldier now carries an entrenching shovel for construction purposes, but they can also be used as weapons. They are slower to attack than bayonets and melee weapons, but they are guaranteed one shot kills. If you don’t have another weapon or a bayonet, they’re a solid alternative - and of course if you’re jumped by an enemy while building something you’ll already have it in hand!

The Italian engineer on the left is using an entrenching tool for its intended purpose!

[h3]...Everything Else[/h3]
You can still melee attack even when you aren’t holding a weapon. Get surprised by an enemy while scoping out enemy positions with your binoculars? By all means take a swing at them, just don’t expect it to be super effective. Still, you know what they say: a decent plan executed right now is better than a perfect plan executed too late!

[h2] What's next?[/h2]
We'll end today's dev diary with a teaser for the next map we'll be revealing… enjoy!


Isonzo is available for wishlisting ahead of the September 13th release!

https://store.steampowered.com/app/1556790/Isonzo

Dev Blog #29 - Advanced Gunplay and Weapon Handling

[h2]Gunplay in Isonzo[/h2]
We’ve always worked hard to make guns feel authentic in the WW1 Game Series, not just in creating accurate 3D models and using sound effects recorded to actual guns where possible, but also in how they function in-game. We wanted to take it to the next level with Isonzo. First up is a greater connection with the world around you…

[h3]Animations and the Environment[/h3]
For Isonzo we decided to take a new approach with how the player's weapons animate on screen. One main goal has been to keep the weapon looking consistent in world space and prevent sudden snapping between animations. You’ll probably notice this most when you’re close up against some part of the environment, be it a wall or a cliffside, where you’ll now see your weapon lifted out of the way rather than potentially clipping through. But we go a step further, and ensure animations (like reloading) work with this dynamic weapon positioning, so reloading up against a wall can use the same animation as reloading in an open field and it still looks natural.

Reloading while sheltering behind rocks. The GIF cuts some frames, you can also watch the full video on YouTube.

To achieve a smooth effect when handing your guns we mix partial-animations on the gun itself, some other tech tricks, and overlaid procedural animations on top to account for other influences such as recoil or movement. The player's arms are driven by Inverse-Kinematics which ensure they remain correctly positioned, no matter where the weapon is currently on-screen.

This also has the effect of making things look more fluid when you combine weapon usage with other systems like movement. For instance, going into a sprint while still bolting your rifle, or aiming down sights from sprinting. These situations with multiple animations in quick succession will be smoother now.

[previewyoutube][/previewyoutube]
[h3]Reloading[/h3]
In Isonzo we’ve built on the complex reload and weapon clip state systems of the previous games. We already modeled weapon quirks such as guns which couldn’t reload until empty, weapons that reload differently when you add individual rounds instead of a full clip, very slow revolver reloads where individual rounds need to be expelled one at a time, and more. We even keep track of whether you’ve worked the bolt on a rifle - sometimes in the heat of battle you might fire and then use your bayonet before bolting, for instance. These details matter in combat, where that extra half-second to work a bolt could be the difference between life and death…

Taking cover while using a rifle.

In Isonzo we’re building on this with even more reload states for various weapons. Weapons with visible bullets in their clips update in accordance with your ammo count, chamber states on certain weapons remain open if the weapon is not closed, cocking pins respond to the firing state, and weapons that have their magazine reloading interrupted will find their mag slot is left empty until they complete the reload!

This really comes into play with some of the more idiosyncratic WW1 weapons like the Villar Perosa. This LMG (originally an aircraft mounted machine gun) has two magazines which are reloaded separately - therefore the gun can have a variety of states of reload and interrupted reload. The Villar Perosa alone has three different reload animations relating to these various states. As well as more accurately recreating how these guns worked, it also gives you more gameplay flexibility in combat by making it less punishing to cancel reloads with these weapons.

After hip-firing the Villar Perosa, only one magazine will need replacement.

[h3]LMG Deployment[/h3]
On the subject of the deployable machine guns like the Villar Perosa, we have completely reworked the system we used in Verdun and Tannenberg for deploying to be far less rigid, and more fluidly integrated with gameplay. You can now auto-deploy an LMG on any valid surface in front of you if it’s the right height, which then provides greatly increased accuracy and stability (and in the case of the Villar Perosa, the use of its second barrel). You can of course still hip fire LMGs in an emergency, but doing so comes at the cost of greatly reduced accuracy.

The new auto-deploy system with the Madsen.

[h3]Weapon Sway[/h3]
Another influential part of the weapon handling which has got some love is weapon sway! The new more tactile weapon sway better mimics how actual breathing affects your body. But more than that, it affects your shooting more precisely now - bullets come from the barrel of the gun, which is affected by the new more natural weapon sway. Therefore there's no need for randomness on the bullet itself to simulate other factors affecting accuracy.

Weapon sway.

[h2]...and more![/h2]
Bullet drop is also a factor in Isonzo, but given typical engagement ranges and the high muzzle velocities for most of the weapons in the game, you likely won't notice it very often. For you snipers at the back of the map, you may need to adjust your sights to hit the perfect headshots over long distances!

In addition to these ‘big ticket items’, we’re also paying attention to the small stuff! We’ve gone the extra mile to distinguish weapons with different muzzle flash FX, more animations in general, and more. All of these details come together to create a more immersive experience that better captures the feel of First World War combat.

To watch the full videos behind the gifs in this blog, check out our WIP Clips Playlist on YouTube!

You can wishlist Isonzo already! Not so long to go before release… the battle for the Italian Front begins on September 13th!

https://store.steampowered.com/app/1556790/Isonzo

Dev Blog #28 - The Austro-Hungarian Arsenal

An army is nothing without weapons, and while we’ve looked at individual guns here and there throughout our previous blogs, we thought it would be valuable to bring them all together in a single post. Today we’re going to look over a number of the Austro-Hungarian weapons that will feature in Isonzo, with a few new images and gifs added for good measure!

[h2]Rifles[/h2]
The workhorse of military conflict for a long time, rifles are the most common weapons in Isonzo and you’d do well to acquaint yourself with their strengths and weaknesses.

Mannlicher–Schönauer Model 1903
The fury of war always consumes a huge amount of material and equipment, and certainly during the First World War no army had an easy time finding enough of anything, even basic items like rifles. This led to situations like these Mannlicher–Schönauer rifles built for export to the Greek army being pressed into service with Austro-Hungarian forces.

A conventional looking rifle hiding an unusual magazine…

It was a very well made and reliable weapon, but that made it expensive to produce. The 6.5mm cartridges were an unusual choice which may also have made it less appealing. Nonetheless, production went ahead for the Greeks, with more than 100,000 supplied before 1914 - rifles ordered afterwards were diverted to the Austro-Hungarian armed forces.

Mannlicher–Schönauer in use assaulting the Solkan church.

The Mannlicher–Schönauer had one other interesting feature - a rotating spool magazine. This part was designed by Schönauer, hence the name of the rifle. While the rifle was fed by stripper clips, inside was a rotating system, as you can see in the diagram below. While uncommon, rotating spool magazines are still in use with some weapons today!

Diagram showing the rotating spool magazine.

Steyr-Mannlicher M95 with C.Reichert Scope
This is the standard issue Austro-Hungarian rifle fitted with Viennese made optics by C. Reichert - a company who also made microscopes.

The Steyr-Mannlicher M95 was a very effective rifle with an unusual straight-pull bolt action, meaning the user would pull it back then push it straight forward again, saving two motions compared to more typical bolt actions where the user had to go up-back-forward-down. This gave the M95 a very solid 20-25 rounds per minute rate of fire. Austro-Hungarian soldiers nicknamed it the ‘Ruck-Zuck’ rifle (meaning ‘back and forth’ rifle).

M95 with scope.

M1867 Werndl–Holub
The Werndl is a reserve rifle - a perfectly serviceable single-shot breechloader… but no match for the fire rate of modern guns. As such they were never intended for use by frontline troops.

The reliable but elderly Werndl, in elderly but reliable hands.

They were issued to some rear-echelon forces so that more modern weapons could be concentrated where combat was expected. As with the Italian soldiers issued old Vetterli rifles, the troops given the Werndl did sometimes find themselves in combat with their decades old firearms. If you can make every bullet count and avoid chaotic situations where you need more than one shot at a time, the Werndl can be a very satisfying weapon to master.

Reloading the Werndl.

[h2]Revolvers and Pistols[/h2]
Handguns are much lighter than rifles and often offer quicker reaction times in close combat situations, but in turn have shorter ranges and less stopping power. However, during WW1 handguns often had as many (or even more) shots available before needing to reload than rifles did. Some classes (like Officers) can carry handguns as a primary weapon, while others can take them as a sidearm to complement a rifle.

[h3]Rast & Gasser Model 1898[/h3]
The Rast & Gasser Model 1898 was an Austro-Hungarian service revolver, produced by an Austrian firm based in Vienna. It was a well made and reliable firearm, but some of the design choices were already outdated when the gun was first put into production.

180,000 of these were built from 1898 to 1912, and by the time of WW1 they were in the process of being replaced with semi-automatic pistols - Steyr M1912s for the infantry and Roth–Steyr M1907s for the cavalry. But since production of these newer weapons wasn’t sufficient to fully equip the Austro-Hungarian armed forces, the Rast & Gasser 1898 would remain in use throughout the war.


One of the big drawbacks you’ll experience in-game is the loading-gate through which individual cartridges are loaded, and extracted individually by an extractor rod. This means rather than being able to empty all spent cartridges at once, you have to open the cylinder, use the rod to expel one round and put in a new one, rotate the cylinder, then repeat that process. Eight times! Use your shots carefully with this one, because you really don’t want to have to reload when you’re in the thick of the action! On the flip side, eight shots before needing to reload is better than any rifle in the game offers…

The Rast & Gasser in action!

Roth-Steyr Model 1907
The Steyr Mannlicher AG is a 157 year old Austrian arms company, which was at the forefront of auto-loading pistol technology in the early 20th century. The Austro-Hungarian military made use of several Steyr firearms, including the two we’re going to look at today: the Roth-Steyr Model 1907, and the Steyr-Hahn 1912. The Roth-Steyr was the first semi-auto pistol adopted by the land army of a major power: it was issued to the Austro-Hungarian cavalry. Because of this, it has a heavy trigger pull to prevent accidental discharge - you don’t want a hair trigger on a pistol to be used by mounted cavalry!


Steyr-Hahn 1912
The Steyr-Hahn is based on the mechanism used by the Roth-Steyr. It was initially issued to the Austrian Landwehr (remember that Austria-Hungary had effectively three armies - the Austrian Landwehr, the Hungarian Honvéd and the Common Army - with the Austrian and Hungarian armies generally being better equipped than the Common Army).


The Steyr-Hahn was a popular enough weapon that Germany would place orders for 10,000 during WW1, and years later the Wehrmacht would order 60,000 after annexing Austria in 1938. Incidentally, these aren’t the only weapons manufactured by Steyr Mannlicher AG that feature in Isonzo.

Reloading the Steyr-Han stripper clip.

[h2]Equipment and Heavy Weapons[/h2]
We don’t just model specific weapons for each faction - different armies made use of different supporting gear as well, including things like canteens and binoculars. While they function the same in-game - no need to worry about imbalance in canteen drinking speed ;) - we wanted to get these details right and remind people of the diversity in equipment used.


This particular pair of binoculars was made by the German CP Goerz company, a leading manufacturer of military optics. In 1908 they opened a branch in the Hungarian city of Pozsony, which is where the Goerz Wien M8 binoculars would have been produced. The M8 is a reference to the year this model was introduced.

An Austro-Hungarian soldier in the barracks with the M.14 Canteen ‘Werke 1914’.

Drinking from the flask going into an assault.

Minenwerfer M14
The 9 cm Minenwerfer M14 is the mortar used by Austro-Hungarian forces in Isonzo. The M14 is loaded from the back, allowing you the opportunity to keep your eyes on the field in front of you. Designed under time pressure by an army committee, it was intended to serve as a much needed light mortar (in contrast to heavier mortars, which in Isonzo are represented by the Officer call-ins).


While it did that job, there were flaws: it was awkward to rotate for aiming, a black powder propellant that could be very smoky, and bomb fuzes that were unreliable and could lead to duds. Many of these problems were fixed in later versions of the mortar, but ultimately it was decided to purchase and use German made mortars from 1917 onwards.

M14 mortar reloading.

[h2] Experience the Great War in black & white [/h2]
Currently, both Verdun & Tannenberg are on sale with 75% off and we enabled the Film Memoir mode for all to use for free even without owning a Supporter Edition DLC! Experience the game and the war in a new way.

[previewyoutube][/previewyoutube]
[h2]That’s it for now![/h2]
As always, don’t forget that you can wishlist Isonzo if you didn’t already. We’re looking forward to everyone trying out these weapons when Isonzo releases on September 13th!

https://store.steampowered.com/app/1556790/Isonzo