Leopard 1, T110Е4, and Kranvagn: Consumables and Tactics
The Core Vehicles within Battle Pass Season VII include three vehicles with different play styles: the Leopard 1 (medium tank), the T110E4 (tank destroyer), and the Kranvagn (heavy tank). Their Point Limits have been increased to 1,000, and they have special rules for earning Battle Pass Points in Random Battles.

T110E4
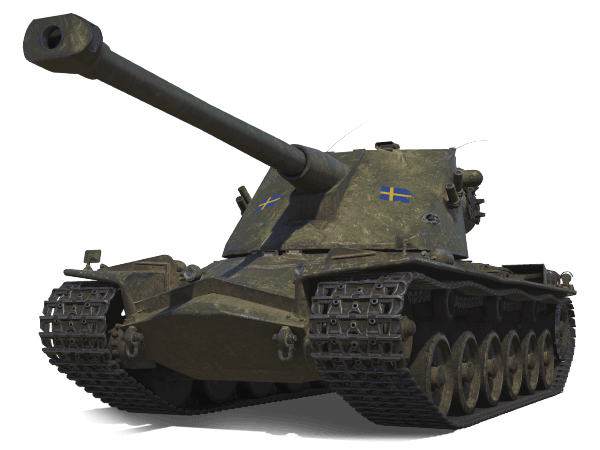
Kranvagn

Leopard 1
In this article, we will tell you how to take full advantage of these vehicles in battle and which equipment to mount on them.
[h3]Rules for Earning Battle Pass Points[/h3]
[expand]
Leopard 1
T110E4
Kranvagn
[/expand]
[h2]See You in the Garage![/h2]
The T110E4 is basically a portable pillbox with decent armor and a gun that can crush everything it might face on the battlefield. This tank destroyer features a turret with a turning angle of 180 degrees, which gives an additional advantage in battle. In urban areas and narrow streets with limited space for maneuvers, an encounter with the T110E4 may not end well for the enemy.

When fighting at close quarters, don't forget about the weak spots of this tank destroyer. First of all, about the commander's cupola, which is vulnerable even to Tier VIII vehicles. The gun mantlet is not able to repel shells that can penetrate 300 mm of armor. The lower glacis plate is also vulnerable, but the upper plate remains solid in most cases.
The above points suggest several game tactics that depend on the choice of equipment. For example, the use of Improved Aiming (especially Bounty Aiming), Improved Ventilation, and Gun Rammer will increase how effectively it causes damage to enemy vehicles at medium range.

The combination of Improved Rotation Mechanism, Improved Ventilation, and Gun Rammer will become an all-purpose set. This equipment will improve the reload time and maneuverability of this tank destroyer.
When in close combat, choose a hull-down position that covers the lower glacis plate, and also keep turning the turret to make it hard for the opponent to aim at its vulnerable spots.
Field Modification allows you to switch between these combinations, depending on the map. This will give you an additional advantage in battle.
[h2]Swedish Berserker[/h2]
The Kranvagn is one of those vehicles in which you feel confident against any opponent if you manage to play hull-down. While opponents try to aim at the Kranvagn's vulnerable spots, which is far from easy, this Swede can effectively discharge a full magazine in return. By the way, its reload time of 21.5 seconds clearly shows others who the true king of the hill is.
This vehicle is a true berserker and doesn't care which enemy it attacks, as long as its own hull is covered by terrain. Neither the Object 268 Version 4 nor the Jagdpanzer E 100 can do anything to this vehicle in such a situation.
A high damage per shot of 440 HP, good stabilization, decent aiming time for a heavy tank, and a gun depression angle of –12 degrees make the Kranvagn extremely dangerous in battle. Just think about it: three shells in the magazine and a reload time of 21.5 seconds. In just over a minute, it can discharge three magazines at its opponents!
The sheer intensity of the Kranvagn's fire can turn the tide of the battle or force encroaching opponents to retreat. But retreat for the enemy is hardly an option either, as this vehicle features a high top speed of 60 km/h.
Therefore, do not stay on the defensive for too long. Once you have an opportunity for an attack, feel free to exchange your durability points, because the opponent will definitely lose more—or even end up back in the Garage.
It makes sense to mount Improved Hardening, Vertical Stabilizer, or Turbocharger on this vehicle.


This is very simple. Improved Hardening provides additional durability points and increases suspension durability (low-damage shells will not be able to destroy the tracks). Vertical Stabilizer will increase the effectiveness of fire and reduce the time required for aiming, meaning your vehicle will be exposed to enemy fire for a shorter time. Turbocharger will improve mobility, so the vehicle will be able to change position faster or catch a fleeing enemy.
[h2]The Most Dangerous of the Felines in World of Tanks[/h2]
One can hardly name another vehicle with such good gun-handling parameters as those of the Leopard 1. The L7A3, with its high-velocity AP shells, is closer to a laser than a gun. When firing from mid-range, there is no need to lead a target. Moreover, this gun stands out for its short aiming time and excellent armor penetration values for both the standard and special ammo.
The Leopard 1 can easily cause damage even to heavily armored targets and successfully deal with fast and maneuverable opponents, which makes it one of the best fire support vehicles in the game.

The vehicle has an excellent view range (410 m), decent damage per shot (420 HP), and a fairly short reload time. All of the above, in combination with good mobility, gives you an all-purpose gizmo that can quickly change flanks and cause considerable damage to enemy vehicles.
The only drawback of this vehicle is its poor armor. So when playing in this vehicle, close combat is the surest way to end up back in the Garage. If the Sound Detection perk warns you of an enemy SPG firing a shot, change position immediately! Even an indirect hit can cause a lot of damage.
The Leopard 1's universal equipment set will include Improved Ventilation, Vertical Stabilizer, and Gun Rammer. With this combination mounted, you can feel comfortable on any map in the game.
In conclusion, here are the main guidelines for playing the Leopard 1:
T110E4
Kranvagn
Leopard 1
In this article, we will tell you how to take full advantage of these vehicles in battle and which equipment to mount on them.
[h3]Rules for Earning Battle Pass Points[/h3]
[expand]
Leopard 1
POSITION ON YOUR TEAM IN BATTLE RESULTS
VICTORY
DEFEAT/DRAW
Top 3 by XP earned
8
6
Top 10 by XP earned
6
4
T110E4
POSITION ON YOUR TEAM IN BATTLE RESULTS
VICTORY
DEFEAT/DRAW
Top 3 by XP earned
10
8
Top 10 by XP earned
5
3
Kranvagn
POSITION ON YOUR TEAM IN BATTLE RESULTS
VICTORY
DEFEAT/DRAW
Top 3 by XP earned
9
7
Top 5 by XP earned
7
5
Top 10 by XP earned
5
3
[h2]See You in the Garage![/h2]
The T110E4 is basically a portable pillbox with decent armor and a gun that can crush everything it might face on the battlefield. This tank destroyer features a turret with a turning angle of 180 degrees, which gives an additional advantage in battle. In urban areas and narrow streets with limited space for maneuvers, an encounter with the T110E4 may not end well for the enemy.
ːsteamthumbsupː Powerful 155 mm gun
ːsteamthumbsupː Rotating turret
ːsteamthumbsupː Decent frontal armor
ːsteamthumbsupː Rotating turret
ːsteamthumbsupː Decent frontal armor
ːsteamthumbsdownː Low maneuverability
ːsteamthumbsdownː Long reload time
ːsteamthumbsdownː Long reload time
When fighting at close quarters, don't forget about the weak spots of this tank destroyer. First of all, about the commander's cupola, which is vulnerable even to Tier VIII vehicles. The gun mantlet is not able to repel shells that can penetrate 300 mm of armor. The lower glacis plate is also vulnerable, but the upper plate remains solid in most cases.
The above points suggest several game tactics that depend on the choice of equipment. For example, the use of Improved Aiming (especially Bounty Aiming), Improved Ventilation, and Gun Rammer will increase how effectively it causes damage to enemy vehicles at medium range.
The combination of Improved Rotation Mechanism, Improved Ventilation, and Gun Rammer will become an all-purpose set. This equipment will improve the reload time and maneuverability of this tank destroyer.
When in close combat, choose a hull-down position that covers the lower glacis plate, and also keep turning the turret to make it hard for the opponent to aim at its vulnerable spots.
Field Modification allows you to switch between these combinations, depending on the map. This will give you an additional advantage in battle.
[h2]Swedish Berserker[/h2]
The Kranvagn is one of those vehicles in which you feel confident against any opponent if you manage to play hull-down. While opponents try to aim at the Kranvagn's vulnerable spots, which is far from easy, this Swede can effectively discharge a full magazine in return. By the way, its reload time of 21.5 seconds clearly shows others who the true king of the hill is.
This vehicle is a true berserker and doesn't care which enemy it attacks, as long as its own hull is covered by terrain. Neither the Object 268 Version 4 nor the Jagdpanzer E 100 can do anything to this vehicle in such a situation.
ːsteamthumbsupː Good depression/elevation angles
ːsteamthumbsupː Impenetrable turret
ːsteamthumbsupː 3-shell magazine loading system
ːsteamthumbsupː Impenetrable turret
ːsteamthumbsupː 3-shell magazine loading system
ːsteamthumbsdownː Mediocre hull armoring
ːsteamthumbsdownː Small HP pool
ːsteamthumbsdownː Small HP pool
A high damage per shot of 440 HP, good stabilization, decent aiming time for a heavy tank, and a gun depression angle of –12 degrees make the Kranvagn extremely dangerous in battle. Just think about it: three shells in the magazine and a reload time of 21.5 seconds. In just over a minute, it can discharge three magazines at its opponents!
The sheer intensity of the Kranvagn's fire can turn the tide of the battle or force encroaching opponents to retreat. But retreat for the enemy is hardly an option either, as this vehicle features a high top speed of 60 km/h.
Therefore, do not stay on the defensive for too long. Once you have an opportunity for an attack, feel free to exchange your durability points, because the opponent will definitely lose more—or even end up back in the Garage.
It makes sense to mount Improved Hardening, Vertical Stabilizer, or Turbocharger on this vehicle.
This is very simple. Improved Hardening provides additional durability points and increases suspension durability (low-damage shells will not be able to destroy the tracks). Vertical Stabilizer will increase the effectiveness of fire and reduce the time required for aiming, meaning your vehicle will be exposed to enemy fire for a shorter time. Turbocharger will improve mobility, so the vehicle will be able to change position faster or catch a fleeing enemy.
[h2]The Most Dangerous of the Felines in World of Tanks[/h2]
One can hardly name another vehicle with such good gun-handling parameters as those of the Leopard 1. The L7A3, with its high-velocity AP shells, is closer to a laser than a gun. When firing from mid-range, there is no need to lead a target. Moreover, this gun stands out for its short aiming time and excellent armor penetration values for both the standard and special ammo.
The Leopard 1 can easily cause damage even to heavily armored targets and successfully deal with fast and maneuverable opponents, which makes it one of the best fire support vehicles in the game.
ːsteamthumbsupː Excellent speed
ːsteamthumbsupː Accurate gun, damage per shot
ːsteamthumbsupː Good maneuverability
ːsteamthumbsupː High shell velocity
ːsteamthumbsupː Basic view range of 410 m
ːsteamthumbsupː Accurate gun, damage per shot
ːsteamthumbsupː Good maneuverability
ːsteamthumbsupː High shell velocity
ːsteamthumbsupː Basic view range of 410 m
ːsteamthumbsdownː Poor armoring
ːsteamthumbsdownː Small HP pool
ːsteamthumbsdownː Small HP pool
The vehicle has an excellent view range (410 m), decent damage per shot (420 HP), and a fairly short reload time. All of the above, in combination with good mobility, gives you an all-purpose gizmo that can quickly change flanks and cause considerable damage to enemy vehicles.
The only drawback of this vehicle is its poor armor. So when playing in this vehicle, close combat is the surest way to end up back in the Garage. If the Sound Detection perk warns you of an enemy SPG firing a shot, change position immediately! Even an indirect hit can cause a lot of damage.
The Leopard 1's universal equipment set will include Improved Ventilation, Vertical Stabilizer, and Gun Rammer. With this combination mounted, you can feel comfortable on any map in the game.
In conclusion, here are the main guidelines for playing the Leopard 1:
- Quickly take key points at the beginning of the battle using bushes and trees for additional concealment to reveal the initial maneuvers of the opposing team, spot enemy vehicles for your allies, and make a few effective shots.
- The vehicle comes into its own in the mid-to-end stages of the battle when it is critical to outplay opponents tactically, and where every shot counts. In such situations, the Leopard 1's key characteristics—good view range, excellent speed, high accuracy, and great armor penetration values—become the keys to victory.