1. Rhythm Quest
  2. News

Rhythm Quest News

Devlog 55 - Gamepad Rebinds, Odds and Ends

I'm continuing my break from working on world 6 levels for now. I've sent out the current build to some internal beta testers to get some feedback on the difficulty scaling and reception to the newer mechanics, so I want to give myself a chance to let that feedback come in and stew on it for a bit before I continue on with the last 4 levels of the game.

In the meantime, I've been trying to tackle some improvements and fixes that have been laying around in my backlog for a while...

[h2]Gamepad Rebinds[/h2]

This one has been desired (and requested) a long while ago, but I kept on putting it off because I wasn't sure exactly how I wanted to handle it.

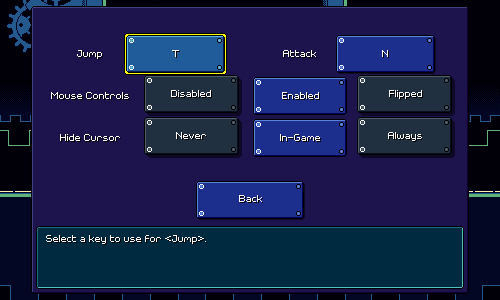
I already had control rebindings working just fine for keyboard controls, which have a single key assigned to each action:


The problem with gamepad bindings is that by default the gamepad controls have many different bindings: to jump you can use the d-pad, the left analog stick, the south or east face buttons, or even the left shoulder button.

I was sort of at a loss for how to deal with this, both in terms of the UI (how to show the combined default bindings?) and in terms of implementation (how to override the entire set of bindings at once?).

Like many other tricky problems I've run across in Rhythm Quest, letting it sit in the back of my head for a while allowed me to come up with a different approach:


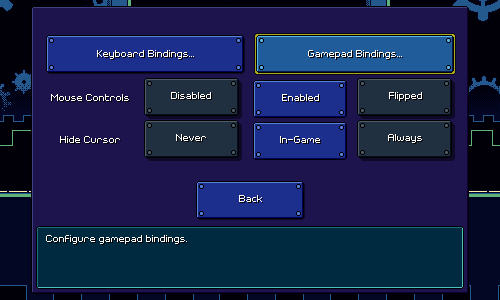
Gamepad and keyboard bindings now each have their own standalone submenu (not available on platforms where they don't apply). More importantly, there's an individual setting that toggles between a "default binds" set and a "custom binds" set. The default binding set features multiple binds, whereas the custom binding set only has two (that can be overriden by the user). This elegantly (?) solves the issue I mentioned above.

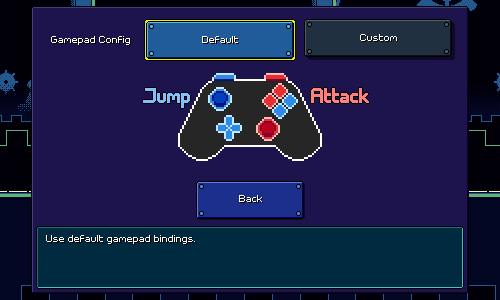
This also lets me illustrate the controls in a hand-drawn diagram, something that's probably easier to parse than "Jump: DPad, Left Stick, Left Shoulder, A, B, ..."

Using the same system, I'm even able to detect whether a (supported) gamepad is plugged in at all, and dynamically update the screen accordingly:


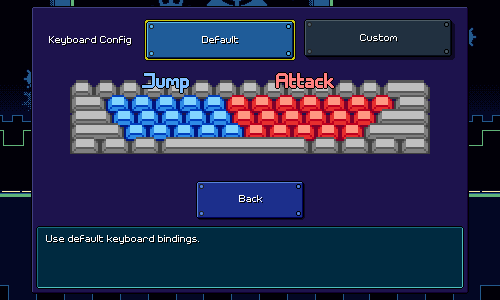
I adopted the same tech for the keyboard bindings screen as well (had a bit of fun trying to draw a keyboard layout):


You'll notice that I decided to also expand the default bindings to just encompass the entire left/right half of the main keyboard keys. Unity does a reasonably good job (?) of detecting keys based on physical location, so this should work even if you use a nonstandard key layout like I do. I'm not sure what will happen for non-ANSI physical layouts, but I'm assuming the custom binding system will suffice for any odd edge cases.

For now I'm providing two custom binding slots for each action (an improvement over before where you could only use one key), in case you want to alternate keys for faster sections.

As usual, there's a ton of silly little details that need to be handled with input rebindings, and as usual, Unity provides just enough functionality to be helpful, but also forces you to work with a ton of abstractions like "InputControlPaths", "InputActions", and "ControlSchemes" that end up making your head spin when you think about them too much. You need to, for example, make sure that a rebinding can be cancelled via either Gamepad OR Keyboard input (the input system by default only allows you to define a single cancellation binding...)...

[h2]Rendering Artifacts[/h2]

This is a really silly one, the kind of thing that you'd never imagine would be an issue, but somehow it is. Rendering the game to a width or height that's an odd number (e.g. 1013x533) causes weird visual artifacts:


This is caused by camera scaling and such -- here, the resolution is 501x301 and the game has decided to render the pixels at 2x, which means the base resolution is 250.50x150.50, which doesn't work out too nicely.

I tried to address this before by automatically resizing the game window and forcing it to be a multiple of two, but that didn't work too well. My new solution is to handle the rendering properly by shifting the camera by a similar fractional amount, so here we simply shift the camera over by a half pixel and fortunately that works to fix things.

[h2]Released Early/Late[/h2]

Suggested by one of my playtesters -- the "Too Early / Too Late" text for holds is now more specific in calling out "Released Early / Released Late". A super easy fix that hopefully helps clarity a tiny bit:


I'm glad I got around to some of these improvements and fixes (which should be coming to the demo soon), but I feel like I've only just scratched the surface of the work that needs to be done. Even for the gamepad rebinding system, I still need to test how it works on Switch / for other types of gamepads, and could even stand to draw different graphics (especially for the Switch joycons). There's also some tweaks that I'm going to be trying to look at after seeing how playtesters fared with the current build...

The year is about halfway over and unfortunately my progress hasn't been super great -- I've only managed to finish off 6 levels in that time, plus some optimization work/etc. Of course, I had some real life stuff happen that drew my attention away, but that's also sort of true in the upcoming months as I help mentor for a video game tournament. That "end of 2023" date is starting to feel really scary when I think about it...

Rhythm Quest Demo v0.26.5 Released

The Rhythm Quest Demo has been updated to version 0.26.5! This patch includes some hefty optimizations, which should help improve performance, particularly on lower-end machines.

Full changelog:

Version 0.26.5
​- Reworked texture encoding for memory and performance benefits
​- Various other performance optimizations
​- Fixed an issue causing minor vertical blurring on WebGL builds
​- Add better transition for Furball attack -> jump
​- Fixed attack animation being cancelled on fly start
​- Fixed menu bug where foreground level backdrops sometimes failed to fade in
​- Minor UI fixes

Devlog 54 - Backdrop Optimizations

Somewhat unexpectedly, I took a break from working on levels this month to focus instead of **performance and memory optimizations**. This was brought on by the fact that I made some release builds for the first time in a while and found that my iOS build crashed on startup because it was running out of memory loading the main menu!

The main culprit? These huge backdrop texture atlases...(this one is 64 MB!)...


[h2]The Problem[/h2]

Your first thought upon seeing these atlases is that they're really wasteful. Why is there so much empty space in the upper-right? Well, that one is because the texture atlases need to be even powers of 2 in dimensions (1024, 2046, 4096). I could, of course, have each layer be separate, without packing them into a single atlas, but then I'd lose all the performance benefits of being able to batch the draw calls for all of the background layers together.

The better question is why does each backdrop layer have so much vertical padding? Well, I didn't want to make any assumptions about the player's aspect ratio, resolution, or zoom settings, so the easiest way for me to solve that was to just author all of my backdrop layers with loads of vertical leeway, so that they'll always be fully in view.


Each separate layer is exported at 500x1200 pixels (very tall!), and then tiled horizontally by the game. Some of the levels have upwards of 10 or 15 separate backdrop layers, so that's quite a lot of pixels...

[h2]Texture Encoding[/h2]

The first thing I wanted to do was see if I could just store the textures more efficiently without changing anything about my authoring workflow. You may have noticed that the texture atlases are all grayscale (no color). This is a change I made a long time ago, back when I decided to use a palette shader for the backdrops. Essentially, I only really need to represent indices into my color palette (currently, one of 11 colors), so during my export I just use grayscale colors that the pixel/fragment shader can read and then interpret as color 0, color 1, etc. I also sometimes have partial transparency, so the alpha value is also important.

However, the textures are still encoded as 32-bit RGBA, which means 8 bits are assigned to each of the red, green, blue, and alpha channels! That's pretty wasteful, so I wanted to look into whether Unity supports other lossless texture formats (across multiple platforms). It does, in fact you can actually use the "R 8" texture format, which exclusively encodes a red channel (nothing else!), and only uses 8 bits per pixel (25% of what I was currently using!).

That seemed perfect, as really all I needed was grayscale values anyways. The one problem was that I still needed to store alpha values to handle partial transparency. Could I somehow pack both the color index, and the alpha information, into 8 bits?

Since I only have 11 different colors in my color index, 4 bits is enough to encode that (2^4 = 16). That would leave the other 4 bits to store alpha information, which would mean I could have 16 different possible alpha values. That's more than enough for my purposes, so I went ahead with this strategy of using 4 bits for color encoding and the other 4 bits for alpha values:


To get this all working, I needed to first write a python script to take all of my original backdrop exports and encode them into an 8-bit red channel like you see above. Then I needed to modify my palette shader to do the reverse: take the 8-bit encoding and parse it into a color index and an alpha value.

After a bunch of shader math debugging and fussing around with bit arithmetic, it was all working (everything looked the same as before) and the iOS build was no longer crashing. Hooray!

[h2]Texture Cropping[/h2]

We can still do better, of course. The next step was to see if I could get rid of all of the extra padding on the top and bottom of many of these images. Take this cloud layer for instance:


Ideally we could only store the actual texture data that really matters (the middle section). The top half is all transparent, so we can just discard that, and then for the bottom half we can just "clamp" the texture lookup so that the bottom-most opaque row is essentially repeated indefinitely.

Doing the crop itself is simple enough -- I just modify my python image-processing script to analyze the rows of the image and trim it accordingly. We end up with this nice cropped version of the image:


The trickier part is that we now need to render this in the same way as the original texture. There are a couple of problems with this...

First, the new origin/center point of the sprite is different than before, since we trimmed an unequal amount of rows from the top and bottom, so it's going to be offset from where it was supposed to be drawn. To fix this, I added processing to my script to keep track of how much the new cropped sprite is offset by. I also track some other important metadata, such as whether the top or bottom sections (or both) should be repeated transparency, or a repeated opaque row. Then I output that all to a C# file that I can read in:


{ "level2-5_background_4", new Entry {
Offset = -62.5f,
TopTransparency = true,
BottomTransparency = false,
OpaqueBelow = 1,
OpaqueAbove = 55
} },


My backdrop tiling script is responsible for taking the stored offset metadata and shifting the center position of the rendered sprite accordingly.

The second issue is that while Unity supports texture coordinate clamping, there's no way to do that when the sprite in question is one of many sprites packed into a texture atlas! Unity's sprite renderer only handles tiling in a very specific way, which no longer applied to what I wanted to do, so I had to modify my fragment shader to handle the texture clamping part.

In order to do this texture clamping correctly, I also needed my fragment shader to understand what UV texture coordinates it was supposed to be working with inside the texture atlas. Normally the fragment shader is completely oblivious of this -- the Sprite renderer is responsible for handing it a set of UVs to render and then the shader just does the texture lookups blindly.

It also turns out that you don't actually have access to the sprite UV metadata from within your fragment shader =/. So I needed to pass those into the shader, =and= I couldn't use uniform variables since that would break batching. Luckily, Unity happens to expose a SpriteDataAccessExtensions class which allows you to write to the UV texture coordinates of the sprite mesh used by a sprite renderer internally.

In addition to allowing you to modify the main UVs, it also lets you set additional texture coordinates on the mesh (TexCoord1, TexCoord2, TexCoord3, etc.). I used those to pass extra data to the vertex shader -- and then through to the fragment shader -- including the sprite UVs from the texture atlas.

This took a lot more debugging to get right, but at the end of all that, it was working! Here's the new version of the texture atlas from before (in all its red-channel glory), which is 1024x1024 instead of 4096x4096, and 1 MB instead of 64 MB!


[h2]Alleviating Overdraw[/h2]

Rhythm Quest isn't really a performance-intensive game, so it runs fine on most systems. That said, there are a couple of areas where it can get into performance issues on lower-end devices (surprisingly, the Nintendo Switch is the main culprit of this so far).

One major performance bottleneck involves overdraw, which is a term used to describe when pixels need to be rendered multiple times -- typically an issue when there are many different transparent / not-fully-opaque objects rendered in the same scene (*cough* backdrop layers *cough*).

Unlike in a generic 3d scene (where we would try to render things from front-to-back, to minimize overdraw), for our backdrop layers we need to render things from back-to-front in order to handle transparency correctly:


Unfortunately, this results parts of the screen being rendered to many times over and over again, particularly the lower areas (all of those overlapping cloud layers...). The good news is that the cropping we did above already does some work to alleviate this a bit. Before, the large transparent portions of backdrops would still need to go through texture lookups and be rendered via the fragment shader, even though they were completely transparent (i.e. didn't affect the output). But now, we've cropped those areas out of the sprite rendering entirely, so they aren't a concern.

We can still do a little more optimization, though, for opaque backdrop sections! Take this layering of opaque cloud layers from level 2-5 as an example:


There's a lot of overdraw happening on the bottom sections of the screen. What if we were smart about this and kept track of which portions of the screen are being completely covered by each layer, front-to-back? That would let us render smaller screen sections for all of the back layers:


We can handle this by having our image processing script store some additional metadata (the "OpaqueBelow" and "OpaqueAbove" fields) so we know at which point a background layer obscures everything above or below it. We then need to modify the backdrop script to adjust the drawing rect and UVs accordingly (easier said than done...)...

The end result of all of this is...that everything looks exactly the same as before...


But! It's significantly more efficient both in terms of memory usage and rendering time. I'll have to patch the existing demo builds with this optimization at some point, but the Switch build is already showing some improvements, which is nice.

We're not completely done with performance though, as right now the rendering of the water sections are also quite inefficient! I may try to tackle that next...

Devlog 53 - Level 6-1

I'm continuing to just roll ahead with levels! It's funny, I feel like there was a long period of time when working on new levels and thinking about the mechanics felt intimidating, so I would just procrastinate on it and work on other miscellaneous things. But now I think it's the opposite (probably partly because all of my mechanics are known now), where I've gotten into the habit of just working on only levels. It's good though, the levels are something that need to be done 100%.

Anyways, I went straight ahead and finished up the first level in world 6, level 6-1!

[previewyoutube][/previewyoutube]

[h2]Speed Zones[/h2]

World 6 introduces one new mechanic, the red "speed zones" that increase scroll speed and change up the rhythmic meter into triplet patterns (quarter note triplets) temporarily:


As with some of my other mechanics, this might get mixed initial reactions from players (or at least, that's the expectation I'm setting up for myself...). For people who don't "get" triplet meter, it might seem sort of like an arbitrary changeup/speedup that's hard to react to. I experimented with having a sort of 2-beat "lead-in" to prep you for the new meter, but I was pretty unhappy with how that sounded (messy...) so I took it out. (Maybe that'll be an optional toggle someday?)

For now I'm just trying to give the player some easy speed zones at first so that they can listen to and get used to the rhythm, before I throw actual quarter-note triplets at them:


You might not have noticed it until I pointed it out (now it'll stick out like a sore thumb...), but none of the speed zones have any height ramps -- they're all completely flat. I couldn't really get the "conveyor belt" graphic to look reasonably good at an angle, so I just decided to add that as a restriction (the level generator will probably be really confused if you try to add ramps in the middle of it). I'm totally ok with that though, it makes them simple to read...and I actually have the same restriction for spike enemies (they can travel across ramps, but the actual jump needs to be on flat ground), so it's not really a new thing. I guess technically I can support height changes in the form of air jump combos and flight paths, but those haven't come up yet.

[h2]Visual Identity[/h2]

This one was easy since I had already been thinking for a long time to do an outer space theme for world 6 (maybe sort of a trope to have the final area be space-themed?). One of the worries here is that all of the level backdrops are just going to look similar since they'll all just be dark skies with stars, but hopefully I can make them a little bit distinct by experimenting with different foreground elements and such.


For this level I went with sort of a "spiral galaxy"-type drawing with a bright orb in the middle. In hindsight, I probably could have drawn it bigger...but I guess this way it's more of a single element rather than filling most of the screen, which works too. It looks like there's all sorts of colors in there, but it's really just the 8-color palette, but with a bunch of translucent layers. It was actually quite fun to draw, as it felt like more of a painterly (impressionistic?) approach throwing blobs and dots of colors everywhere rather than the geometric shapes from world 5. You can also see that I'm making heavy use of the spraypaint tool for the first time here, particularly in the soft "nebula"-like patterns in the background.

As usual, I tried to add in some amount of variation in the color palette depending on the different sections of music. Here I switch to a completely black background color for the first "main" section of the song to up the contrast level a little bit:


I'm hopeful about this art style for world 6! Hopefully I'll be able to draw some nice backdrops by experimenting with this general direction. I was a bit worried at first since I feel like "space" art tends to not do well with such limited color palettes, but it's turning out fine with clever use of dithering-like effects and translucency.

[h2]Musical Identity[/h2]

Unlike with world 5, I didn't do a whole ton of musical exploration before starting off on this level...I sort of just "winged it" and went with some rough ideas, seeing what came out of them. I knew I wanted to try playing around with whole-tone scale melodies, but I was also interested in exploring more varied bass sounds (maybe even dubstep-esque), as well as featuring prominent use of arpeggios and low-pass/high-pass filter automation.

Here's a snippet showcasing the "wub" bass featured in this track, as well as a triangle wave synth that plays a whole tone scale pattern. I dunno, somehow wobbly basses and triplet rhythms almost seems like a bit of a musical trope...

https://rhythmquestgame.com/devlog/53-wholetoneandbass.mp3

Here's another snippet, showing off some low-pass filter automation on gated chords, as well as an arpeggio that has some long reverb on it (spacey!).

https://rhythmquestgame.com/devlog/53-arpfilter.mp3

And here's a longer snippet of the main buildup in the song. I use a different (but still-prominent) bass here, and slowly open up the filter as it builds. As with world 5, I'm making heavy use of triangle-wave tom fills to accentuate the rhythmic changeups.

https://rhythmquestgame.com/devlog/53-buildup.mp3

[h2]Level Select[/h2]

A new world also means a new level select theme! Here's a short video where you can hear that in action:

[previewyoutube][/previewyoutube]

I had a few false starts on this one before I landed on the idea, but it sounds great! I love how the major IV -> minor iv progression works here. You can hopefully hear the low-pass filter automation on the chorded synth, as well as the reverbed short arpeggio pattern -- same ideas as in the level.

There's still a bunch more to explore with speed zones and how they combine with the other mechanics, which should be interesting to figure out over the course of these next 4 levels! I might have to tread a tricky balance since fast rhythms (e.g. double-hit enemies) are =really= fast in speed zones, so those will only be feasible if I take the overall tempo down a notch...

Devlog 52 - Level 5-5

Despite not having a lot of time/energy to throw around this month, I somehow managed to finish working on level 5-5, tentatively titled "Brilliant Boulevard":

[previewyoutube][/previewyoutube]

As is usual with the last level in each world, there are no new mechanics here, so it's just combining everything from the previous levels and amping up the difficulty. The tempo is significantly faster than the slower-paced level 5-4, which makes the chart a lot more dense in terms of inputs.


For visuals, I experimented somewhat aimlessly with different shapes until I settled on this sort of "spiked" design, mirroring the top and bottom so it kind of feels like stalactites and stalagmites. It's reminiscent of the design from level 5-1, just with different shapes. Again my lack of visual "complexity" is showing here with the simplistic shapes -- the visual detail really lies in the layering (translucency!) and parallax scrolling.

I also experimented with having syncopated / offbeat spike enemies in the tail end of this level (so far they've only been on downbeats). Normally this is a little hard to read, but adding the green enemies actually makes it fine since it gives you a static marker to read the rhythm (even if the spike enemies were invisible you could still play this section fine):


This is one of those curious instances where adding additional obstacles (having green enemies, instead of just rolling spike enemies) actually makes the chart easier, not harder. There are many types of possible difficulty in Rhythm Quest charting ("random" notes that lack patterns would be incredibly awkward and difficult to read), but I'm following rather specific charting philosophies in order to feature difficulty in the "right" ways -- at least, for the main campaign.

That wraps up the entirety of world 5, which means next up I'll have to find some sort of musical and visual identity for world 6, where I'm supposed to introduce triplet-based speed zones!