Update 79 - New Build!
Update 79 - New Build!
(September 15th - October 24th, 2018)
A new build of Build a Game Universe is live! Yea!
Are you new to Build a Game Universe? Request your key (free) today and start playing with all the new features! ([email protected])
First.
This update represents the past several months of work on Build a Game Universe. We have eight major areas to cover (changes, revisions, additions) and (for those following along) it combines updates from the last few months to help keep things organized. :)
1. Main Menu
2. Market Center
3. Product Page
4. Editor Mode
5. Tile Types
6. Tilesets (tiles)
7. Tile Builder
8. Performance Upgrades
You can dive in to the categories below and/or jump straight in to Build a Game to see the changes yourself. Let us know if you have any questions. Have fun!

1) Main Menu.
+ Learn Modes
Framework has been established for four different learning types. Quick intro, classroom, manual, and video. As we move forward (lots to do), we'll continue to refine and polish these based on feedback and testing.
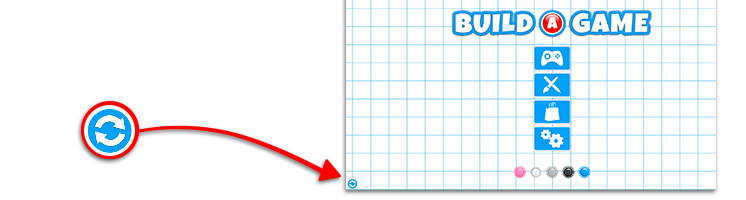
+ Refresh Button
The refresh button on the main menu page (lower left) is the beta way of insuring you can 'refresh' tiles and products in case they don't appear in your market and development.
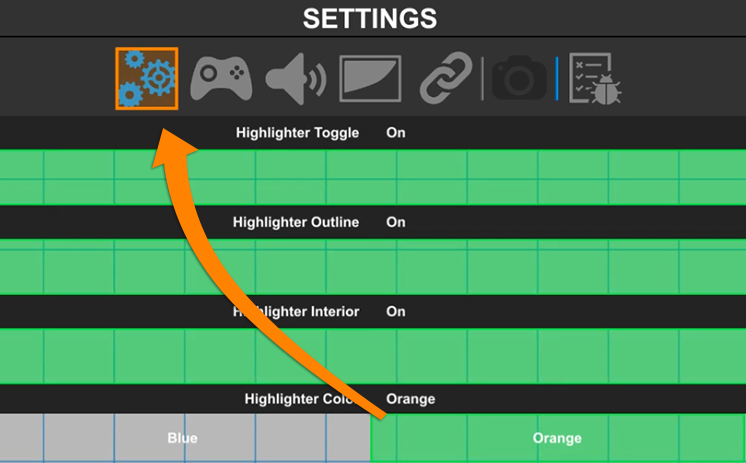
+ Settings Menu (Highlighter)
A new highlighter is available for the user. It allows active UI to show a border line, inside fill and optional color when selected. Settings menu will soon include all editor side options as well.
+ Onscreen Keyboard
The onscreen keyboard (joystick and touch mode) provides a clean grid pattern for easier navigation.
2) Market Center.
The Market Center (continuing goals) are to provide a fresh and fun experience while exploring the games and tilesets in the Build a Game Universe.
+ Layouts and Grids
Added optional view types which included small and large sizing, and added a list, grid and column type view.
+ List View (New Design)
+ Switchable views (List, Column, Grid)
+ Product View Sizes (Small/Large)
3) Product Page.
+ New to the product page is the ability to assign a unique background image to your product. The background fits for any screen-size and defaults at 1920x300 pixels. Examples can be found in the Default Tileset
+ Public and Private Modes(plus coming soon - gameID's for quick sharing)
+ Gallery System (carousel)
Set youtube video links and screenshot images to your games.

+ The carousel viewer provides two viewing modes (fullscreen and halfsize)
+ Video player controls (close up)
+ Gallery viewing example

+ QA Section
The core testing of levels is currently disabled so that we can implement a much larger (and fun) system for quality assurance on games. The end goal is to help increase developer quality and meet a higher level of expectation from the end user. In place of QA, the developer will verify their game is playable and meets the user guidelines each time they publish, by clicking on the message prompt for Publisher Agreement.
4) Editor Mode.
+ Toolbar tools
Let's point out a few buttons you may enjoy clicking on in the editor. :)
 1) Home (0,0) - Takes you back to the origin point in the scene.
2) Quick Map and Go - Click to zoom out to scene extents, then click to zoom back in.
3) Save Scene - Allows you to save while you work (Hotkey - Ctrl+S)
4) Video Player - In editor - watch or follow the training videos while you build.
5) Tile Selection - List style view for selecting and moving to a tile.
Example of Tile Selection Viewer
+ Tile Connections
Building levels then coming back to them after a day (or two) can present a challenge in remembering what tile is connected to what. Our first goal in assisting with that challenge is to connect the dots. Any tile that connects with another has the option of viewing it's connection.
Optional Line Images
Animating the Line Direction
Multi-tile Connection
+ Trigger Events
The Trigger Event system in Build a Game is prepared for testing. We'll release additional videos on complex designing this month. For now, it would be great to see how everyone handles the basics (and help in finding bugs, polishing flow and function). Thank you!
1) Trigger Event: Basics 2) Trigger Event: Screen Transition 3) Trigger Event: Change Player State 4) Trigger Event: Change Mover Direction 5) Trigger Event: Adjust Scribble Brush Size
+ Slider bar input
The input buttons (by click) will allow you to change the value directly (without sliding/dragging).

Multiple input selection and adjustment

+ Disabled Tile Save Type (None, Remember-Me, Persistent) for tiles. We are refactoring it's core purpose alongside the QA section. Will be released in a future beta build.
5) Tile Types.
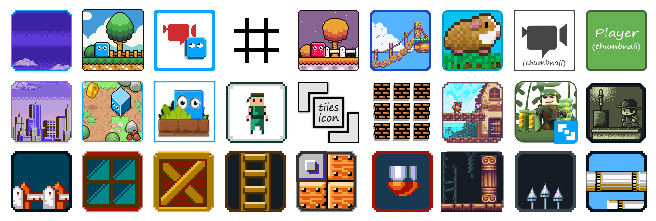
The new tile types are listed below with one example for each. Next week we'll post training videos covering all their cool features and how to use them. :)
+ Teleportation Item - Ability to teleport player a set distance

+ Offscreen Indicator - Tracks any tile using an icon (on/off screen)
+ Waypoints - Point path system for tiles to follow
+ Gui - Added a popup message system and pause option (user side)
+ Music Match - Pattern making system to match by click
+ Dissolver - Create smooth fades to reveal and hide parts of your scene
+ Dissolver - Direction and gradient type
+ Dissolver - Edge blending for effects
+ Trigger By Layer - Tiles on one layer can trigger tiles on another layer.
You can test all available tiles by downloading the Default Tileset in the Market Center. :)
Current tile list (wall of text): Audio, Auto-Tile, Background (Parallax), Block (Default), Block Multi-State, Bomb, Builder (Think minecraft), Camera (20+ different type), Camera Gui, Check Point, Clouds and Shadow, Damage, Decal, Dialog Bubble (Simple), Dissolver, Door (key, lever, pad), Dynamic Circuits (visual), Dynamic Sky, Dynamic Grass, Fog of War, Goal, Gradient Sky, Grappling Hook, Hang System (vines, poles), Image Effects (300+ camera effects), Jetpack, Jumppad, Killbox, Ladder (standard and grow), Light and Shadow, Lightning, Lightrays, Manager, Message Flash, Music Notes, Numbers2048, Offscreen Indicator, Particles, Passthrough, Pickups (Lots of options), Platform, Player, Player Ai, Reflection, Screen Transition, Scribble Physics, Slingshot, Spawner, Start Position, Teleportation, Teleporter, Terrain, Trigger, Volume, Waypoint, Weapon and more tiles on the way! And combine these with thousands of properties to make each tile incredibly unique and yours. :)
6) Tilesets.
Available now, 25+ tilesets ready for testing.
Special Note: For all developers that have submitted content to the Market Center, you can now re-submit to get things back up. :) No changes are needed, simply open the tileset project in Tile Builder, click Submit, then when you are ready, make it Public in Build a Game.
Check out the full process here
7)Tile Builder.
We've added two options (buttons) in Tile Builder for improving the workflow and speed of making tiles between tilesets.
Exporting a Project
Have a tileset project? Wish you could use that one as a starter project for other tilesets? You can!

1. Bottom left corner you'll see four buttons. Click on the disc with the green arrow.
2. Create a folder or navigate to an existing one.
3. Click the 'Export Project' button.
4. Done.
That's all there is to it. Now you have a full copy of the project to use for a new starter project. When you open it up, you can replace (Right click on tiles and replace images) tiles and already have all your properties completed. Yea!
Check out the video example to see how quick and easy it is. :)
Exporting a Tile Builder Project
Template Loading and Saving
Templates allow you to Save and Apply tile properties within different projects (tilesets). Meaning -> You spent hours on a player tile and want to apply those same values to another tileset player. Now you can. :)

1. Open Project'A'. (Any project you want)
2. Right click on a Tile. Select the Save as Template option.
3. Give it a name when prompted (Ex. Player Tile - Dog 1 )
4. Open Project'B'. (Any project you want - or use it in the project you already have opened)
5. Right click on a Tile. Select the Apply Template option.
6. Select the template you want to apply. Tile Builder will automatically assign it to the selected tile.
Here's a simple video showing how to do it :)
Template Saving and Applying Explained
8) Performance Upgrades.
The past few months we've continued to focus testing on mobile and consoles, mainly in key areas for speed and size improvement.
+ Loading into Build a Game happens immediately.
+ Going into the level editor loads much faster with intelligent tileset checking.
+ RAM usage is significantly less in multiple areas, namely loading and unloading of tiles.
If you have been using Build a Game for awhile, then you are most likely going to notice a huge speed increase on loading (in all areas). :)
Training Videos
Don't forget, we have training videos available for those wanting to learn how to use Build a Game.
1025+ videos are available for learning Build a Game!
116 videos are available for learning Tile Builder!
Our Silver Standard Reminder (Silver Coin Allowance)!
During the beta program, you will receive 1,000 silver coins into your account each week. Have fun purchasing games and tiles!
Beta Group Signup
Sign up for the Beta. Email [email protected] to get your steam key and be a part of the testing. =)
Remember, this update means we have cleared the store front and servers (Fresh Start). If you have any questions or concerns, just let us know ([email protected]). Thank you!
Time to Build a Game with us and fill up the store with fun!
Thanks!
Chad - Nathan - Eric
(September 15th - October 24th, 2018)
A new build of Build a Game Universe is live! Yea!
Are you new to Build a Game Universe? Request your key (free) today and start playing with all the new features! ([email protected])
First.
This update represents the past several months of work on Build a Game Universe. We have eight major areas to cover (changes, revisions, additions) and (for those following along) it combines updates from the last few months to help keep things organized. :)
1. Main Menu
2. Market Center
3. Product Page
4. Editor Mode
5. Tile Types
6. Tilesets (tiles)
7. Tile Builder
8. Performance Upgrades
You can dive in to the categories below and/or jump straight in to Build a Game to see the changes yourself. Let us know if you have any questions. Have fun!
1) Main Menu.
+ Learn Modes
Framework has been established for four different learning types. Quick intro, classroom, manual, and video. As we move forward (lots to do), we'll continue to refine and polish these based on feedback and testing.
+ Refresh Button
The refresh button on the main menu page (lower left) is the beta way of insuring you can 'refresh' tiles and products in case they don't appear in your market and development.
+ Settings Menu (Highlighter)
A new highlighter is available for the user. It allows active UI to show a border line, inside fill and optional color when selected. Settings menu will soon include all editor side options as well.
+ Onscreen Keyboard
The onscreen keyboard (joystick and touch mode) provides a clean grid pattern for easier navigation.
2) Market Center.
The Market Center (continuing goals) are to provide a fresh and fun experience while exploring the games and tilesets in the Build a Game Universe.
+ Layouts and Grids
Added optional view types which included small and large sizing, and added a list, grid and column type view.
+ List View (New Design)
+ Switchable views (List, Column, Grid)
+ Product View Sizes (Small/Large)
3) Product Page.
+ New to the product page is the ability to assign a unique background image to your product. The background fits for any screen-size and defaults at 1920x300 pixels. Examples can be found in the Default Tileset
+ Public and Private Modes(plus coming soon - gameID's for quick sharing)
+ Gallery System (carousel)
Set youtube video links and screenshot images to your games.
+ The carousel viewer provides two viewing modes (fullscreen and halfsize)
+ Video player controls (close up)
+ Gallery viewing example
+ QA Section
The core testing of levels is currently disabled so that we can implement a much larger (and fun) system for quality assurance on games. The end goal is to help increase developer quality and meet a higher level of expectation from the end user. In place of QA, the developer will verify their game is playable and meets the user guidelines each time they publish, by clicking on the message prompt for Publisher Agreement.
4) Editor Mode.
+ Toolbar tools
Let's point out a few buttons you may enjoy clicking on in the editor. :)
1) Home (0,0) - Takes you back to the origin point in the scene.2) Quick Map and Go - Click to zoom out to scene extents, then click to zoom back in.
3) Save Scene - Allows you to save while you work (Hotkey - Ctrl+S)
4) Video Player - In editor - watch or follow the training videos while you build.
5) Tile Selection - List style view for selecting and moving to a tile.
Example of Tile Selection Viewer
+ Tile Connections
Building levels then coming back to them after a day (or two) can present a challenge in remembering what tile is connected to what. Our first goal in assisting with that challenge is to connect the dots. Any tile that connects with another has the option of viewing it's connection.
Optional Line Images
Animating the Line Direction
Multi-tile Connection
+ Trigger Events
The Trigger Event system in Build a Game is prepared for testing. We'll release additional videos on complex designing this month. For now, it would be great to see how everyone handles the basics (and help in finding bugs, polishing flow and function). Thank you!
1) Trigger Event: Basics 2) Trigger Event: Screen Transition 3) Trigger Event: Change Player State 4) Trigger Event: Change Mover Direction 5) Trigger Event: Adjust Scribble Brush Size
+ Slider bar input
The input buttons (by click) will allow you to change the value directly (without sliding/dragging).
Multiple input selection and adjustment
+ Disabled Tile Save Type (None, Remember-Me, Persistent) for tiles. We are refactoring it's core purpose alongside the QA section. Will be released in a future beta build.
5) Tile Types.
The new tile types are listed below with one example for each. Next week we'll post training videos covering all their cool features and how to use them. :)
+ Teleportation Item - Ability to teleport player a set distance
+ Offscreen Indicator - Tracks any tile using an icon (on/off screen)
+ Waypoints - Point path system for tiles to follow
+ Gui - Added a popup message system and pause option (user side)
+ Music Match - Pattern making system to match by click
+ Dissolver - Create smooth fades to reveal and hide parts of your scene
+ Dissolver - Direction and gradient type
+ Dissolver - Edge blending for effects
+ Trigger By Layer - Tiles on one layer can trigger tiles on another layer.
You can test all available tiles by downloading the Default Tileset in the Market Center. :)
Current tile list (wall of text): Audio, Auto-Tile, Background (Parallax), Block (Default), Block Multi-State, Bomb, Builder (Think minecraft), Camera (20+ different type), Camera Gui, Check Point, Clouds and Shadow, Damage, Decal, Dialog Bubble (Simple), Dissolver, Door (key, lever, pad), Dynamic Circuits (visual), Dynamic Sky, Dynamic Grass, Fog of War, Goal, Gradient Sky, Grappling Hook, Hang System (vines, poles), Image Effects (300+ camera effects), Jetpack, Jumppad, Killbox, Ladder (standard and grow), Light and Shadow, Lightning, Lightrays, Manager, Message Flash, Music Notes, Numbers2048, Offscreen Indicator, Particles, Passthrough, Pickups (Lots of options), Platform, Player, Player Ai, Reflection, Screen Transition, Scribble Physics, Slingshot, Spawner, Start Position, Teleportation, Teleporter, Terrain, Trigger, Volume, Waypoint, Weapon and more tiles on the way! And combine these with thousands of properties to make each tile incredibly unique and yours. :)
6) Tilesets.
Available now, 25+ tilesets ready for testing.
Special Note: For all developers that have submitted content to the Market Center, you can now re-submit to get things back up. :) No changes are needed, simply open the tileset project in Tile Builder, click Submit, then when you are ready, make it Public in Build a Game.
Check out the full process here
7)Tile Builder.
We've added two options (buttons) in Tile Builder for improving the workflow and speed of making tiles between tilesets.
Exporting a Project
Have a tileset project? Wish you could use that one as a starter project for other tilesets? You can!
1. Bottom left corner you'll see four buttons. Click on the disc with the green arrow.
2. Create a folder or navigate to an existing one.
3. Click the 'Export Project' button.
4. Done.
That's all there is to it. Now you have a full copy of the project to use for a new starter project. When you open it up, you can replace (Right click on tiles and replace images) tiles and already have all your properties completed. Yea!
Check out the video example to see how quick and easy it is. :)
Exporting a Tile Builder Project
Template Loading and Saving
Templates allow you to Save and Apply tile properties within different projects (tilesets). Meaning -> You spent hours on a player tile and want to apply those same values to another tileset player. Now you can. :)
1. Open Project'A'. (Any project you want)
2. Right click on a Tile. Select the Save as Template option.
3. Give it a name when prompted (Ex. Player Tile - Dog 1 )
4. Open Project'B'. (Any project you want - or use it in the project you already have opened)
5. Right click on a Tile. Select the Apply Template option.
6. Select the template you want to apply. Tile Builder will automatically assign it to the selected tile.
Here's a simple video showing how to do it :)
Template Saving and Applying Explained
8) Performance Upgrades.
The past few months we've continued to focus testing on mobile and consoles, mainly in key areas for speed and size improvement.
+ Loading into Build a Game happens immediately.
+ Going into the level editor loads much faster with intelligent tileset checking.
+ RAM usage is significantly less in multiple areas, namely loading and unloading of tiles.
If you have been using Build a Game for awhile, then you are most likely going to notice a huge speed increase on loading (in all areas). :)
Training Videos
Don't forget, we have training videos available for those wanting to learn how to use Build a Game.
1025+ videos are available for learning Build a Game!
116 videos are available for learning Tile Builder!
Our Silver Standard Reminder (Silver Coin Allowance)!
During the beta program, you will receive 1,000 silver coins into your account each week. Have fun purchasing games and tiles!
Beta Group Signup
Sign up for the Beta. Email [email protected] to get your steam key and be a part of the testing. =)
Remember, this update means we have cleared the store front and servers (Fresh Start). If you have any questions or concerns, just let us know ([email protected]). Thank you!
Time to Build a Game with us and fill up the store with fun!
Thanks!
Chad - Nathan - Eric