Update 84 - Timeline Tile and Tutorial!
Update 84 - Timeline Tile and Tutorial!
(March 28th - April 23, 2019)
Introduction to Timeline!
We want to take time to walk you through the features available in the Timeline Tile (Tutorial style). Documentation is available here.
Timeline Structure
The timeline tile provides an easy way to add story context to your game!
The structure of a timeline looks like the image below. A director tile (controls the start and general elements of an event). The clips are individual actions (ie. movie bars animate in, or play an animation sequence, etc). The props provide a series of images and audio clips to use during the timeline event.
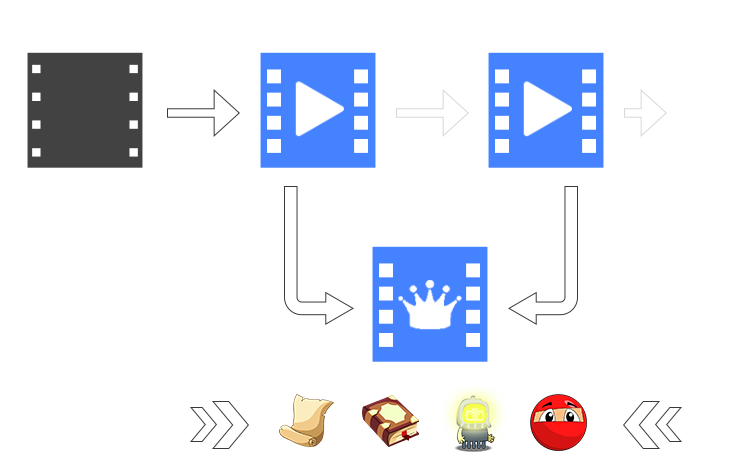
With the Director, you can have it trigger the event to start. Each Director has an id to tell corresponding Clips to begin. The Clips run in numeric order and once all clips are complete, the event is ended.
Let's take a look at the setup and several of the timeline clip actions available:
Step 1: Using the Default Tileset, you can put the director and two clip tiles in to the scene. Then enable the Director (gif example).
Step 2: Activate the first clip.
Step 3: Set the movie bars to 'show' when activated.
Step 4. Activate the second clip.
Be sure the id for the clip is changed to 1, that way it happens after the clip 0.

Step 5. Now we can hide the movie bars after a slight delay.

Step 6. Press play and walk the player into the tile to see the event happen.

Step 7. Camera Zooming. With timeline, you can control the camera features directly as things happen. This example sets the camera to zoom out, then back in on completion.
Step 8. Actor Setup and Fade. Any tile can be enabled as an actor for the timeline.
+ Enable an Actor
+Fade Setup
Step 9. Gui Elements. When going in to a cutscene, hiding/moving gui offscreen is common. Set gui as an actor and the timeline auto toggles its state.
+ Gui Setup
+ Gui moving on / off screen
Timeline Editor
The editor is an input field with some fun features added. You can type your story directly in to it, and/or use an external tool (notepad++, etc) and copy/paste it in to the box.
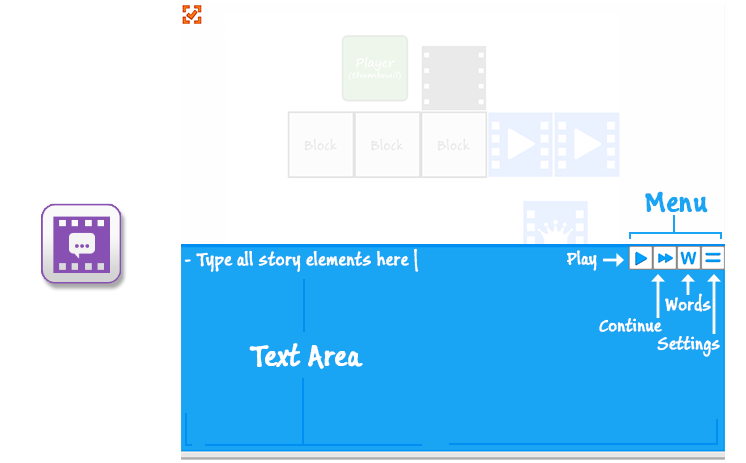
Timeline Editor Menu
While we're looking at the editor, here's a quick look at the extended tools.

1 - Play : Test out what you've written instantly.
2 - Continue : Make changes and continue where you left off.
3 - Word : Available words you can type and templates to start with.
4 - Copy : Click to copy the current text to the clipboard.
5 - Paste : Click to paste the clipboard text in to the current text.
6 - Font Type : Click to cycle through font type.
7 - Text Size : Display size of text in editor.
8 - Font Color : Color for editor text.
9 - Editor Layout : Six layout options for the panel.
10 - Panel Alpha : Level of transparency for editor panel.
11 - Panel Color : Color of editor panel.
12 - Toggle Tools : Show full and compact mode.

Writing Your First Story
Let's jump in to writing! To have text appear on the screen we can use several different options. Our first option is to tell Timeline which box to type in.
~centerbox
And then we can align the text to a position. For this example we'll put it in the center of the screen using: aligncc (Note: We separate each parameter with a comma ',')
~centerbox, aligncc
Then we use the colon : to let the story know we're ready to type our message.
~centerbox, aligncc: Hi there
Now you're ready to press the play button to test it out. :)
Extra:
If you want to change the color of the font, type in:
~centerbox, aligncc, color = red: Hi there
Extra, Extra:
Want to add an icon into the text? Try this:
~centerbox, aligncc, color = red: Hi there
Introduction to Flags and their Functions
Flags and their functions
~ Speaking
@ Name and speaking
# Picture
+ Increment
! If statement
> Run
/ Command
In total, there are about 700 keywords provided for the flags. :)
A line has 3 sections:
Flag
The first character of the line, that is not a letter or a number (example: “@” is a flag). When looking up the flag, white spaces at the beginning of the line are omitted. If the line does start with a letter, then the default “~” flag is assigned. The flag is used to invoke different methods, for example the flag “#” will trigger the “picture” method, which will change an image element of the UI.
Properties
Any number of phrases, words, numbers etc. separated by a comma, located between the flag and a colon. While all white spaces count, a single space after the comma is omitted for clarity. Arguments are used by all methods differently. ~ -flag doesn't have arguments and the whole line (ex. Flag) is used as a message.
Message
Everything that comes after the colon. All white spaces after the colon and at the end of the line are cleared. Messages are used by all methods differently.
Word Samples
Click on the 'W' button and choose Templates to see a full list of examples.
And that concludes the overview and tutorial on getting started with the Timeline tile. This week we'll post full videos walking you through all the elements in greater detail. Thank you!
Training Videos
Don't forget, we have training videos available for those wanting to learn how to use Build a Game.
1025+ videos are available for learning Build a Game!
116 videos are available for learning Tile Builder!
Our Silver Standard Reminder (Silver Coin Allowance)!
During the beta program, you will receive 1,000 silver coins into your account each week. Have fun purchasing games and tiles!
Beta Group Signup
Sign up for the Beta. Email [email protected] to get your steam key and be a part of the testing. =)
Have fun testing out the Timeline tile in Build a Game Universe!
Thanks!
Chad - Nathan - Eric