1. Albion Online
  2. News

Albion Online News

Dev Talk: New Albion Journal Categories

In this Dev Talk, Game Director Robin Henkys introduces two exciting new Albion Journal categories coming with the Horizons update: Social & Guild, and Islands. Each offers their own brand-new, themed rewards, so join us as we take a look within.

[previewyoutube][/previewyoutube]
[h3]Social & Guild[/h3]
Take part in guild activities like large-scale PvP battles and hunting Crystal Creatures to earn these prestigious rewards:
  • A jousting-themed Armored Horse skin which displays your guild colors
  • A Heraldic Banner to flaunt your Guild heraldry, with an elite version also available


[h3]Islands[/h3]
Enjoy the simple life by completing farming, cooking, and building challenges to unlock these rustic rewards:
  • Farming-themed Transport Ox skin: The farmer’s perfect companion
  • A Straw Hat, whose elite version features a double rainbow


The Horizons update lands October 28, so you'll be able to enjoy these new challenges very soon.

You’ll hear more about our future plans after the update. Stay tuned!

The Final Invasion Day of Season 24 is Coming!


As the final Invasion Day of Season 24 approaches this weekend, guilds are preparing for the final push. Here's a recap of the state of play after the previous Invasion Day:
  • Albion Americas: Members of the AZULE alliance have been holding the top two spots, with The Lonely Men close behind. With their allies FAX in 4th, The Lonely Men pose an even greater threat to the top two as we reach the season’s end.
  • Albion Europe: The big war between the FFlow and BOBER coalitions saw the fall of Sex and Flex's headquarters, leaving POLSKA GUROM in a dominant position. With the support of their allies, POLSKA GUROM has a clear path to victory, and many guilds are now focused on securing Crystal and Gold rankings.
  • Albion Asia: One Gin is on track to surpass 1.3 million Season Points – an all-time Albion record! With a surely unassailable lead, the question is just how many points they’ll gather as this historic season draws to a close.


The final Invasion Day of Season 24 will reset all territories, giving guilds one last chance to earn points before the season ends on October 21 and the final ranks (and rewards) are set. Tune in to watch it all play out live on twitch.tv/AlbionTV, with Robinhoodrs, Shozen, Lewpac, Bogul, and Tazzik providing commentary and analysis:
  • Albion Asia: October 19, 14:00 UTC
  • Albion Europe: October 19, 18:00 UTC
  • Albion Americas: October 20, 01:00 UTC
After a short break, Guild Season 25 begins on November 2. For the full schedule, see this forum post.

Learning Points and How To Use Them


Developing your character in Albion Online is a journey with many possibilities, and Learning Points can help you progress essentially five times as quickly. This guide shows how Learning Points work, how to earn them, and how to use them wisely to advance in the areas that matter to you.

[h3]What are Learning Points?[/h3]
Learning points, (LP for short) allow your character to accelerate progress considerably on the Destiny Board.


Once you’ve reached at least 20% of progress in a given node (a mastery level of a specific skill), you’ll unlock the option to immediately complete that level by spending Learning Points. This is indicated by a line in the progress bar of a given node.
  • Open the Destiny Board (Hotkey: B)
  • Select the node you wish to learn
  • Click “Learn” to spend the necessary Learning Points and complete that level


The amount of Learning Points needed to complete a node depends on the amount of Fame that would otherwise be required to complete it. It also scales with the type and level of the node you wish to complete. Each Learning Point counts for more Fame at higher levels on the Destiny Board.

To automatically learn a node without having to go through this process every time, you can activate Auto-Learn. This will use Learning Points in the selected nodes once the 20% threshold has been reached. For this to work, you need to have Auto-Learn selected in both the node you wish to progress, as well as the main Auto-Learn option located at the top-right of the Destiny Board. Here you can also see your current amount of Learning Points.


[h3]How do I get Learning Points?[/h3]
Learning Points can be obtained in several ways:
  • You automatically earn 30 LP every day by having active Premium status
    • With Premium you receive 1 point every 48 minutes, whether you’re online or not
  • You will also receive 500 Learning Points the first time you purchase 7 days Premium or more for a character
  • Mastery Packs contain different amounts of Learning Points, depending on the tier you purchase
  • Non-Premium characters can earn 10 Learning Points by completing the daily Adventurer’s Challenge
  • You can obtain Tomes of Learning by completing certain Albion Journal missions.
    • These reward a certain amount of Learning Points when used, depending on their tier


There is no limit to how many Learning Points you can accumulate, so you might want to save them for the right opportunity.

[h3]How can I use Learning Points?[/h3]
Learning Points can be used to progress in most areas of your Destiny Board.

Combat

You can spend Learning Points on Weapon/Armor mastery to unlock the ability to use higher-tier items. If used on the specialization nodes on the outside of the Destiny Board, you can boost your Item Power of each item.


Tip: Since combat Fame is comparatively easy to come by in Albion, you may want to consider using your Learning Points on other areas that you wish to progress first.

Crafting

Similarly to combat, crafting mastery allows you to craft higher-tier items, while specialization reduces Focus costs and increases the chances of crafting higher quality items.

Tip: It is often recommended to use Learning Points to progress through lower-level crafting specializations, allowing you to unlock more valuable, higher-level crafting easily.


Refining

When it comes to refining, the first level within a node unlocks the ability to refine a new tier of materials. After that, additional levels increase your Focus efficiency.

Tip: If you’re interested in refining, it’s often recommended to use Learning Points to increase your specialization and become a master refiner.

Gathering

Gathering nodes work like refining. Reaching the first level of a node will unlock a new tier of gathering tools and gathering armor, while further levels within a node increase the gathering speed and yield of resources within that tier.


Tip: Gathering is a great place to use Learning Points early on. It is often recommended to use Learning Points to unlock the first level of a new gathering tier, so that you can use better tools and gathering armor while starting to progress towards the next tier.

Learning Points can not be used to boost progress through the Adventurer and Reaver nodes, nor on cooking, alchemy, and farming.

How you spend your Learning Points is ultimately up to you, and really depends on the activities you want to do in Albion. And remember, if at any point you’re unsure, you can always hold onto your Learning Points for now and use them later. Happy learning!

Dev Talk: UI Improvements

After our last Dev Talk on the upcoming open-world changes, Game Director Robin Henkys sat down to explore the other side of the Horizons update: its UI improvements. In this video, we look at the much-anticipated customization options and quality-of-life improvements coming when the update releases on October 28.

[previewyoutube][/previewyoutube]
[h3]Advanced Inventory Options[/h3]
  • Collapse your equipped items into a compact view
    • This gives you more room to see what’s in your inventory
  • Adjust the size of items in your inventory
  • New sorting options:
    • Weight
    • Tier
    • Estimated market value
    • Value by weight


[h3]Storage Upgrades[/h3]
The following features are being added to Bank and Chest UIs:
  • A Move All option
    • Allows you to easily move items between your inventory and the bank, or between bank tabs
  • A Repair All function
    • Lets you repair items from within bank tabs


[h3]Quick Settings Presets[/h3]
  • Create and save settings presets with your preferred graphics, audio, and control options
  • Presets can have keybindings to switch instantly in different gameplay situations


[h3]HUD Editor[/h3]
  • Adjust the position, scale, and opacity of nearly every HUD element
  • Some elements have additional customization options
  • Export and import layouts to share your setups with other players
  • Assign HUD layouts to a Quick Preset to get the perfect interface for any activity with a single keystroke


These changes will enhance your gameplay experience and provide a level of convenience and customization never before seen in Albion. Stay tuned for our next Dev Talk where Robin will introduce the new Albion Journal categories and their rewards!

In the meantime, learn more about the Horizons update in the official update page.

Guide: Farming

When you attend to your farms after a hard day’s adventuring, you’re not just taking a well-deserved break. You’re also fueling Albion’s economy as you produce raw materials that are used in a multitude of ways across the game.

[previewyoutube][/previewyoutube]
Farmed products are used to create many different kinds of food and potions. Food is essential to keep crafting stations running, and also provide buffs to players when consumed, while potions offer additional options in combat. You can read more about them in our guide to potions and alchemy.

In addition, you can use your farm to raise baby animals to become the mounts that accompany every adventurer on their journeys.

This article provides you with a step-by-step guide for you to get started, before going through the different types of farming. Ready to start growing your own crops, herbs, and animals? Then read on…


[h3]Step 1: Purchasing an Island[/h3]
In order to farm, you need a farming plot. This is most common on a player island, but can also be on a farming territory provided by a guild.

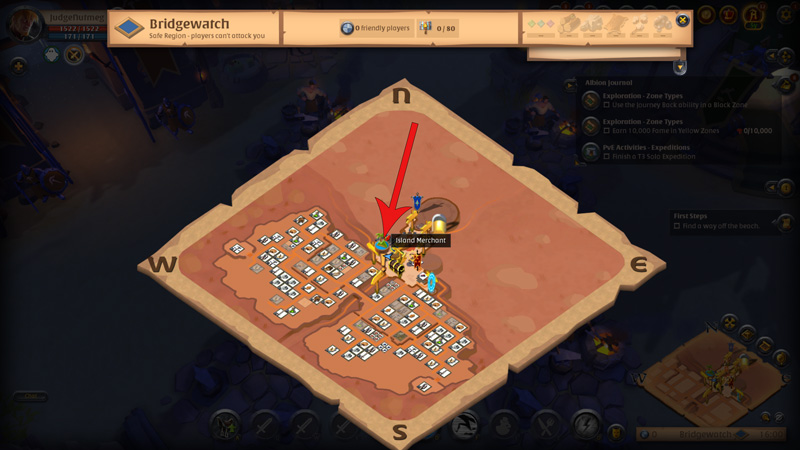
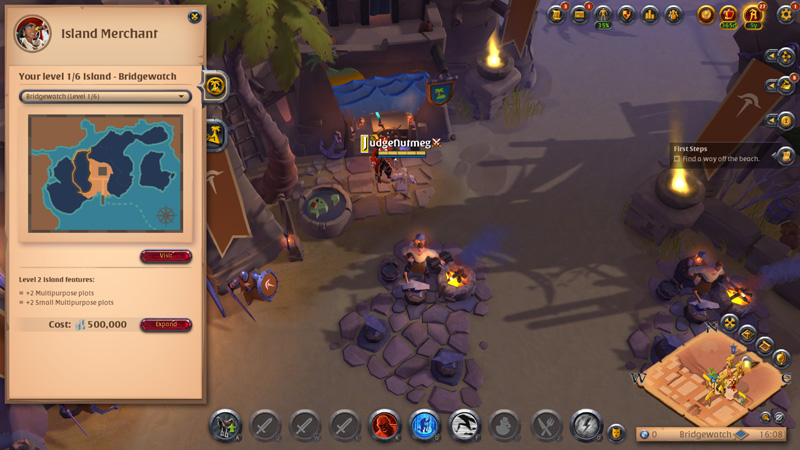
Islands can be purchased at the Island Merchant in any of the Royal Cities, Caerleon, or Brecilien. The Island Merchant is located in the center of these cities, close to the Marketplace. Here’s how it appears on the region map:


Please note that to purchase an island you need at least 7 days of Premium. After this, you can keep the island forever without needing to continuously have Premium status.

Every island is linked to the city in which it was purchased, and you can own up to one island for each city. They share a biome, and importantly you can travel between an island and its host city for free. If you wish to travel from an island to a different city, you need to pay transportation costs.


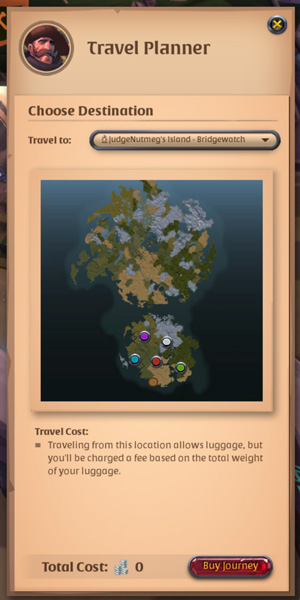
Now that you have an island, you can travel to it using the Travel Planner.


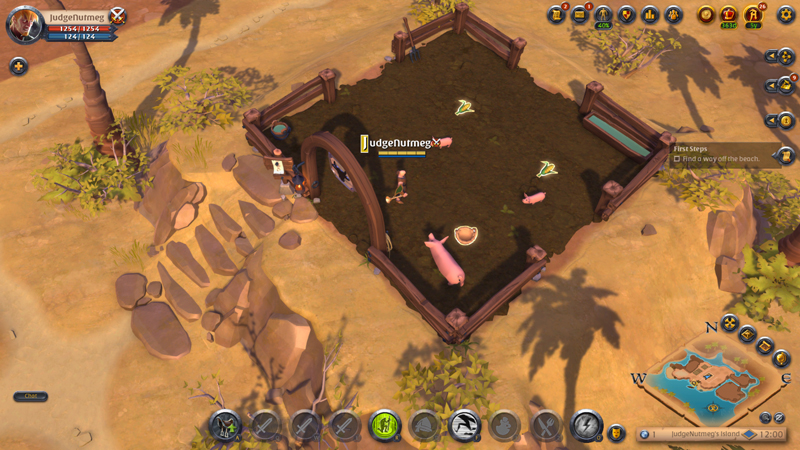
[h3]Step 2: Building a Plot[/h3]
Depending on the level of your island, you will have access to a number of multipurpose plots that can be used for different types of farming plots or buildings. A level 1 island contains one multipurpose plot. Farming territories have only four plots to build on but will produce four times as much crop yield, and will grow animals four times as quickly.

To start building a farm, go to a multipurpose plot. Then, navigate to the Build UI by clicking your avatar in the top cleft and selecting ‘Build’ (on desktop you can simply press H to open this menu). Navigate to the second tab, “Farming”, where you can choose between building a Farm, Herb Garden, Pasture, or Kennel. Each of these allows you to grow different crops or raise different animals.


To build one of these, you need to make sure you have the necessary resources, which you can buy on the Marketplace or gather yourself.

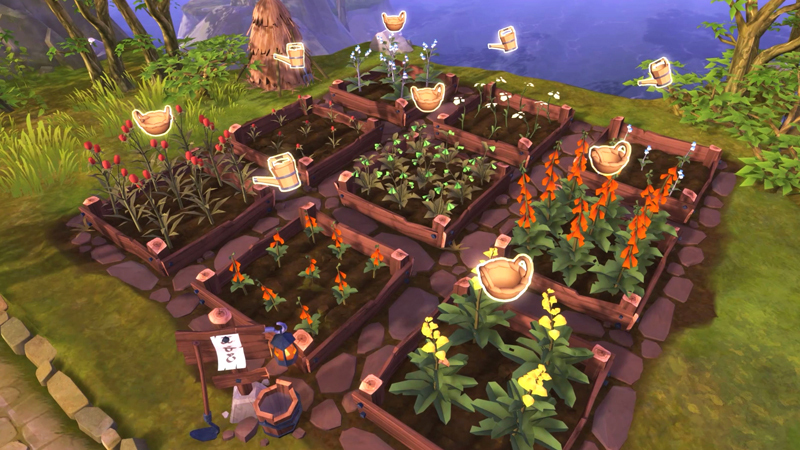
[h3]Step 3: Growing Produce[/h3]
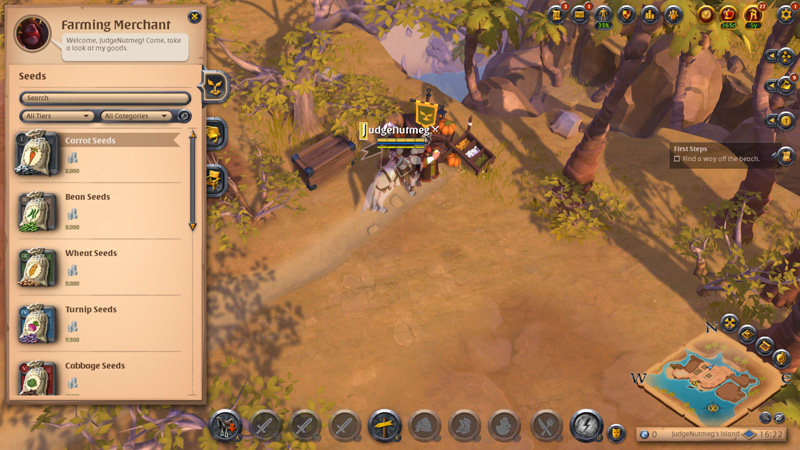
Let’s say you want to farm carrots. Once you’ve built a farm plot, you need to purchase some Carrot Seeds. Level 2 islands contain a farming merchant from whom you can buy seeds, or you can obtain them from Marketplaces. It might be worth comparing prices to see which option is cheaper.


Go to your farming plot, select the Carrot Seeds from your inventory, and click "Place" to plant them.

If you have Focus Points, you can choose to water your plants which will guarantee that you receive seeds back from your crops (see below). If you water about half your plants, you can maintain enough seeds for the next day without having to purchase new ones, increasing your profits.

[h3]Step 4: Harvesting[/h3]
All plants have a growth cycle of 22 hours, after which you can harvest them. There is also a chance that you’ll receive additional seeds that you can use to farm again, and Earthworms which can be used to craft Fishing Bait.


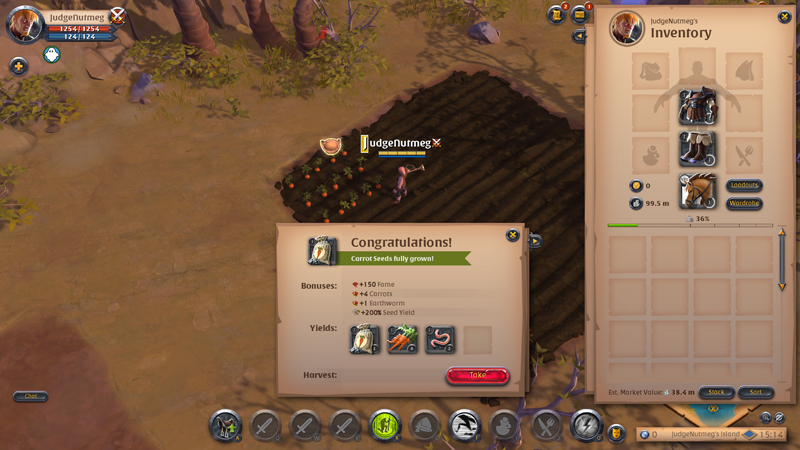
Go to your farming plot and click “Collect”. Congratulations, you've successfully grown and harvested your first plants!


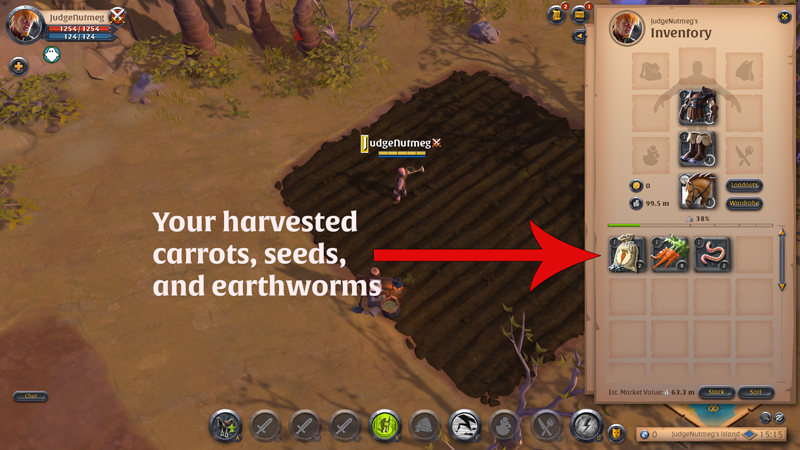
You can now sell your crops at the Marketplace, or use them for crafting food.

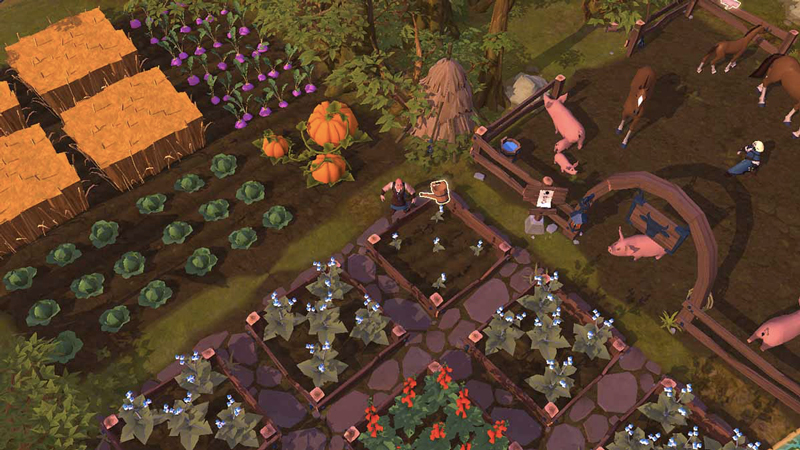
[h3]Types of Farms & their Products[/h3]
Specializing in a particular type of farming can allow you to progress more quickly in that area, leading to greater efficiency and mastery over time. Conversely, diversifying your farming operations lets you produce a broader range of items, offering flexibility and adaptability in the market. Each farming plot has a fixed cost and can be demolished at any point, which returns 90% of its resources. Below is an overview of the costs of each plot type and their products:

Farm

15 Rough Logs

15 Rough Stone

Carrots, Beans,

Wheat, Turnips,

Cabbage, Potatoes,

Corn, Pumpkins

Herb Garden

25 Rough Logs

25 Rough Stone

25 Birch Planks

25 Limestone Blocks

Arcane Agaric, Brightleaf Comfrey, Crenellated Burdock, Dragon Teasel, Elusive Foxglove, Firetouched Mullein, Ghoul Yarrow

Pasture

30 Rough Logs

30 Rough Stone

30 Chestnut Planks

30 Sandstone Blocks

T3 - T8 Horses

T3 - T8 Oxes

Stag, Moose

Chickens, Goats, Geese, Sheeps, Pigs, Cows

Kennel

50 Bloodoak Logs

50 Slate

10 Runite Steel Bars

T5 & T8 Moabirds, T5 & T8 Winter Bears,

T5 & T8 Wild Boars, T5 & T8 Bighorn Rams,

T5 & T8 Swamp Salamanders, T5 & T8 Greywolves,

T5 & T8 Mystic Owls, Swiftclaws, Direwolves, Direboars, Swamp Dragons, Direbears, Mammoths, Spring & Caerleon Cottontail


Here’s what you need to know about each type of product…

Plants

The basics of planting have been covered in the step-by-step guide above. It’s also worth noting, though, that each Royal City has a local production bonus for certain vegetables or herbs, which increases their yield by 10%.


Lymhurst

Bridgewatch

Martlock

Thetford

Fort Sterling

Crop

(T8) Pumpkin

(T7) Corn

(T6) Potato

(T5) Cabbage

(T4) Turnip

Herb

(T4) Crenellated Burdock

(T5) Dragon Teasel

(T6) Elusive Foxglove

(T7) Firetouched Mullein

(T8) Ghoul Yarrow

Animal

(T5) Goose

(T4) Goat

(T8) Cow

(T7) Pig

(T6) Sheep

Additional

(T1) Carrot

(T2) Bean

(T3) Wheat

(T2) Arcane Agaric

(T3) Chicken
Livestock Animals

Livestock placed on a pasture need to be fed in order to start growing. Each type has a favorite food which halves the amount of crops necessary to feed them.

Livestock Animals’ growth cycle is 1 day 20 hours, but can be halved if you have Premium Status.

When fully grown, these animals can either be collected to be butchered, or fed again in order to get secondary products like eggs or milk.

By using Focus Points you can increase the chances of them producing offspring which, similar to plants, helps you to restart the process without having to spend additional Silver.

Each Royal City has a local production bonus which increases the yield from butchering certain animals, and of their secondary products (see table above).


Riding Animals

Unlike livestock, Riding Animals don’t have a favorite food and their growth cycle is dependent on the tier of the animal. Here’s how long it takes for each to grow (with and without Premium):

Baby Animal

With Premium

Without Premium

T3

22h

1d 20h

T4

1d 22h

3d 20h

T5

2d 22h

5d 20h

T6

3d 22h

7d 20h

T7

4d 22h

9d 20h

T8

5d 22h

11d 20h

Only Horses and Oxen can be purchased from the Farming Merchant, all other Baby Animals need to be purchased from other players or found in the wild — when killing a Wild Animal, it has a chance of dropping its corresponding Baby Animal as loot.

Horses, Oxen, Stags and Moose can be raised on a Pasture, while all other Riding Animals require a Kennel.

Baby Animals higher than T4 can also be nurtured multiple times, increasing the chances of them producing offspring.

When a Riding Animal is fully grown, it can be saddled at the Saddler (another Farm Building which can be constructed on your island) and either used as your new riding mount or sold to other players.


[h3]Conclusion[/h3]
Whether you choose to produce food or potions from the products of your labor, or sell them directly on the Marketplace, there are many ways you can contribute to Albion's vibrant economy — and turn a healthy profit while you do so!

Sometimes it’s a good idea to sell your products to your guildmates and friends. Many players are happy to buy them at a small discount, while both of you benefit by avoiding Marketplace taxes.

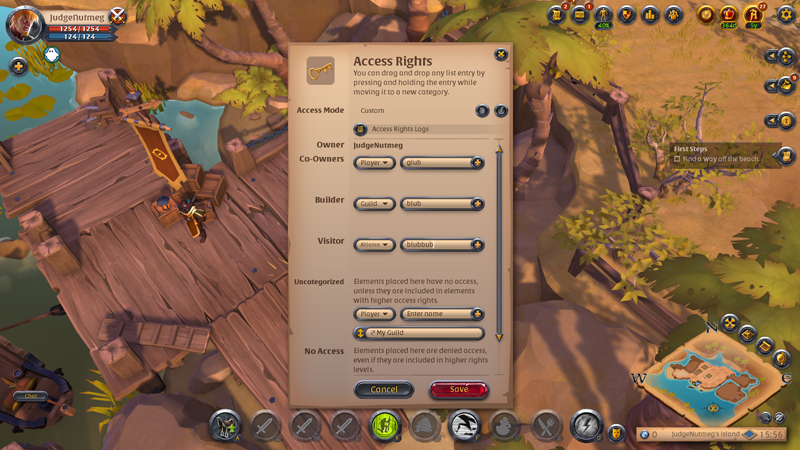
If you’re looking to expand your farming space but can’t upgrade your island any further or purchase a new island in another city, you can also ask your friends or guildmates if you can use their islands. They can allow you access to their islands via the Access Rights UI, and vice versa.


With this information, you should have all you need to work the land and earn your prosperity. Happy farming!