Behind the Design: Weasel Raceway (Part 2)
Welcome back, designers! When we last left off, I had just finished laying down the groundwork for Weasel Raceway, both metaphorically (giving the weasels racing AI) and literally (the track). Of course, I still had a lot to do, so the only question now was… what’s next?
[h3]Make or Break Time[/h3]
The track may have been done, and the player could run laps on it well enough, but it was still missing a few key components before it could be considered fully functional. These included:
A.) Some sort of “checkpoint” system to make sure the player is actually making full laps and not taking unintended shortcuts.
B.) A way for the AI racers to successfully navigate the course.
C.) Something that puts the racers back on the racetrack if they happen to fall off in any way.
The good news? All of these features are already part of the racer template game! The checkpoints are trigger volumes that span entire portions of track and are stored in a list - you have to drive through all the trigger volumes in order before crossing the finish line in order for it to register as a full lap. Meanwhile, AI racers navigate using a list of waypoints, already programmed to try and get as close to one waypoint as they can (with random variance built in so they don’t all follow the same exact line every time) before moving towards the next one in the list. Finally, more trigger volumes can be set up alongside the track or inside pits that, when entered, automatically teleport the player or AI back to a specific point, making sure no one gets too far off-road. All that said, while the systems were all already in place, it was still my job to customize them specifically for my racetrack. How did I make sure all my adjustments worked? By doing the single most important thing one can do when creating games…
Testing. Lots and lots of testing.
 Sorry kids, you’ll still be doing a lot of tests even after you leave school.
Once I had finished my initial pass on placing down checkpoints, waypoints, and teleporters, I spent a lot of time playing through the game over and over, seeing where I needed to fine-tune things further. The checkpoints worked without a hitch, but it was the waypoints that proved to be a challenge. If you have too many, there’s little room for variance in how the AI moves through the course (not to mention bog down the game trying to keep track of them all). Too few, and you have the AI hitting walls and clipping corners due to trying to take too direct a path between waypoints. Plus, the position of the waypoints on the course itself is important: It may seem like the easiest solution is to always place them in the middle of the track, but that can result in the AI overshooting certain turns and slamming into walls (you generally want to put the waypoint on the inside of turns to prevent this). The only real way to see if you’ve placed the waypoints correctly is to play it over and over, stay as close to the AI racers as you can, and see what points on the track they seem to have issues navigating. Then, go edit the waypoints in that portion of the track and hop back in to see if they perform better with those changes. Rinse and repeat until your AI makes it through the entire track successfully.
As for the “whoops I fell off the track” teleporters, testing and adjusting them is a little different. You can’t really use the AI to test how effective they are since, ideally, they aren’t falling off the track that much (and if they are, you might wanna go back and check those waypoints again), so you’ll have to test them yourself by hopping over rails and messing up jumps at every available opportunity. The important thing when doing this kind of testing is to be incredibly thorough and not take any possibility for granted. Sure, you’ll want a teleporter underneath a jump in case the player doesn’t have enough speed to make it, but what if they make a sharp right turn in the middle of the jump? Or attempt to pull a u-turn as soon as they leave the ramp? And sure, you may have railings throughout the entire course that ordinarily can’t be jumped over, but if someone holds onto a boost power-up and uses it on the peak of a hill, will they get enough airtime to hop it then? It may sound silly to be worried about covering these edge cases - after all, who in their right mind would even try obviously bad ideas like that? - but something you learn quickly is that players love trying silly things just to see what happens. The more you’re prepared for it, the better.
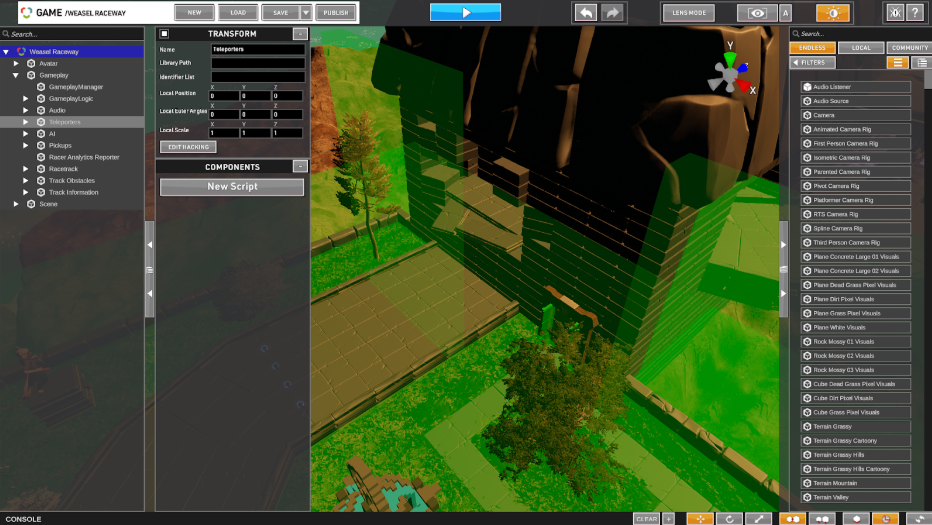 The green boxes are the trigger volumes for the teleporter. Note the ones behind the hole racers jump out of on either side. They’re there because you can midair turn hard enough to reach them. Completely absurd? Yes. Will someone try it anyway? Also yes. Always be prepared, yo.
One last thing: When testing, always take into account not just everything a player could do, but every state the player can try it in. Remember how you can choose between a Lightweight, Middleweight, and Heavyweight racer? For the longest time, I was doing all my testing with the Middleweight racer, since that’s the “default” option. It wasn’t until I was testing out the various jumps on the course that it occurred to me to ask “wait a sec, Lightweight racers have a lower top-speed; will they have enough speed to make this jump that the Middleweight and Heavyweight racers have no problem with?” And it’s a good thing, too, because I quickly discovered that they could not, and I had to adjust the jump accordingly. This won’t always be an issue depending on what kind of game you’re creating, but if you give the player the option of altering their physics or stats in any way, make sure to test the game with all those options.
[h3]Made to Ruin[/h3]
So the track is 100% complete and all the necessary bits to make it work are in place. At this point, the game is, from a technical perspective, “done.” It’s fully functional and playable from beginning to end. I could’ve called it here and just uploaded the game to the content portal as-is. But people don’t want to just play featureless tracks suspended in space; theming and decoration to bring things to life is a major component of any video game. Just because you don’t directly interact with it doesn’t make it any less important! So, with the track finalized, it was time to go in and make it look like a proper race through an ancient ruin.
Admittedly, giving a full “walkthrough” of how I did the backgrounds and scenery for the game feels kinda unnecessary, as the whole process can be pretty subjective and entirely dependent on your personal sense of creativity. Still, there’s at least a few pointers I can give:
Box Out Everything First - One of the first things you should always do is “box out” what scenery you want and where using basic shapes. Plop down featureless walls to mark out the size and shape of your buildings. Drop a huge cube where you want to eventually create a statue. It’ll all look pretty ugly at first, but the point of this is to explicitly lay out exactly what you eventually want to get around to doing. This will help you make sure there’s room for everything (can I have this wall here without it intersecting the track?) and figuring out what scale everything needs to be at (how large should this statue be if I want it to be the focal point of this room?). Plus, if it looks really hideous, it’ll stick out like a sore thumb you’ll be motivated to go back and replace it, reducing the risk of your janky placeholder assets accidentally making it into the final product.
 Of course, every once in a while, everyone just falls in love with the placeholder asset so much that they keep it, like Kirby here. Yes, really.
Find Creative Alternative Uses for Assets - When deciding what assets to use in your game, it’s always good to remember: It doesn’t matter what the name says the asset is, but what your players think it is in-game. In other words, if you can’t find what you’re looking for in the asset library, try thinking outside the box and repurposing some other assets in different ways. When creating the garden area, I discovered there currently isn’t any dirt asset in the game I could use. However, from certain angles, the “moss covered rock” asset has a distinctly brown tint to it - clump enough of them together, and it makes for a good representation of a patch of soil! There aren’t any statues currently in the asset library, either, but any other asset can have a smart texture placed on them that lets you change their color completely. That Capitan Blackclaw statue? That really is Capitan Blackclaw, just with her animations turned off and her texture replaced with a gray one! Don’t feel limited to using assets solely for their “intended” purpose - as long as you can make it look like what you want, the actual objects used don’t matter.
Only Worry About What Your Players Can See - Every single asset that you add to your game increases the file size and load time of the entire package, which can result in a massive impact to overall performance. If you don’t want your players to have to wait five minutes to play a game that only runs at 15fps, you’ll want to be selective in just how many assets you use. A good rule of thumb: If your players can’t see it, you don’t need it. Got a building in the background that your player never gets close to? Don’t build the whole thing, just the front wall will do. Is your statue just floating in midair, but your player never sees the base of it (or lack thereof) in-game? Then don’t worry about it, just leave it floating! Your environments only need to look as complete as what your players can see. It may require some extensive playtesting to figure out exactly what you’re capable of catching a glimpse of in-game, but trust me, your graphics card will thank you for it.
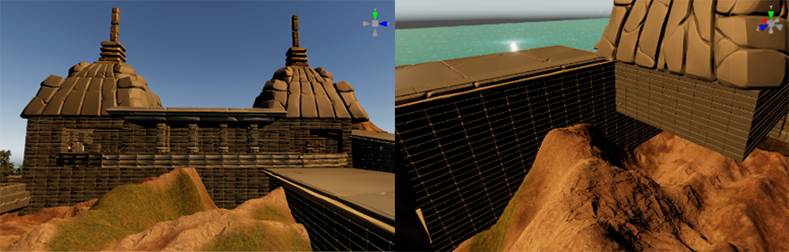 From the Front: A majestic temple. From Behind: Uh… Where’s the back wall? Or foundations?
As long as you keep these three tips in mind, there really isn’t any right or wrong way to decorate your levels. Do you want to spend days putting in minute details in every aspect? Go for it. Do you prefer a more minimalistic approach that’s significantly quicker to put together? That’s fine, too! Any method is valid so long as you’re able to successfully capture the theming you’re aiming for. As for me, I felt just about ready to publish my game after finishing up the decorations. One final pass on optimization and playtesting later (I can’t stress this enough, you can never have too much playtesting), and I was uploading the game as you all have seen it to the Content Portal!
Conclusion
Okay, this article has gone on long enough and my editors are starting to cry silently in a corner over here. I hope you all enjoyed this brief(?) look into how I created Weasel Raceway, and that my insights and tips will help and inspire you as you create your own games. I’m looking forward to seeing what you guys come up with! Until then… Keep on creating!
Image Credits:
colleplanningtoday dot com, tvtropes dot org
[h3]Make or Break Time[/h3]
The track may have been done, and the player could run laps on it well enough, but it was still missing a few key components before it could be considered fully functional. These included:
A.) Some sort of “checkpoint” system to make sure the player is actually making full laps and not taking unintended shortcuts.
B.) A way for the AI racers to successfully navigate the course.
C.) Something that puts the racers back on the racetrack if they happen to fall off in any way.
The good news? All of these features are already part of the racer template game! The checkpoints are trigger volumes that span entire portions of track and are stored in a list - you have to drive through all the trigger volumes in order before crossing the finish line in order for it to register as a full lap. Meanwhile, AI racers navigate using a list of waypoints, already programmed to try and get as close to one waypoint as they can (with random variance built in so they don’t all follow the same exact line every time) before moving towards the next one in the list. Finally, more trigger volumes can be set up alongside the track or inside pits that, when entered, automatically teleport the player or AI back to a specific point, making sure no one gets too far off-road. All that said, while the systems were all already in place, it was still my job to customize them specifically for my racetrack. How did I make sure all my adjustments worked? By doing the single most important thing one can do when creating games…
Testing. Lots and lots of testing.
Sorry kids, you’ll still be doing a lot of tests even after you leave school.Once I had finished my initial pass on placing down checkpoints, waypoints, and teleporters, I spent a lot of time playing through the game over and over, seeing where I needed to fine-tune things further. The checkpoints worked without a hitch, but it was the waypoints that proved to be a challenge. If you have too many, there’s little room for variance in how the AI moves through the course (not to mention bog down the game trying to keep track of them all). Too few, and you have the AI hitting walls and clipping corners due to trying to take too direct a path between waypoints. Plus, the position of the waypoints on the course itself is important: It may seem like the easiest solution is to always place them in the middle of the track, but that can result in the AI overshooting certain turns and slamming into walls (you generally want to put the waypoint on the inside of turns to prevent this). The only real way to see if you’ve placed the waypoints correctly is to play it over and over, stay as close to the AI racers as you can, and see what points on the track they seem to have issues navigating. Then, go edit the waypoints in that portion of the track and hop back in to see if they perform better with those changes. Rinse and repeat until your AI makes it through the entire track successfully.
As for the “whoops I fell off the track” teleporters, testing and adjusting them is a little different. You can’t really use the AI to test how effective they are since, ideally, they aren’t falling off the track that much (and if they are, you might wanna go back and check those waypoints again), so you’ll have to test them yourself by hopping over rails and messing up jumps at every available opportunity. The important thing when doing this kind of testing is to be incredibly thorough and not take any possibility for granted. Sure, you’ll want a teleporter underneath a jump in case the player doesn’t have enough speed to make it, but what if they make a sharp right turn in the middle of the jump? Or attempt to pull a u-turn as soon as they leave the ramp? And sure, you may have railings throughout the entire course that ordinarily can’t be jumped over, but if someone holds onto a boost power-up and uses it on the peak of a hill, will they get enough airtime to hop it then? It may sound silly to be worried about covering these edge cases - after all, who in their right mind would even try obviously bad ideas like that? - but something you learn quickly is that players love trying silly things just to see what happens. The more you’re prepared for it, the better.
The green boxes are the trigger volumes for the teleporter. Note the ones behind the hole racers jump out of on either side. They’re there because you can midair turn hard enough to reach them. Completely absurd? Yes. Will someone try it anyway? Also yes. Always be prepared, yo.One last thing: When testing, always take into account not just everything a player could do, but every state the player can try it in. Remember how you can choose between a Lightweight, Middleweight, and Heavyweight racer? For the longest time, I was doing all my testing with the Middleweight racer, since that’s the “default” option. It wasn’t until I was testing out the various jumps on the course that it occurred to me to ask “wait a sec, Lightweight racers have a lower top-speed; will they have enough speed to make this jump that the Middleweight and Heavyweight racers have no problem with?” And it’s a good thing, too, because I quickly discovered that they could not, and I had to adjust the jump accordingly. This won’t always be an issue depending on what kind of game you’re creating, but if you give the player the option of altering their physics or stats in any way, make sure to test the game with all those options.
[h3]Made to Ruin[/h3]
So the track is 100% complete and all the necessary bits to make it work are in place. At this point, the game is, from a technical perspective, “done.” It’s fully functional and playable from beginning to end. I could’ve called it here and just uploaded the game to the content portal as-is. But people don’t want to just play featureless tracks suspended in space; theming and decoration to bring things to life is a major component of any video game. Just because you don’t directly interact with it doesn’t make it any less important! So, with the track finalized, it was time to go in and make it look like a proper race through an ancient ruin.
Admittedly, giving a full “walkthrough” of how I did the backgrounds and scenery for the game feels kinda unnecessary, as the whole process can be pretty subjective and entirely dependent on your personal sense of creativity. Still, there’s at least a few pointers I can give:
Box Out Everything First - One of the first things you should always do is “box out” what scenery you want and where using basic shapes. Plop down featureless walls to mark out the size and shape of your buildings. Drop a huge cube where you want to eventually create a statue. It’ll all look pretty ugly at first, but the point of this is to explicitly lay out exactly what you eventually want to get around to doing. This will help you make sure there’s room for everything (can I have this wall here without it intersecting the track?) and figuring out what scale everything needs to be at (how large should this statue be if I want it to be the focal point of this room?). Plus, if it looks really hideous, it’ll stick out like a sore thumb you’ll be motivated to go back and replace it, reducing the risk of your janky placeholder assets accidentally making it into the final product.
Of course, every once in a while, everyone just falls in love with the placeholder asset so much that they keep it, like Kirby here. Yes, really.Find Creative Alternative Uses for Assets - When deciding what assets to use in your game, it’s always good to remember: It doesn’t matter what the name says the asset is, but what your players think it is in-game. In other words, if you can’t find what you’re looking for in the asset library, try thinking outside the box and repurposing some other assets in different ways. When creating the garden area, I discovered there currently isn’t any dirt asset in the game I could use. However, from certain angles, the “moss covered rock” asset has a distinctly brown tint to it - clump enough of them together, and it makes for a good representation of a patch of soil! There aren’t any statues currently in the asset library, either, but any other asset can have a smart texture placed on them that lets you change their color completely. That Capitan Blackclaw statue? That really is Capitan Blackclaw, just with her animations turned off and her texture replaced with a gray one! Don’t feel limited to using assets solely for their “intended” purpose - as long as you can make it look like what you want, the actual objects used don’t matter.
Only Worry About What Your Players Can See - Every single asset that you add to your game increases the file size and load time of the entire package, which can result in a massive impact to overall performance. If you don’t want your players to have to wait five minutes to play a game that only runs at 15fps, you’ll want to be selective in just how many assets you use. A good rule of thumb: If your players can’t see it, you don’t need it. Got a building in the background that your player never gets close to? Don’t build the whole thing, just the front wall will do. Is your statue just floating in midair, but your player never sees the base of it (or lack thereof) in-game? Then don’t worry about it, just leave it floating! Your environments only need to look as complete as what your players can see. It may require some extensive playtesting to figure out exactly what you’re capable of catching a glimpse of in-game, but trust me, your graphics card will thank you for it.
From the Front: A majestic temple. From Behind: Uh… Where’s the back wall? Or foundations?As long as you keep these three tips in mind, there really isn’t any right or wrong way to decorate your levels. Do you want to spend days putting in minute details in every aspect? Go for it. Do you prefer a more minimalistic approach that’s significantly quicker to put together? That’s fine, too! Any method is valid so long as you’re able to successfully capture the theming you’re aiming for. As for me, I felt just about ready to publish my game after finishing up the decorations. One final pass on optimization and playtesting later (I can’t stress this enough, you can never have too much playtesting), and I was uploading the game as you all have seen it to the Content Portal!
Conclusion
Okay, this article has gone on long enough and my editors are starting to cry silently in a corner over here. I hope you all enjoyed this brief(?) look into how I created Weasel Raceway, and that my insights and tips will help and inspire you as you create your own games. I’m looking forward to seeing what you guys come up with! Until then… Keep on creating!
Image Credits:
colleplanningtoday dot com, tvtropes dot org